
Big Tires = BigFun
In December of 2017, had a big post covering some work that I was doing to my ’67 Mustang. Fast forward a little more than a year later and a lots happened since then!
That post covered MOD1 front suspension updates from Mike Maier Inc and Wilwood 140-10220 6 Piston Brake Kit install which highlighted new wheels I was working on installing.

At the time, I wasn’t able to get the wheels to fit the way I wanted, even with spacers as the front wheels could only tuck in so far due to upper ball joint positioning that I had a mismatch of about 1.5″ per side between the front and rear of the car, a little silly looking to say the least! Click through for more.
After lengthy discussions with Mike Maier, decided not to pursue a drop spindle route and decided needed to change up the rear end to make it work. Earlier, I’d gone in and put in Mike’s Panhard Bar, but since I was changing out the housing anyways, and thanks to a nice bonus, decided it was time to step up the game big time in the back. There are multiple options on the market to upgrade rear suspension on Mustangs, including various 4-link kits (which I’m not a big fan of), torque arm kits (which can sacrifice ground clearance), and one 3-link kit which is made by Street or Track, LLC.
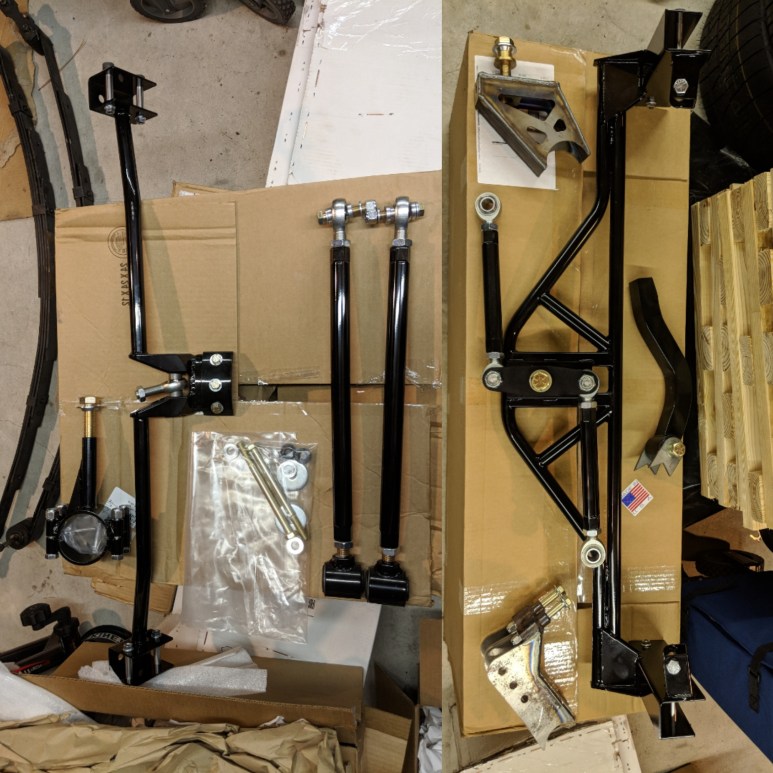
I really wanted to go 3-link since that’s the same setup we have on the Camaro, but at the same time was a bit worried about clearance and NVH in a street-driven car. This kit has a few nice bits which help with the street manners, including strategically using bushings in a few spots (front arm mounts and 3-link axle mount) and rod ends elsewhere. Fast forward to the end and I’m extremely pleased with picking this kit and street manners have been great!
As a part of the upgrade, a new axle housing was in order. A call into Quick Performance got me a new housing, axles, and Wilwood brake kit. Everything showed up looking good, though later found I have a small diff fluid leak in the bottom jacking pad that I’ll have to address at some point.


The Street or Track kit basically bolts in a carrier for the Watts Link and 3-link mount, with a welded in reinforcing plate on the inner side of the driveshaft tunnel. The axle housing gets the trailing arm mounts, Watts link mount, and 3-link mounts welded on. This is an area where I ran into a minor issue I had with the kit and that was the Watts link arms are too short. The dimensions in the instructions dictate a position for the Watts link mount to sit basically on top of axle housing stamping. While you could weld in one piece, the bolt-on piece for the opposite side couldn’t be mounted as it has to sit on the axle tube. This wasn’t a major deal and 2 new links from Allstar Performance later, I was good to go.
Shocks I wanted to run the same as the front and Street or Track sold me the kit, minus the Bilsteins and Mike Maier was happy to sell me a set of single-adjustable JRis to match my front kit. Overall been very happy with these shocks!

To paint the axle housing I wanted to step up my game a little bit and get a “real” paint gun to try and get a good finish. Ok, so this one is from Harbor Freight, it’s their 20 oz. Professional HVLP Gravity Feed Air Spray Gun. LOT of lessons learned spraying this axle. I used “ready to spray” lacquer primer and paint from O’Reilly’s. It was really poorly mixed in the can and I struggled to get it mixed well. I’ve got lots of paint defects in the axle, but overall it’s probably better than I would have done if it’d been a rattle can job.


Everything painted, I was ready to install the axle and exhaust. I wasn’t optimistic on this part as I couldn’t see how the over the axle exhaust would fit with the Watts link. Street or Track says it’s compatible, so I had my fingers crossed. Sure enough, had a clash with the axle-side Watts mount. With some custom re-routing, I think this can be made to work, but for now it’s dumps…

After getting the housing and shocks bolted up, in go the new axles and Wilwood brake kit. I went with the big bearing “new Ford” style ends on the housing on the recommendation of Quick Performance as it’s easier to source parts vs the old-style like my Versailles rear-end had. Enter second issue with the Quick Performance rear end and that was GARBAGE T-bolts for the axle. Almost every single bolt stripped torquing them down. Had to replace the lot of them with new ones from Summit. Pretty frustrating and disappointing for something so simple, especially when you have to grind/cut one out from the backside… This kit was a 4-piston caliper with an integral drum parking brake. Having some issues with this that I’ll get to later on. Tapping in the axles I ran into an issue of caliper spacing. The axles didn’t want to go in as far as they should, likely the bearings weren’t pressed all the way on at the factory and both sides ended up being ~0.055 too far out which meant I couldn’t install the calipers. Enter Tom Holt who kindly machined down the spacers for me so they fit perfectly! Thanks Tom!


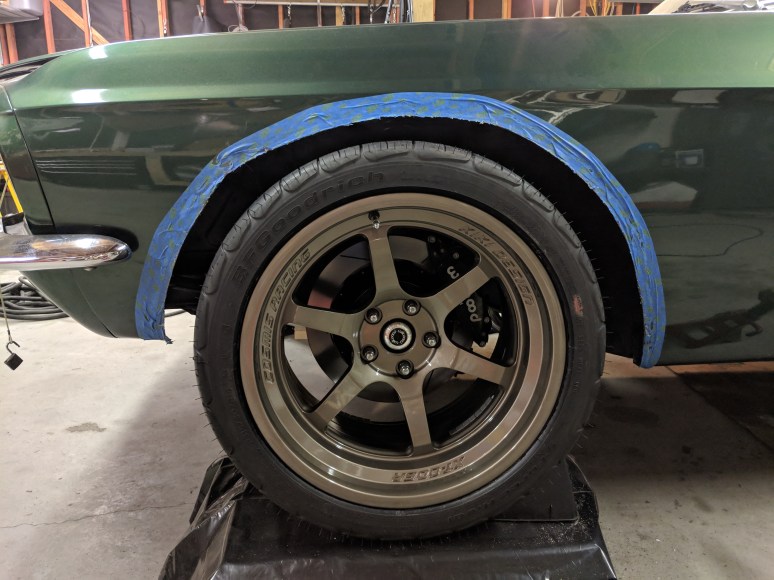
Once the brakes where installed, set the car down on the wheels and started the fender trimming process. Probably should have used a body saw, but instead used a diamond edge cutoff wheel. Fronts were relatively straight forward. Leave lots of “dynamic” clearance for bump and turning. With a large scrub radius and wide wheel, you need lots of clearance on the front side by the bumper. This picture shows it before I got it fully trimmed, a lot more cutting was necessary!
In the back, knew it was going to be a challenge. First I loosely fit up the new Maier Racing 3.25″ flares to see how much of the body they covered. From that, figured out the easiest to do was probably to cut all the way up to where the inner and outer wheel well were flat. Classic Mustang wheel wells have quite the arc which you’ll see in the picture sequence below, cutting to this point would allow for an “easy” pie-cut and re-weld, or so I thought.
The pie cuts and welding was an ordeal. I’ll spare you pictures of the welding, but let’s just say it was a hell of a lot of work. Looking back, I’d seriously think about different methods to get this done. Probably took about 20 hours of labor to cut, trim, fit, and weld in material to close up the gaps.

Flares I struggled with the right look. In my prior post, the “Eleanor” style flares weren’t going to cut it. Thankfully Maier Racing exchanged the flares straight across! All I had to do was pay shipping.

On the downside… the flare still aren’t quite big enough!
But the car is going to look pretty mean once they’re fit and everything is prettied up!

In between all this I shuffled a house move and a busy work schedule, so even though the car was driveable in the fall, January 6th was really the first time I got to drive the car in anger. Other than a few jaunts around the neighborhood and a few hard launches on an abandoned road, the car was going to get it’s first test at an autocross! On the day before the event the car developed an annoying squeak from the left rear brake when coasting down to a stop. Took the car home and adjusted the parking brake pads again, hoping that would fix the issue…
This would be the first autocross on the big tires and first on the all-new suspension and brake set. Didn’t really know what to expect.

On advice from others running the same tires, I aired them down to 30 psi, aiming for 32 psi hot. Mike had told me to set the shocks in the middle for street driving and crank them up all the way for track. I didn’t go quite that far, opting to set them about half-way between middle and full-stiff for this trial run.
First run out I was shocked by grip I didn’t think possible on street tires or in a ’67 Mustang! The car felt like it was on R-compounds and I was having trouble keeping myself in the Recaro seats. Had me grinning ear to ear after the run. Second run was even better after I got some confidence, until I started losing brake pedal! Coming hot into the final turns, the pedal went straight to the floor and had no effect on the car until I pumped it several times. Going back to the pits, it was completely normal… Seemed to be some sort of pad knock-back, but how? Went ahead and took my 3rd and 4th runs, not ever really able to improve much since I didn’t have any confidence in the brakes.
Nonetheless, I couldn’t have been happier with the suspension performance. Tons of grip, really neutral handling (500lb front springs and 250lb rears), and no tire rubbing or crazy noises! I got the car home and pulled off the wheels to check out the brakes and I’ve definitely got some sort of issue in the back. Clearly the parking brake is rubbing, but that wouldn’t explain the “knock-back” effect. Bought a magnetic dial caliper, so will do some pushing and pulling to see if I can find out what’s going on.

After a bit of digging, found out later on that this was due to a bad bleed and air in the system. Getting a Motive Pressure bleeder made a HUGE difference and the car finally has brakes for the first time!
So what’s next? Got a pipeline of more fun in this car this year. Which reminds me, buy my Camaro so I can free up some funds for the Mustang!
 Red Line Oil
