
Fastback Fun
Wow, it’s been a long year, but not too many posts from me. With lots of life changes, things tend to get in the way of blogging. Not posted about much, but still being worked on is my 1967 Mustang Fastback. This post will actually catch up to a year ago when this package arrived from Mike Maier Inc!
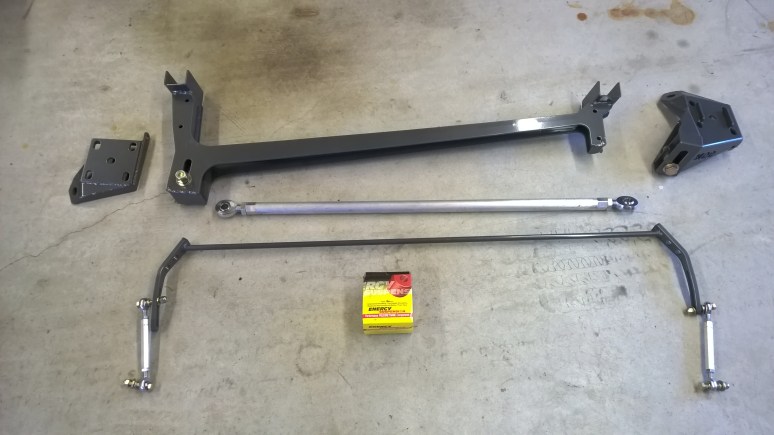
Mike, who you’ll be familiar with from lots of my CP posts, runs a company who makes suspension pieces for classic Mustangs. His car, Old Blue, is familiar to many and highlights the potential for the platform in the right hands!
This video is from Mike’s earlier version of the car, today’s version is even better, but more on that in a little while. Click through for more!
The panhard kit was meant to address some issues I’ve always had with the ’67 – the loose feeling that leaf spring cars always have. The panhard bar, while not as high-tech or effective as a watts link is a far easier and cheaper system to implement while getting most of the same functionality needed. Additionally, Mike’s system is made for the chassis, so it didn’t take much modification to fit.
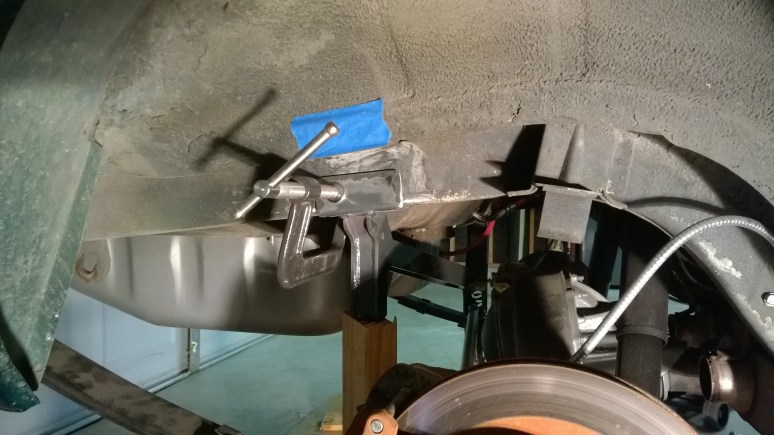
After careful measuring, the frame is prepped and the panhard clamped into place for welding.
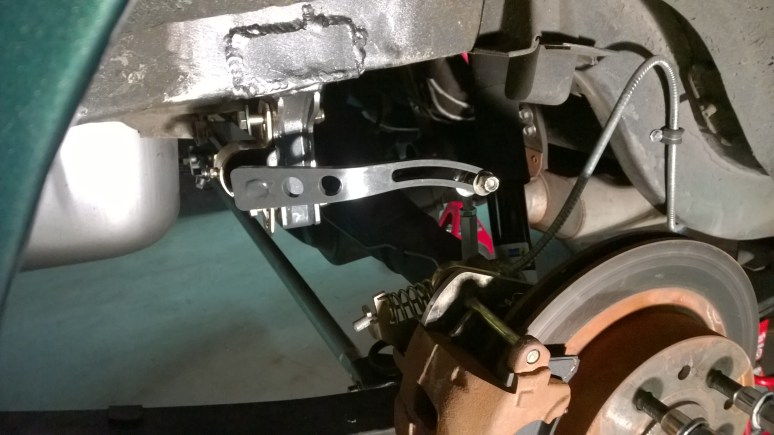
After welding, a touch of paint (which unfortunately doesn’t match!) and the bar was in place. The sway bar here is mocked up, but you can see the nice slotted ends for adjust ability! Mike’s kit is meant to run the end link down to the leaf-spring mount, but unfortunately the parking brake spring interferes, so I had to weld some tabs to the axle housing.
Please note, the brake line has since been replaced with stainless steel! Bit embarrassed to have this shot…
Everything gets tightened up and car lowered to the ground. The panhard bar is set to level with the car at ride-height. Note that the adjustable slots don’t line up necessarily as the right hand slot is dependent upon the spring arch and the right side is fixed on the frame. Mike’s kit has to accommodate a range of springs, so can’t be perfectly aligned unfortunately!
The challenge with a panhard bar is fitting in the exhaust. Mike’s kit has slots of this, but can’t accommodate every exhaust system on the market or the peculiarities of every car. The Flowmaster kit that I had on the car I had been wanting to ditch for a while due to constant exhaust leaks at the header to X-pipe flange and the recognition that I’m not 20 years old anymore and while the car sounds fantastic it’s a bit too much for driving anywhere on the highway!
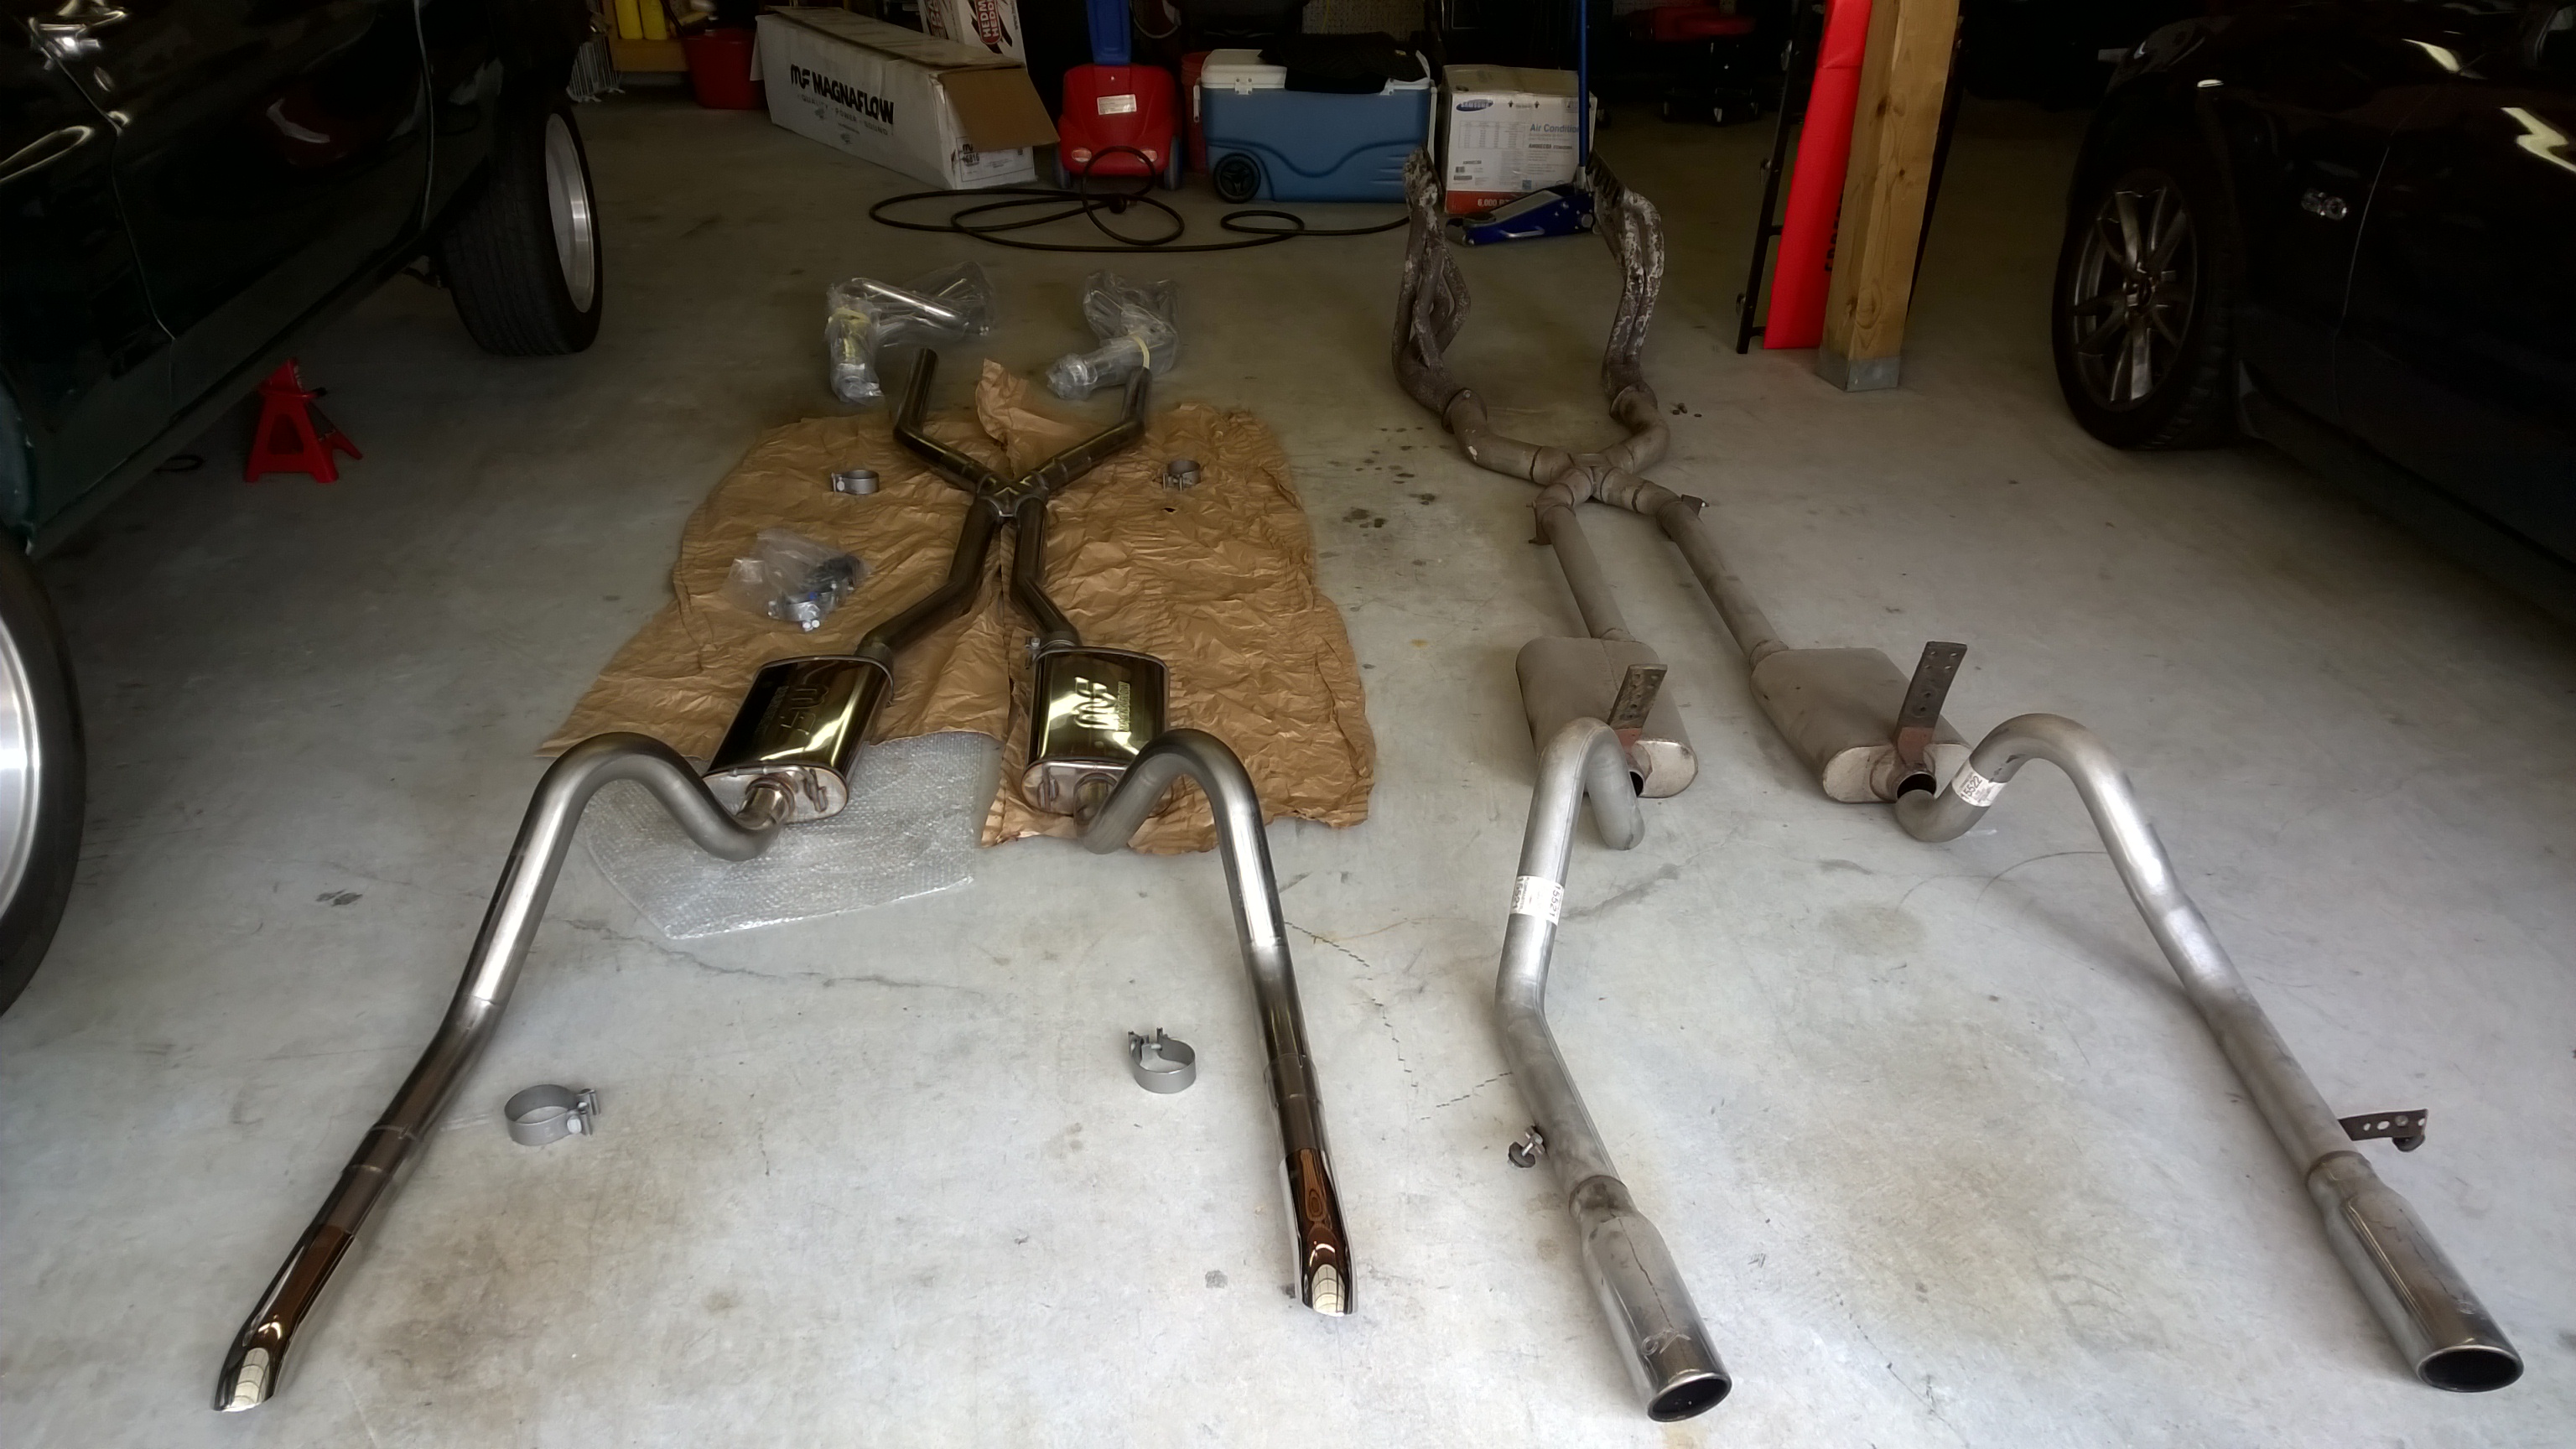
Magnaflow makes a great 2.5″ exhaust kit which is billed as a bolt-on for classic mustangs. If you look around on YouTube you can find the exact kit being installed on a 1967 GT500 which really helped to show the ease of installation for me. The pipes and mufflers are all in stainless steel as well which is a big bonus in the rust prone south! It’s the only kit that I could find which includes an X-pipe and uses ball and socket flanges for the headers! Unfortunately the inlet pipes into the X pipe are only 2.5″ instead of the 3″ that the header collectors finish in. Considering my 302 is fairly mild, I decided I was willing to compromise on this to get a pre-made kit.
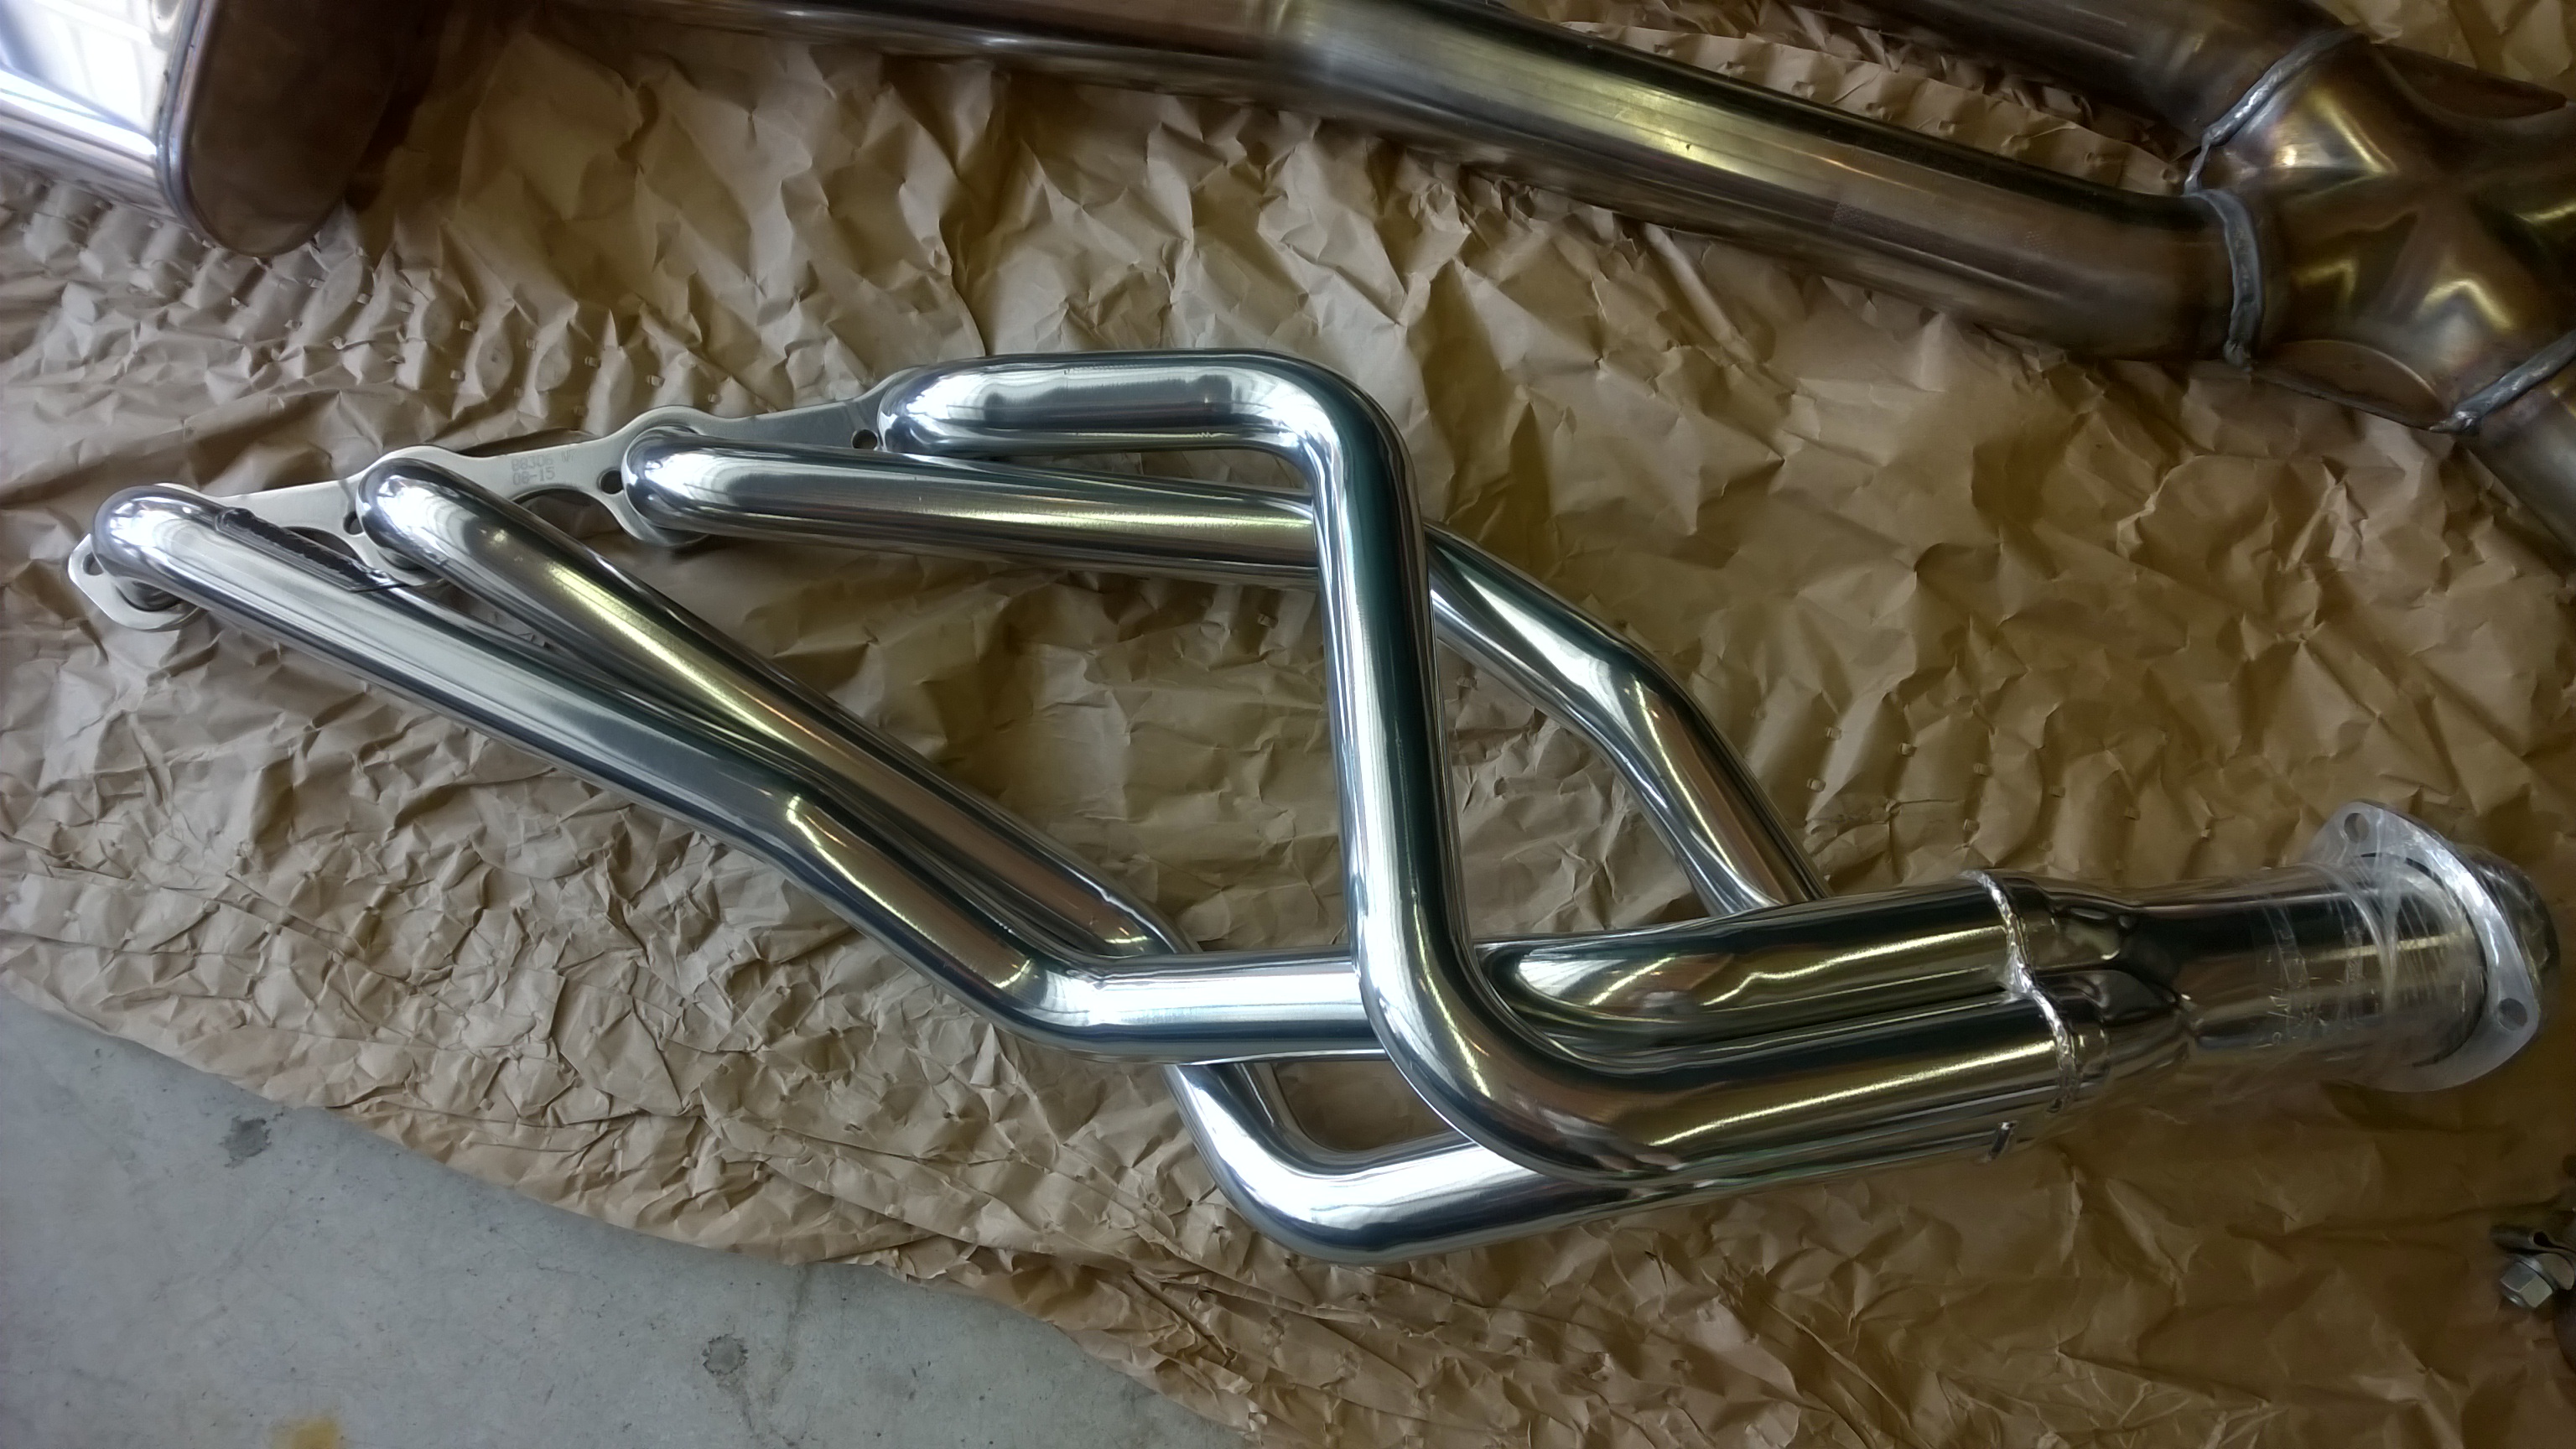
New ceramic coated headers from Hedman were in the works as well! These headers are the only ones on the market that use a ball and socket flange which was one of the main changes I wanted to make. The old flat style collectors on my Hooker headers leaked constantly, regardless of what gasket I had or how often I check the tightness.
One item I wasn’t super happy to find out with these headers was the port size. The top gasket is the one used with my Hooker headers and matched exactly to the ports in my Trick Flow cylinder heads. The bottom are those provided with the Hedman headers and match the ports on the headers… Big difference. I haven’t had the car on the dyno, but fingers crossed this really doesn’t make an impact.
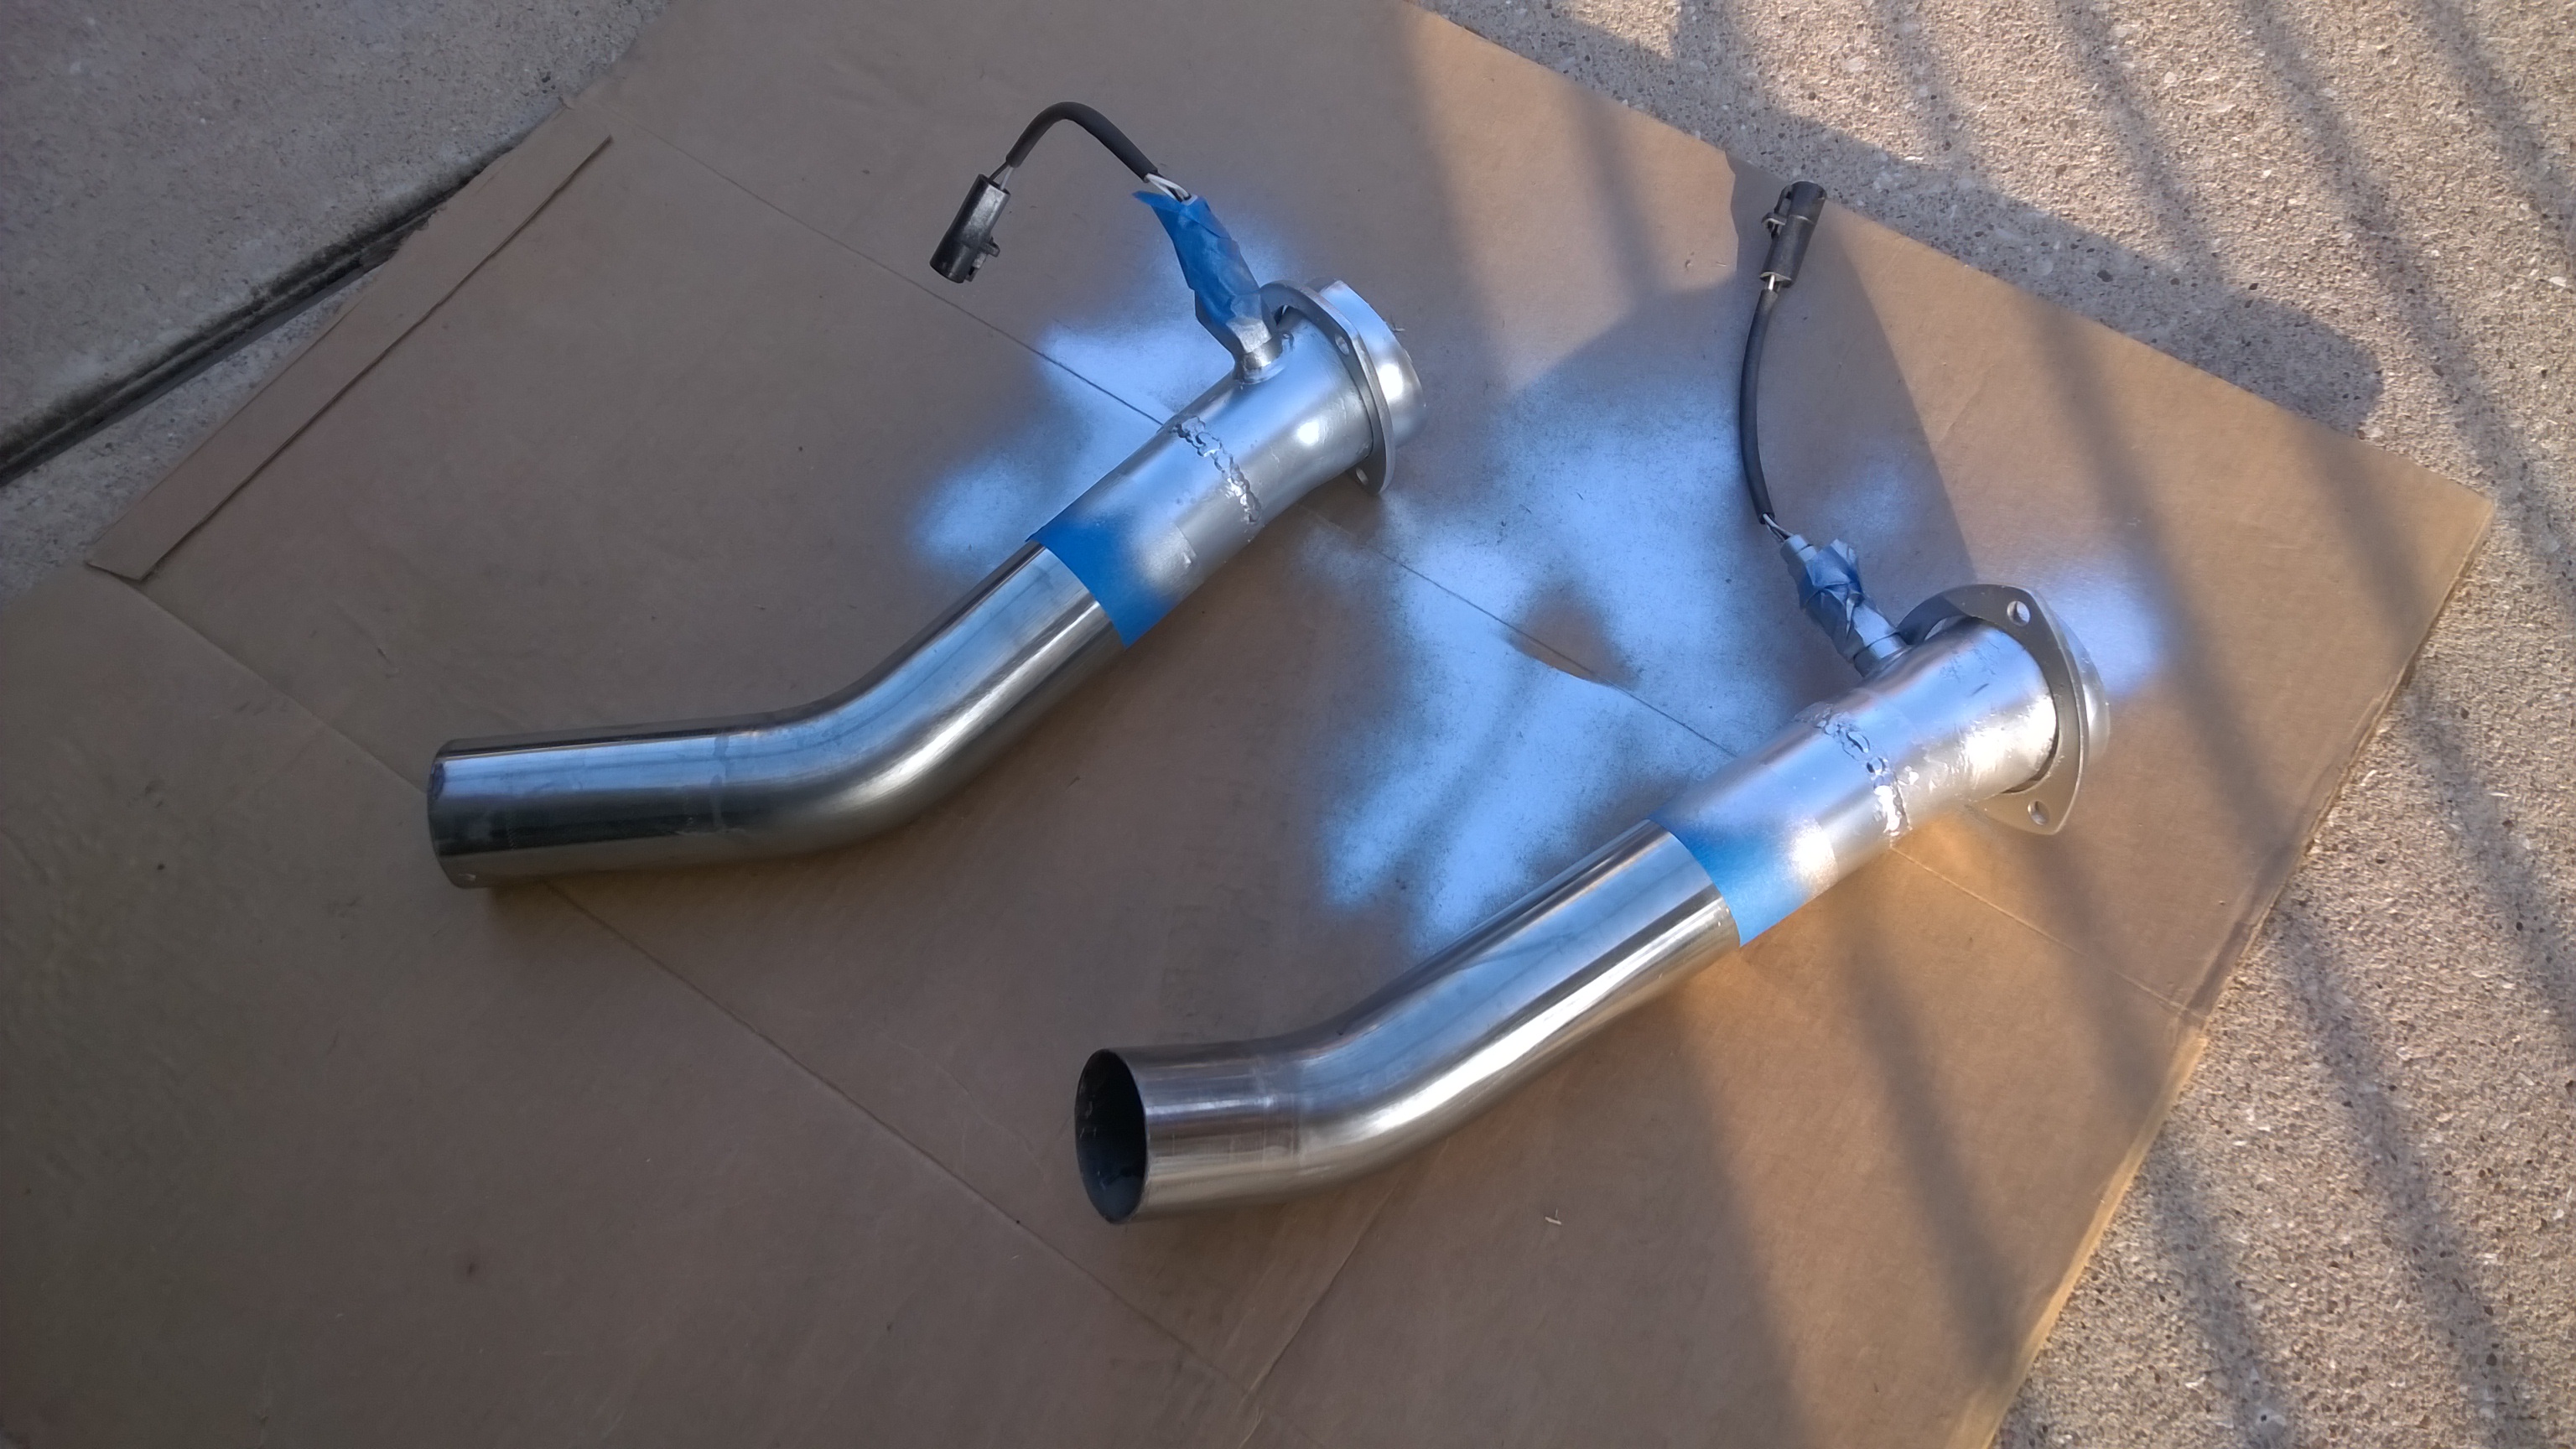
The Magnaflow kit includes 2.5″ ball and socket adapters, but the headers are 3″. Luckily, Hedman sells 3″ to 2.5″ adapters which even include O2 sensor bungs. They’re in carbon steel, so had to hit them with some high-temp paint to make sure they don’t rust out on me later down the road.
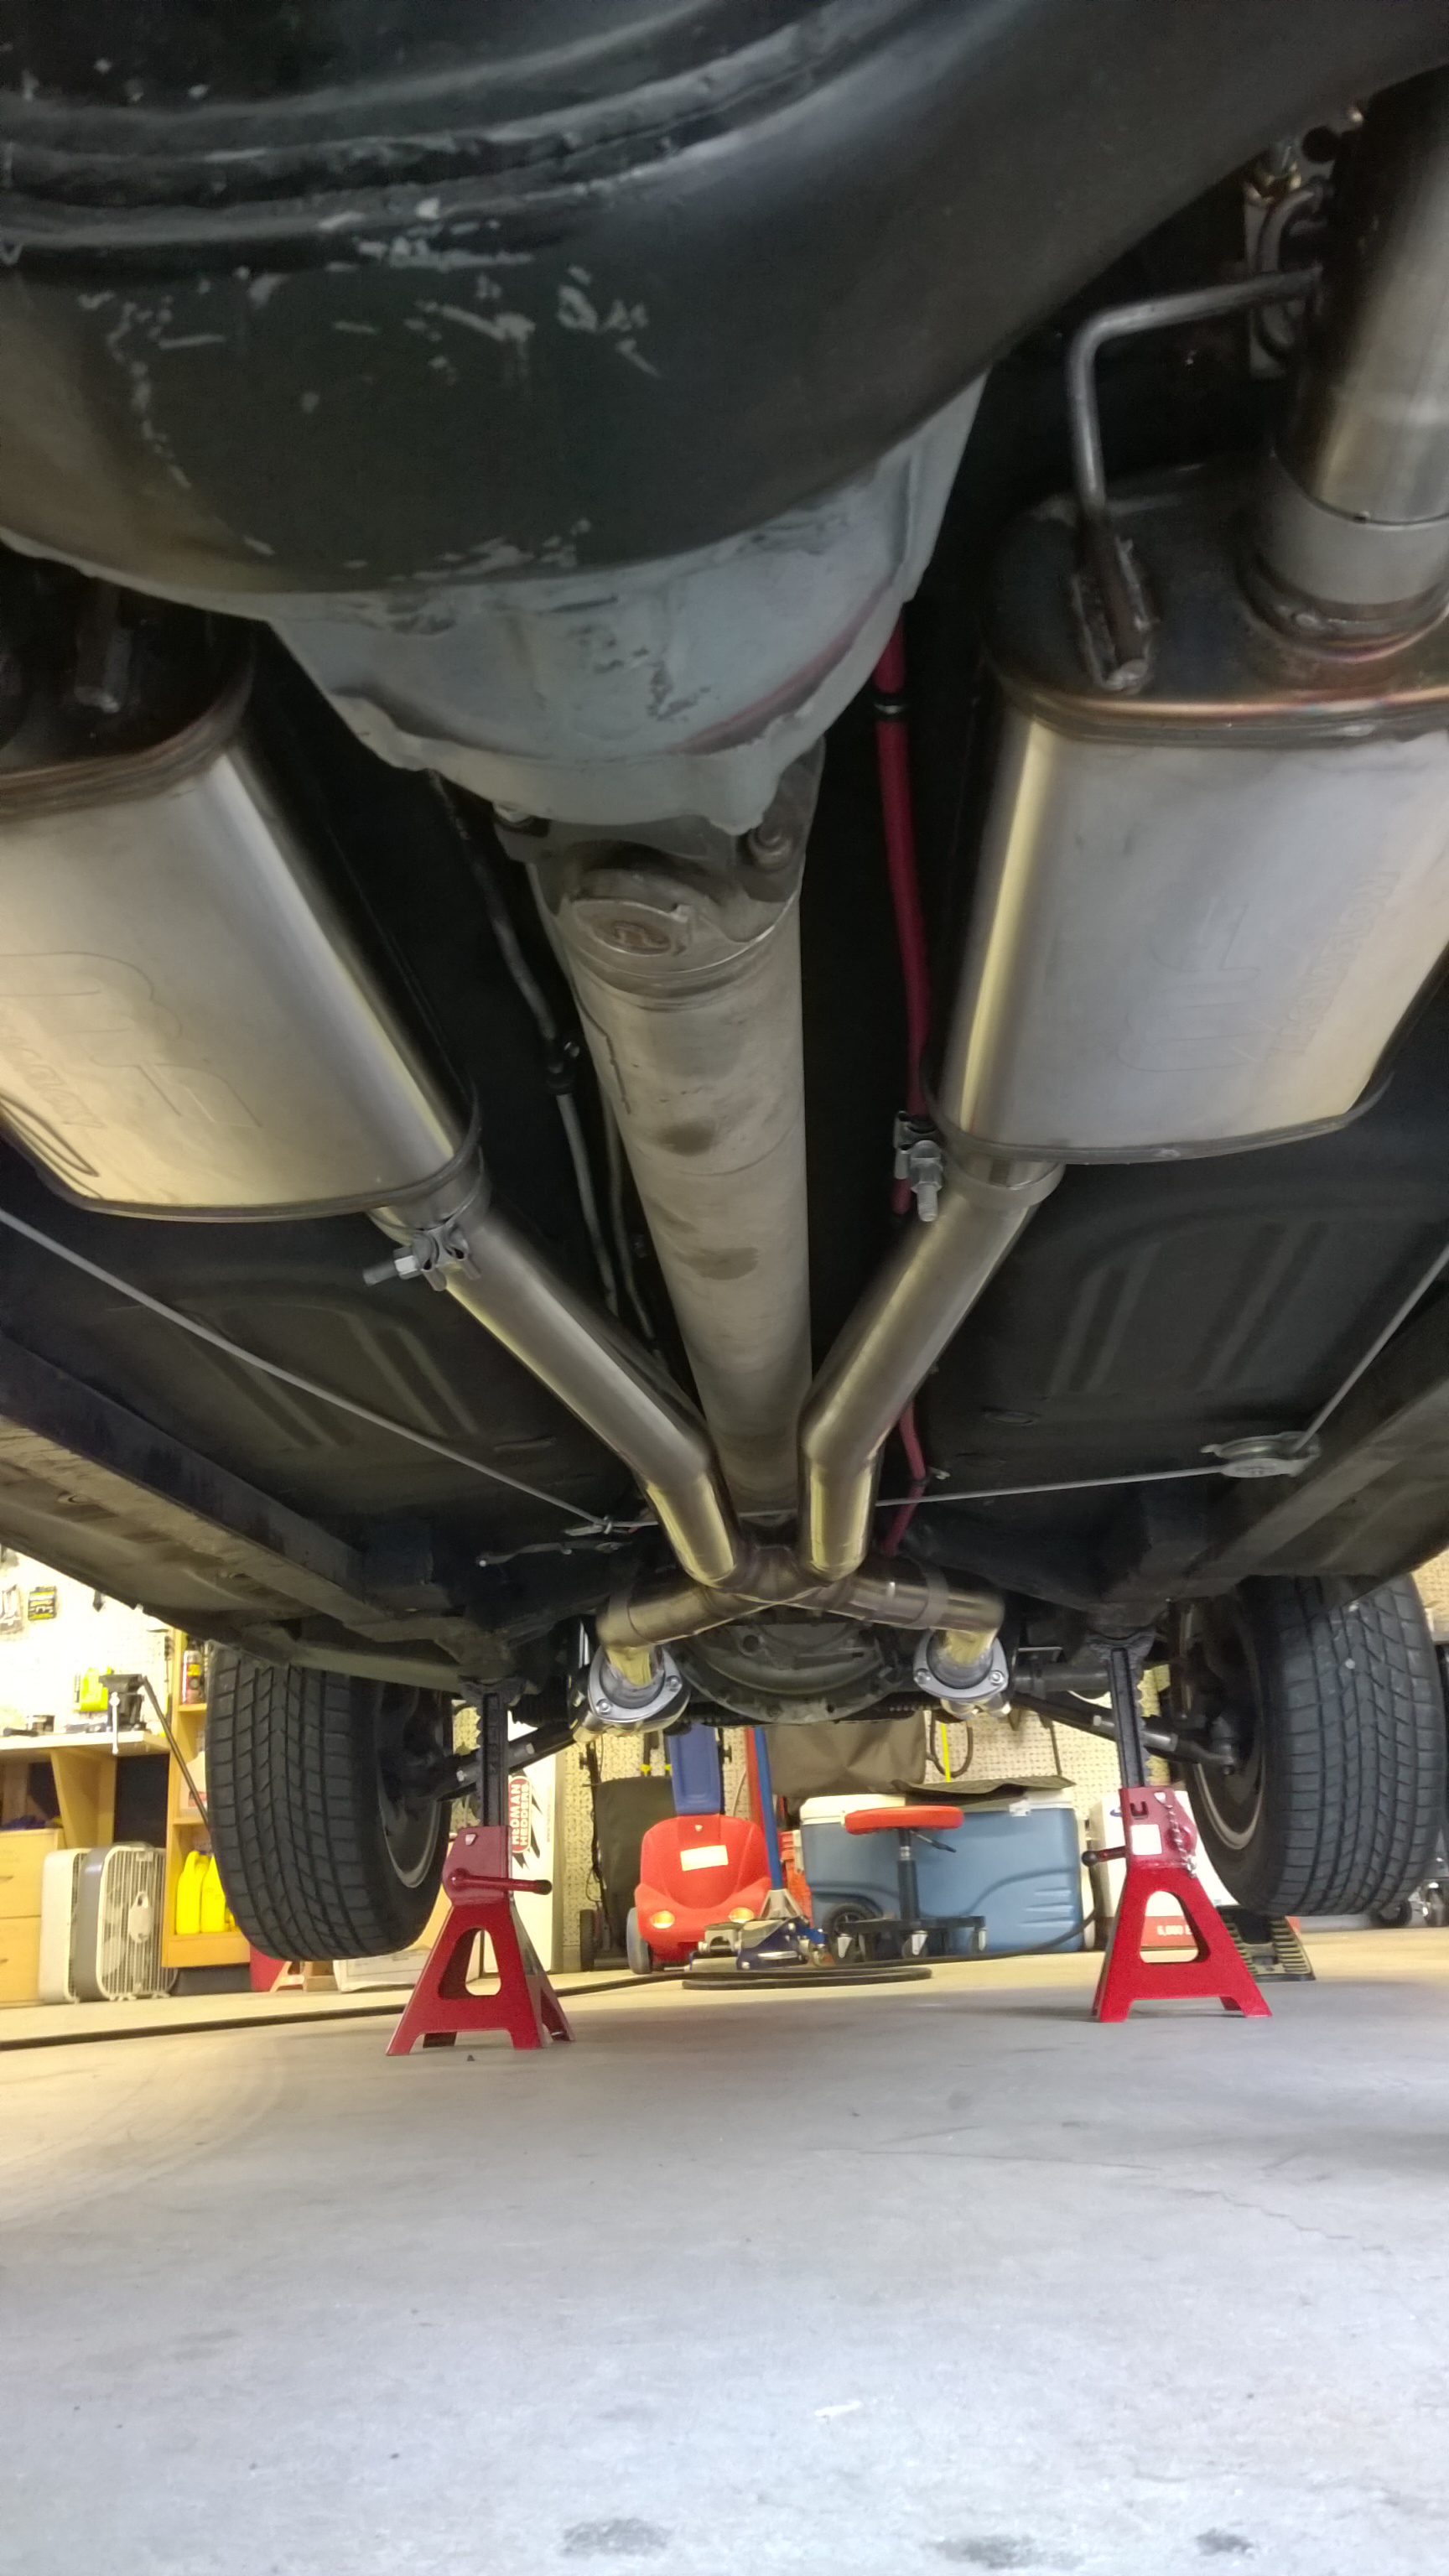
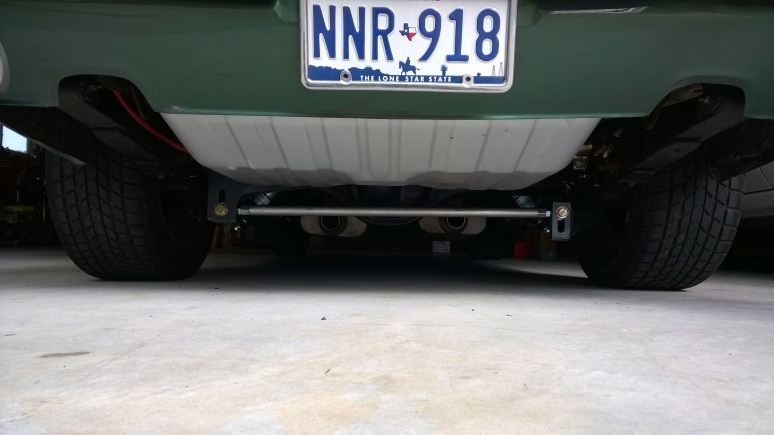
The exhaust system tucks up very nicely under the car with the pipes running right down the tunnel. I’m extremely pleased with the fit and fitment of this kit.
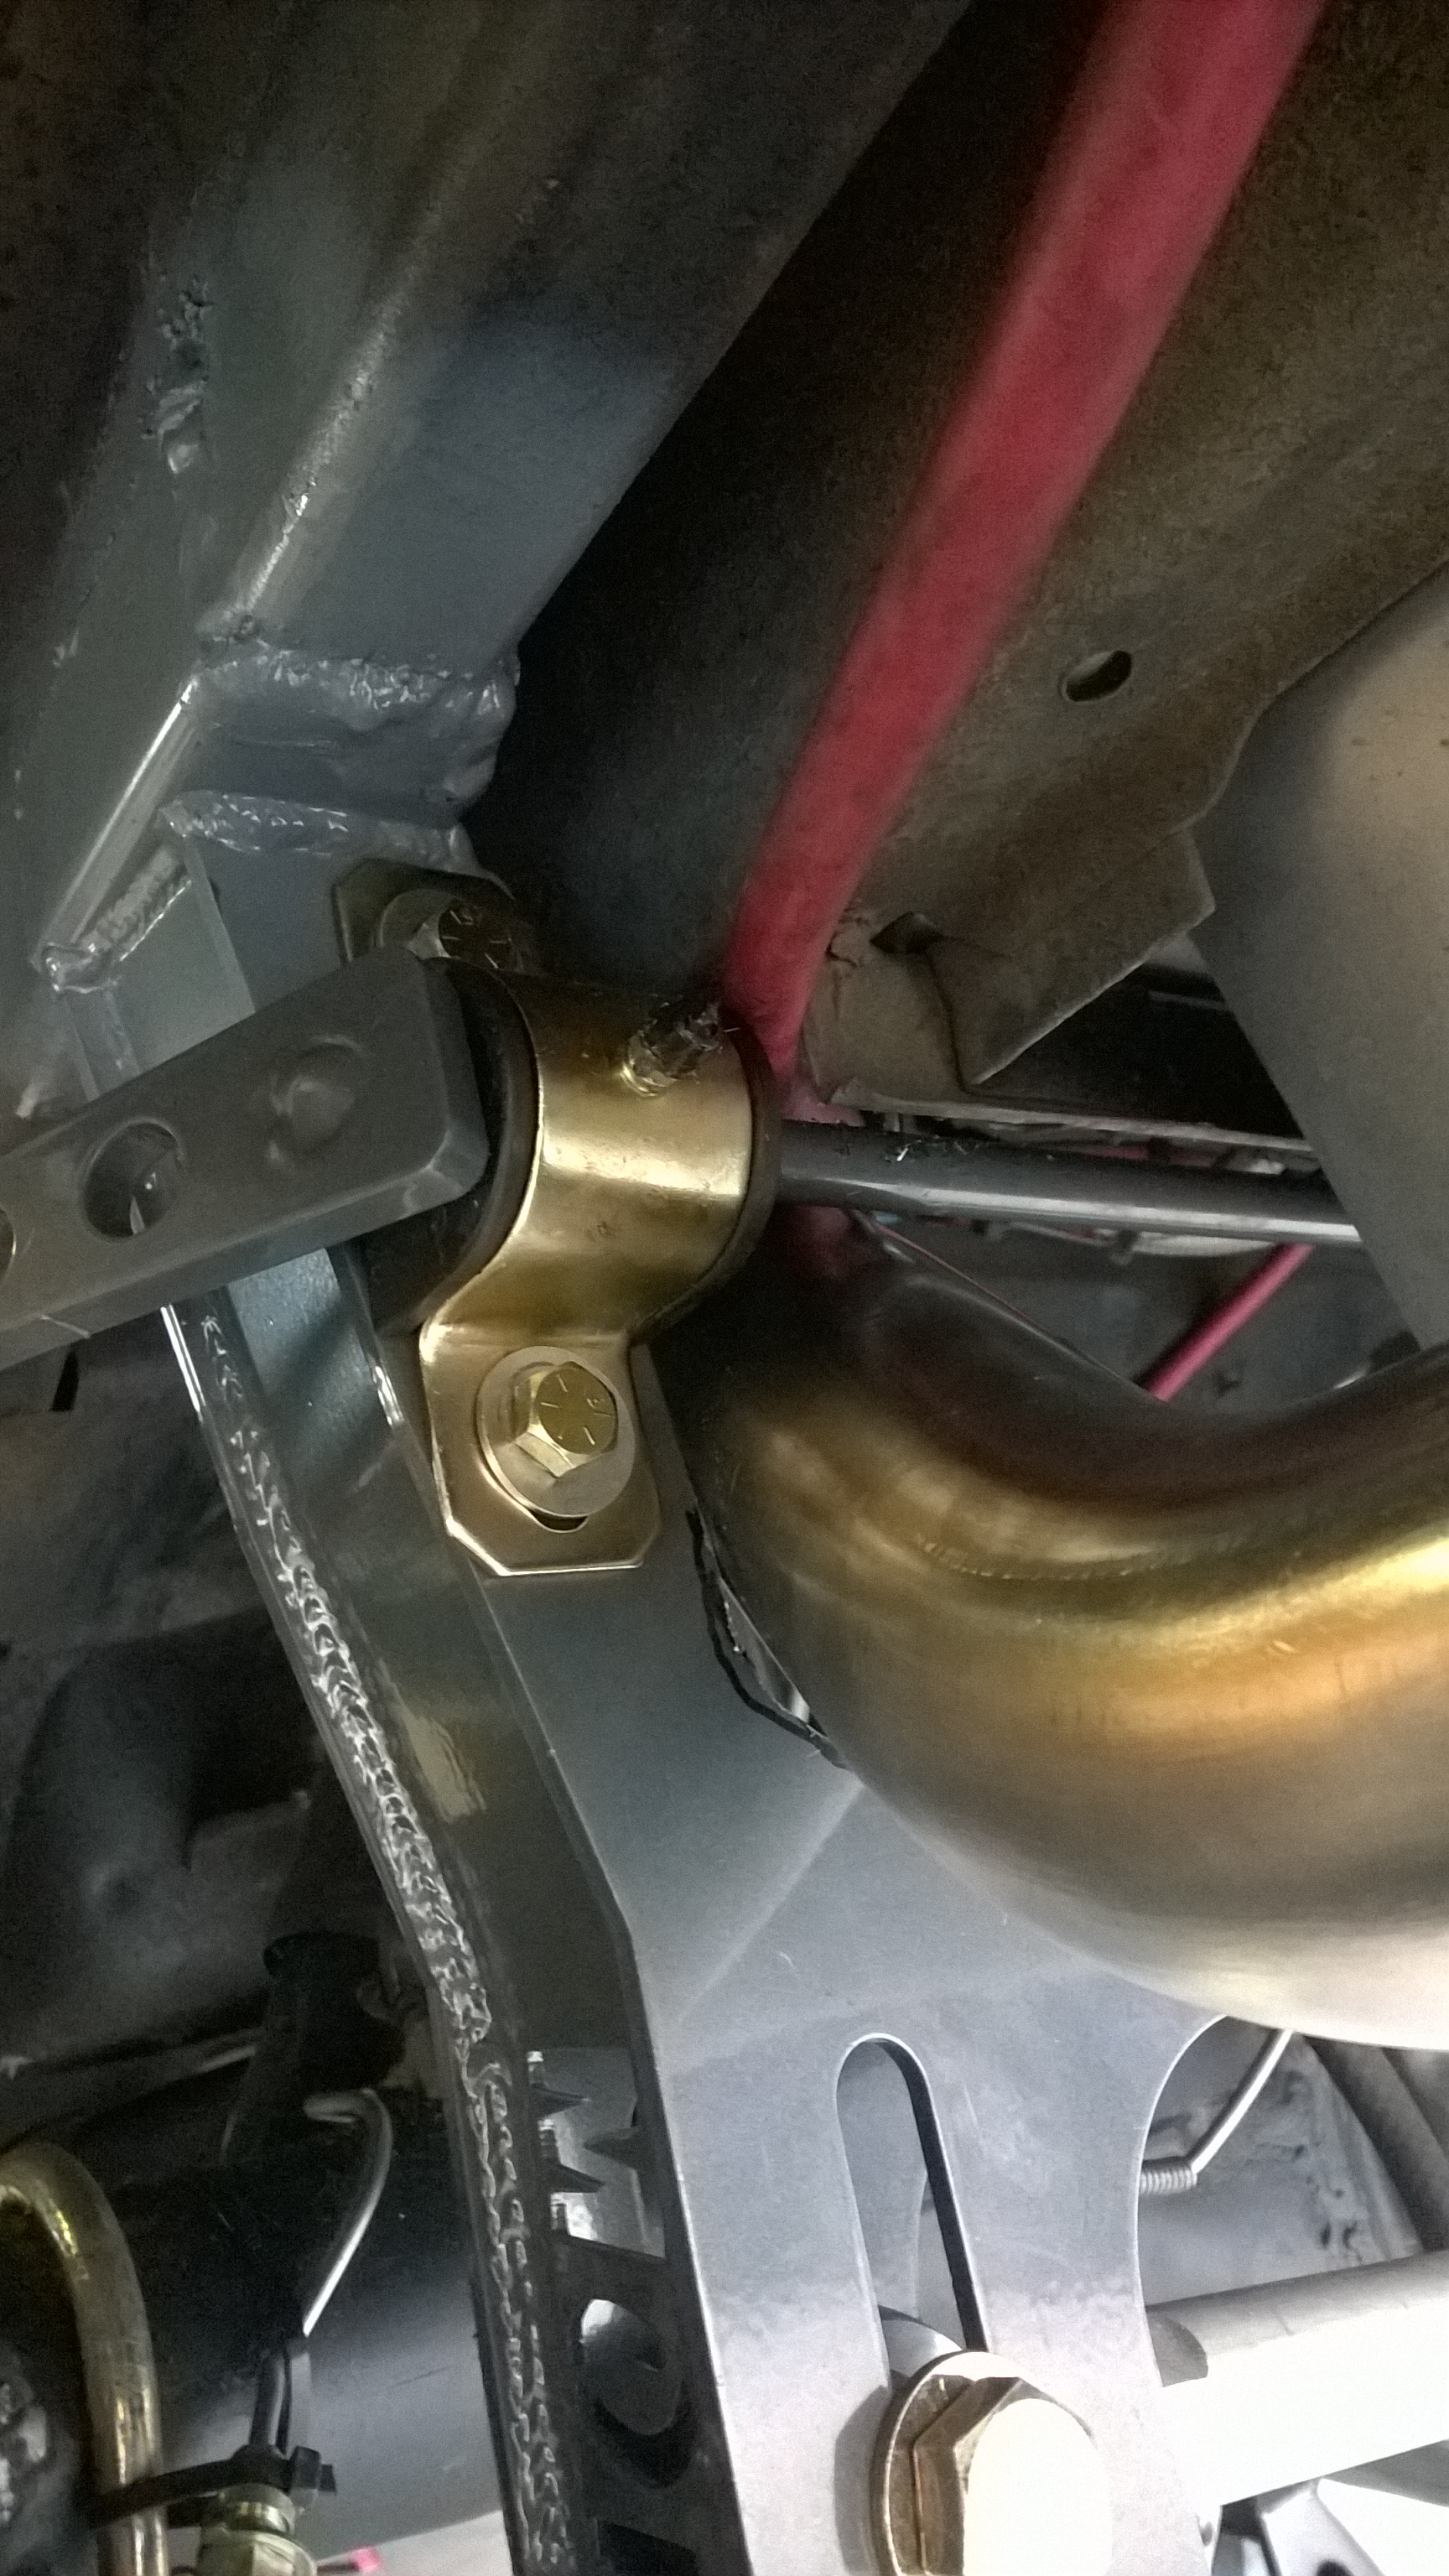
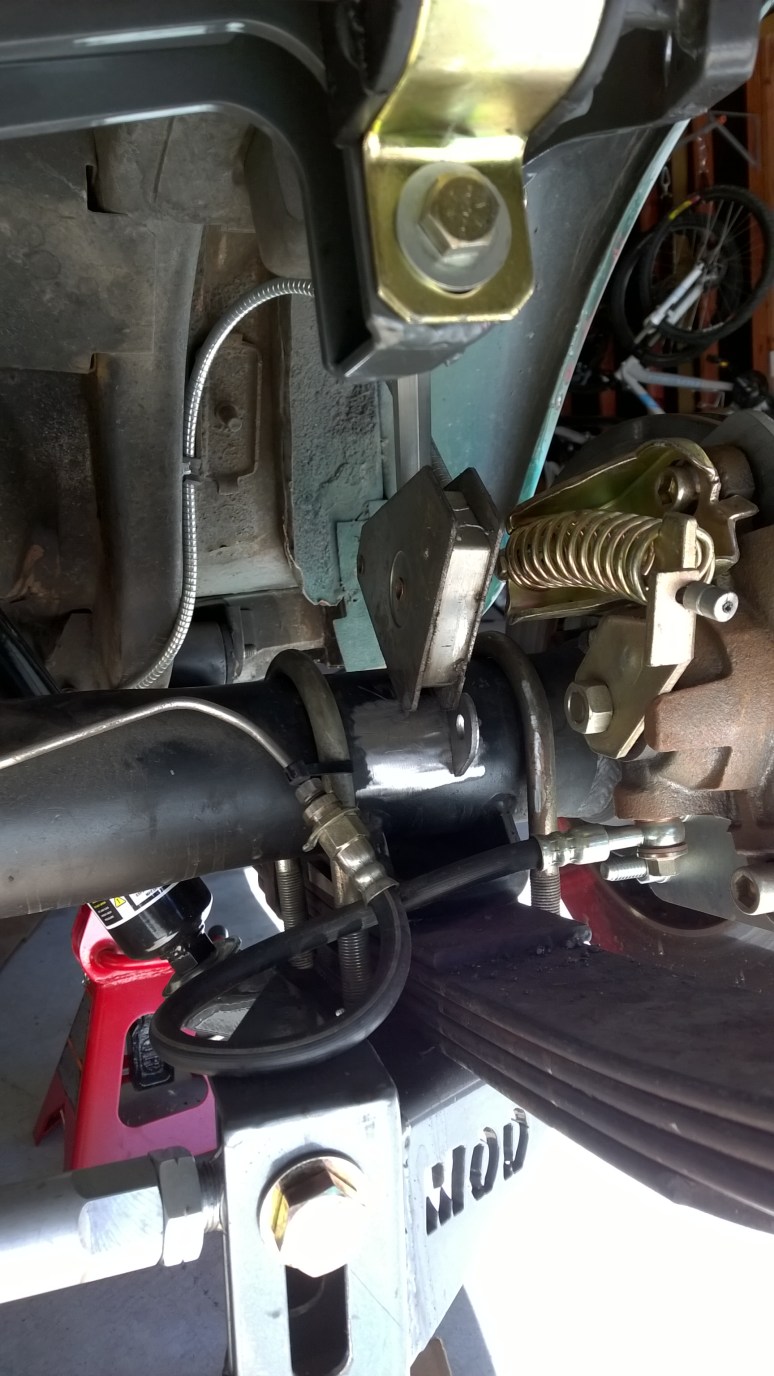
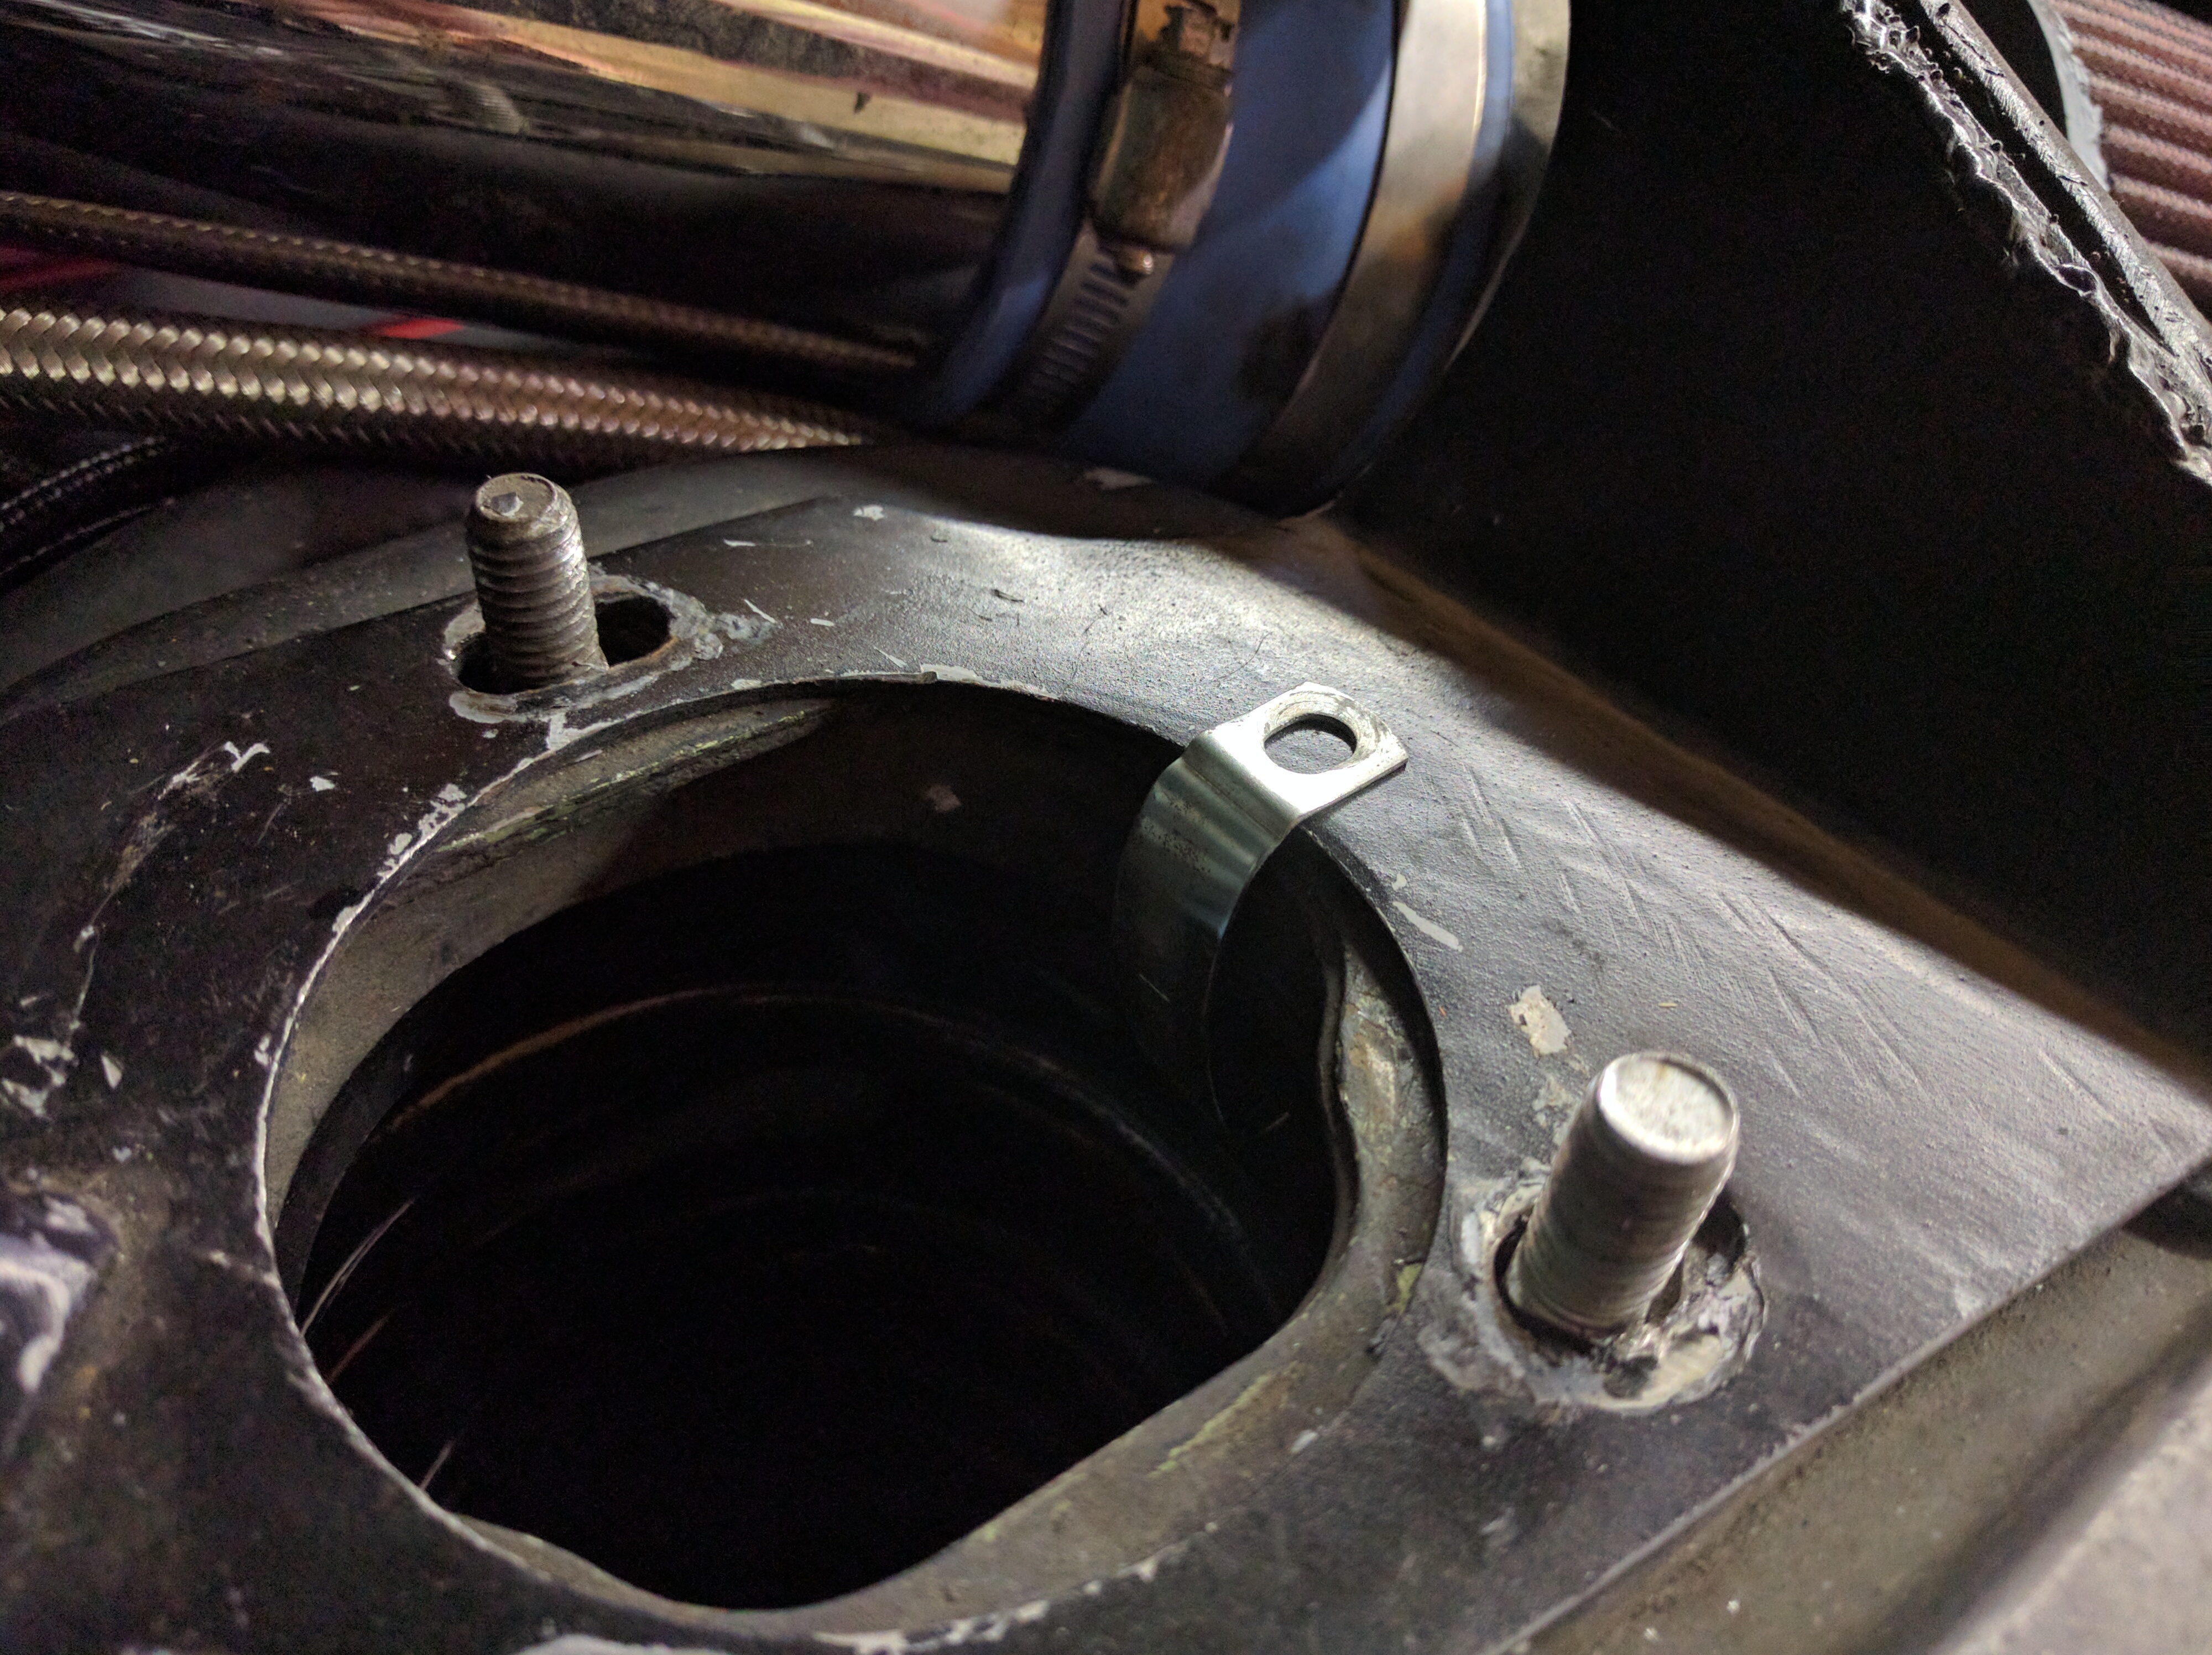
Now the fun part. Once I got the exhaust into place, there were interference points with the panhard mount on each side. On the driver’s side this required some material removal on the panhard mount. Luckily this is a really stout piece, so I don’t anticipate any strength issues. The kit recommends 1/2″ clearance to avoid rattles and I can tell you that’s necessary.
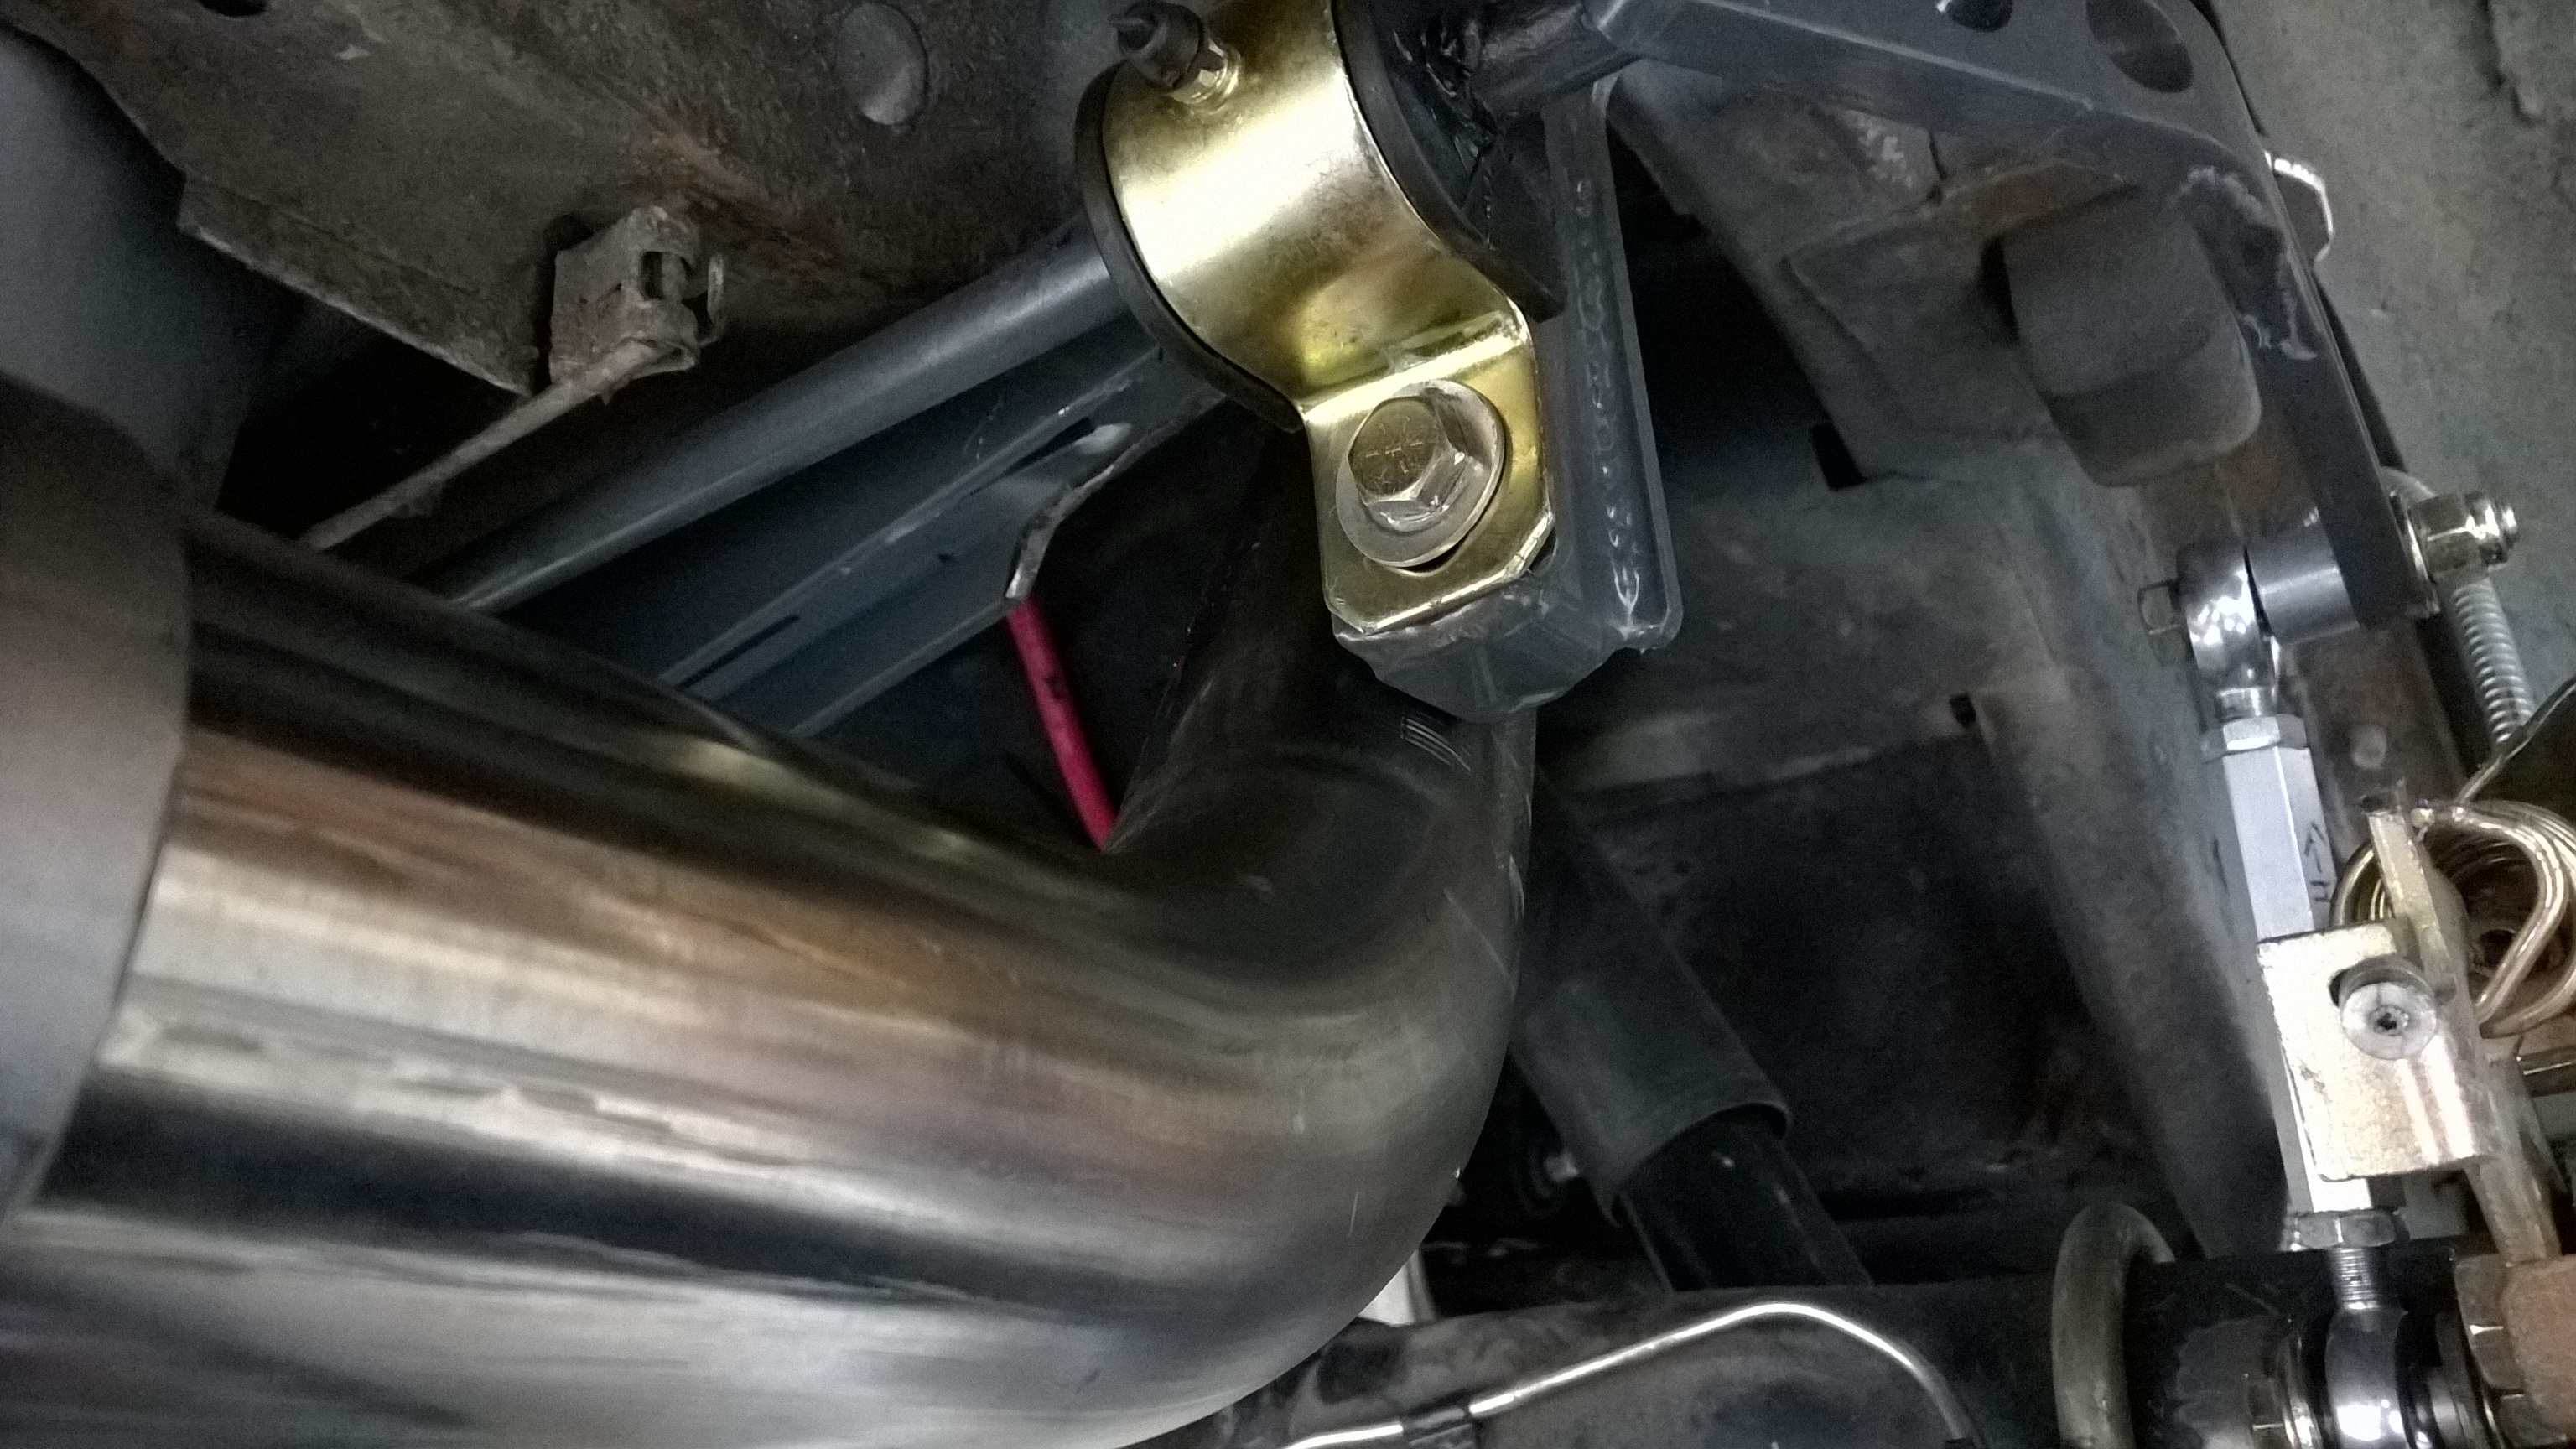
The passenger side had a clash as well. This one was a lot easier though and addressed by spacing the pipe down correctly at the tip and making sure the pipes were pushed as far forward in the slip connections as possible.
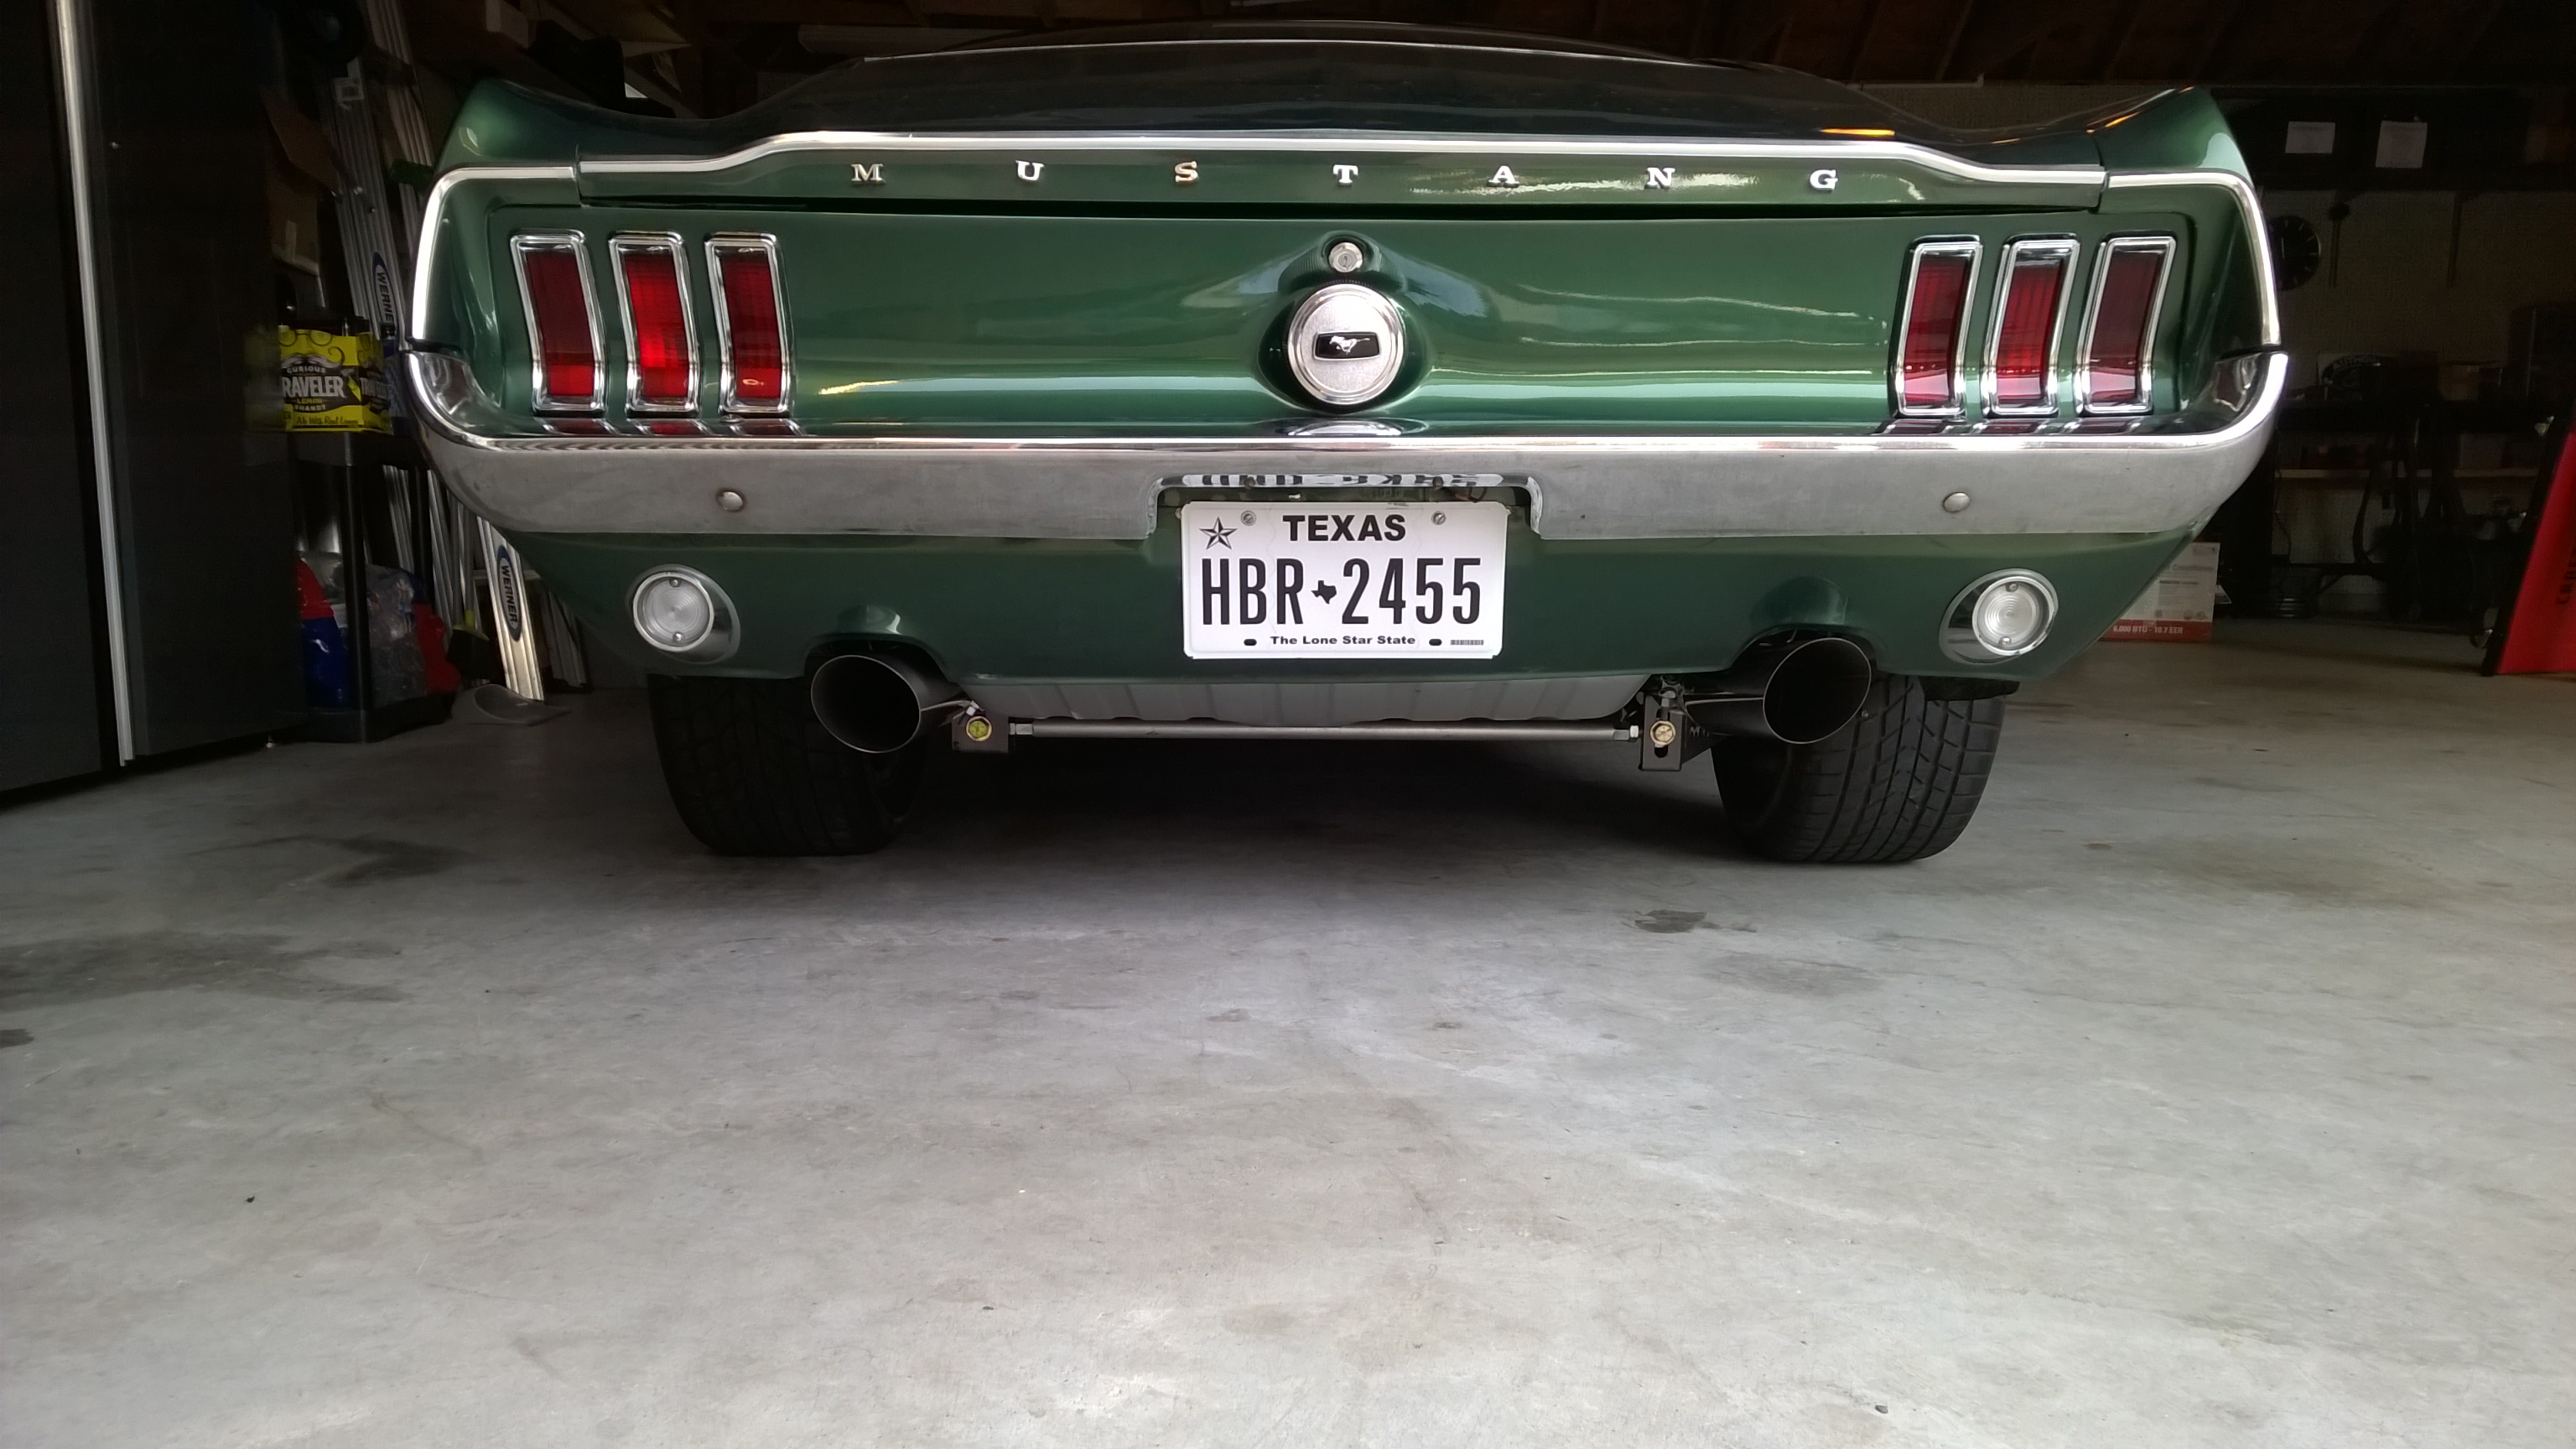
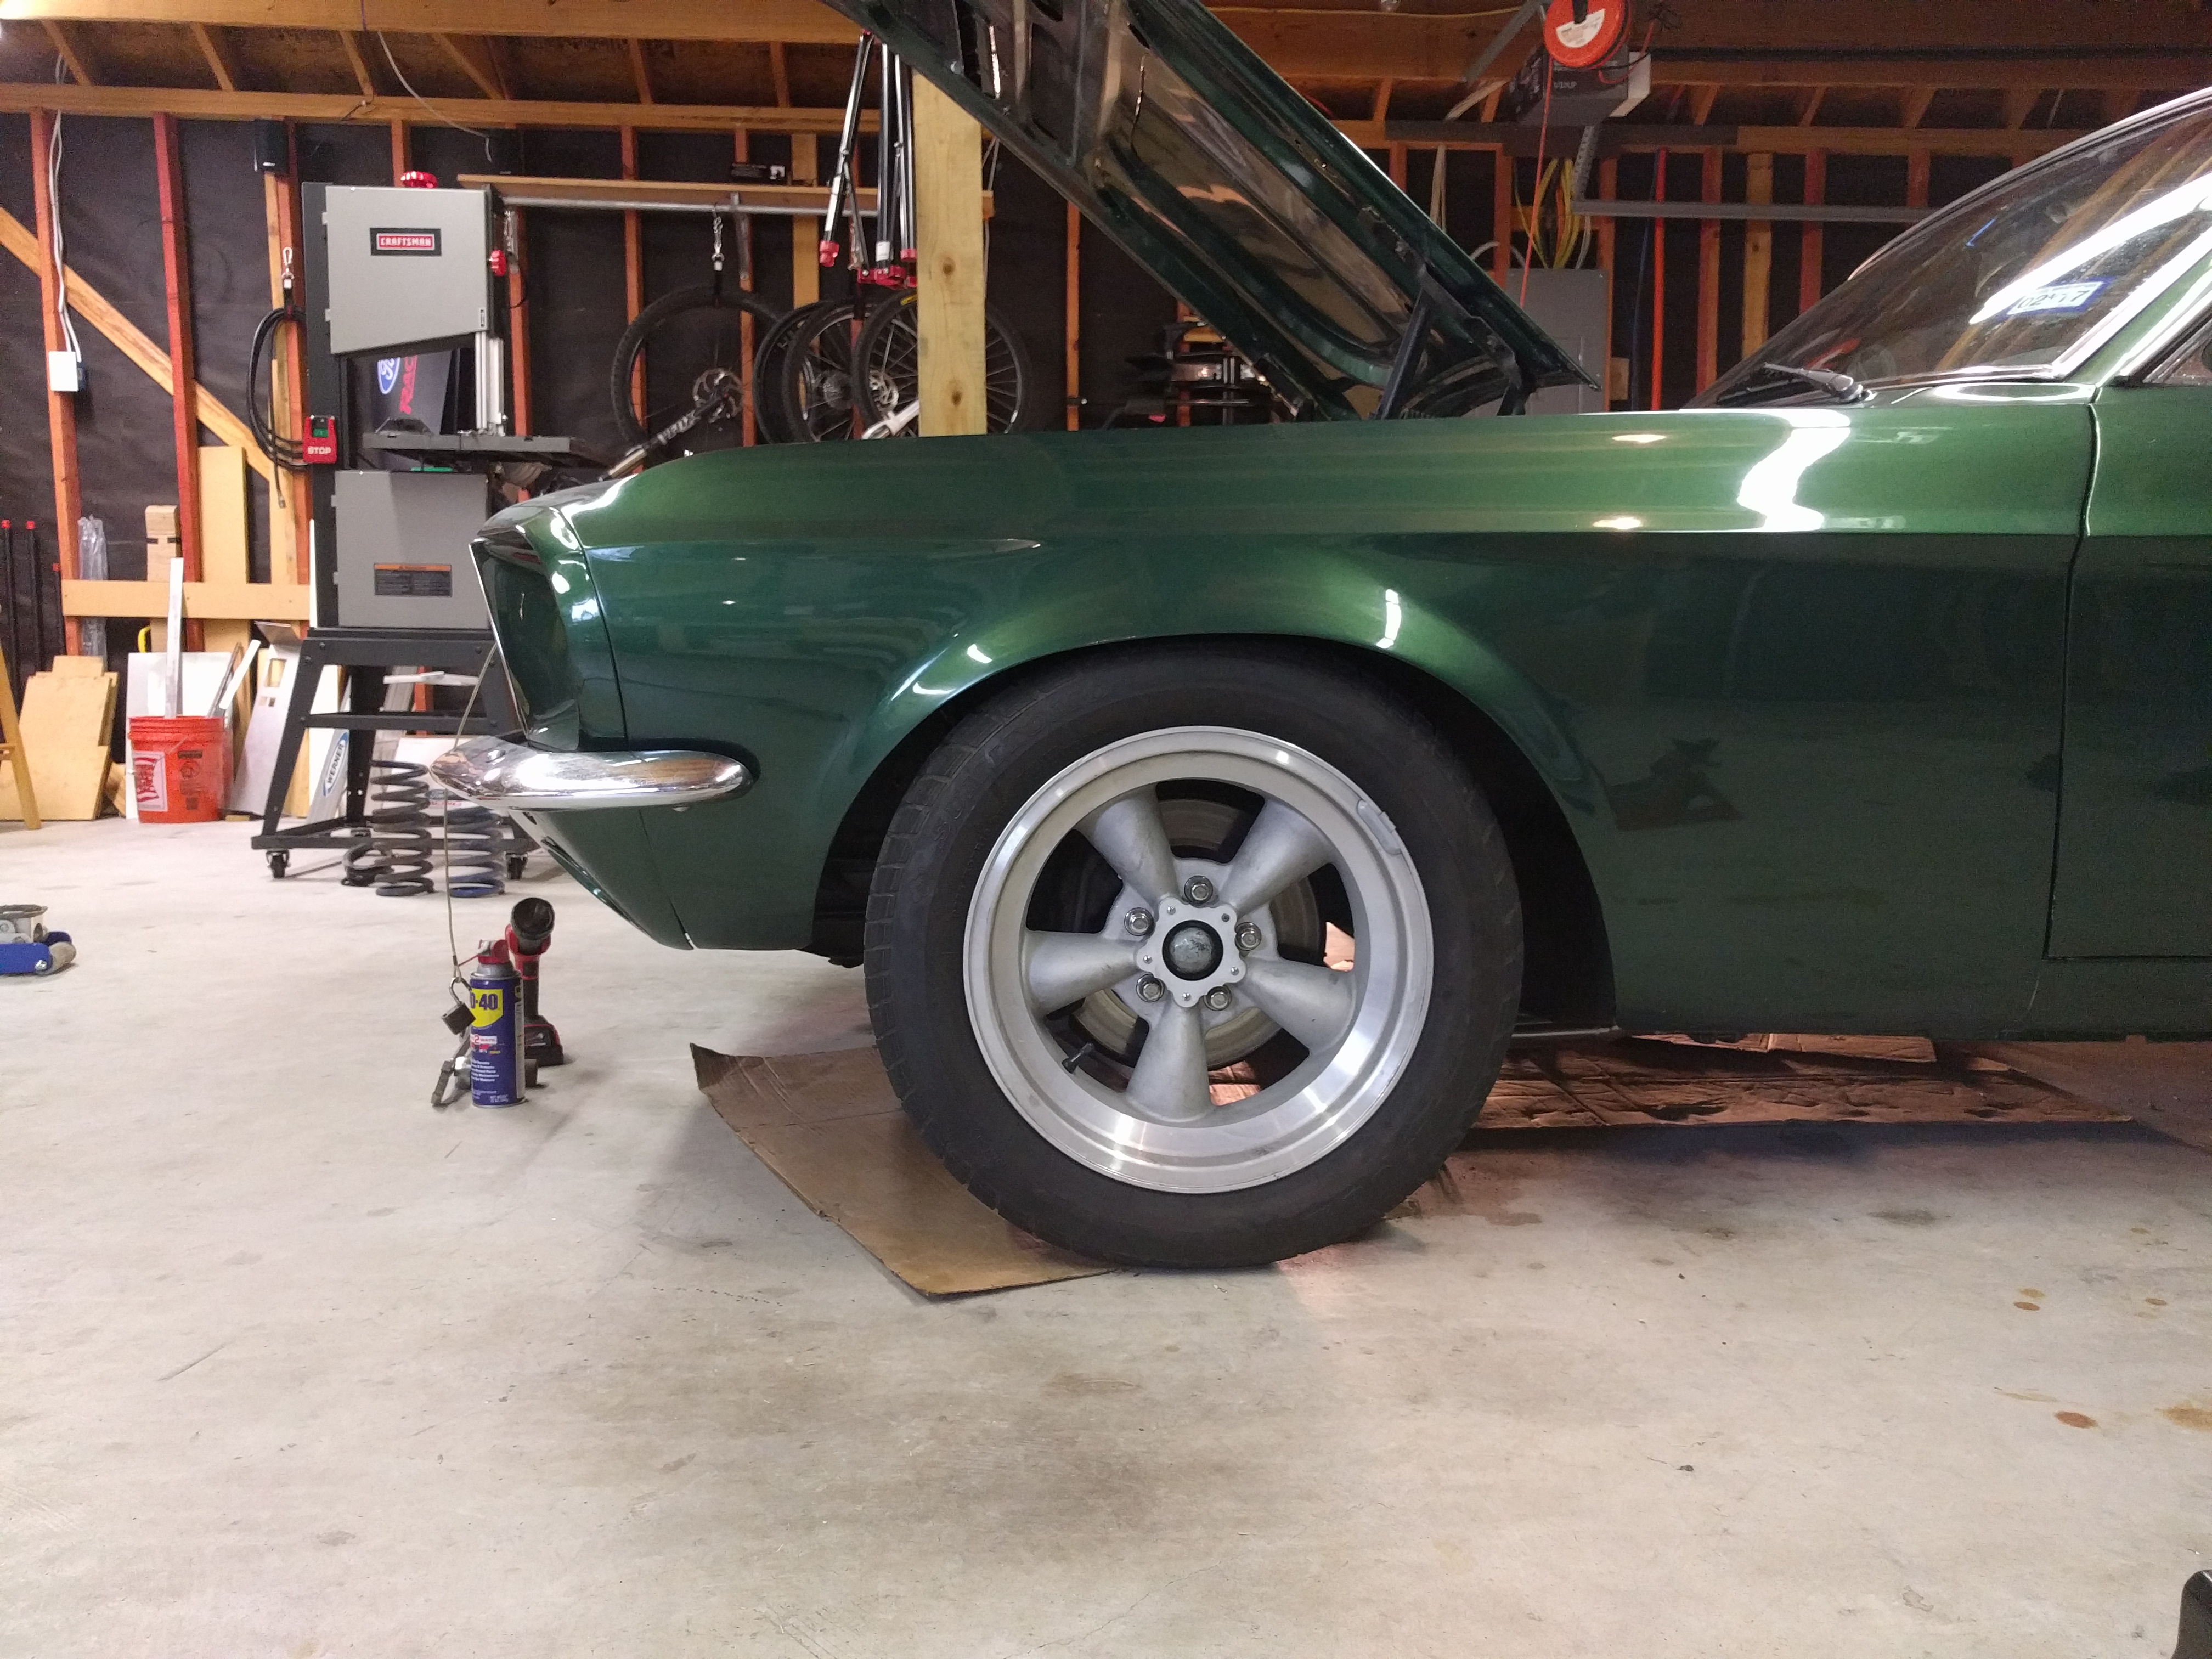
Hey, it might not be the perfect fitment, but I’m really pleased with it and I avoided any custom fabricated bends around the panhard bar. The 4″ stainless slash-cut tips really finish it off in my opinion! At the same time as the panhard went in, I also threw in a set of Mike’s custom valved Bilstein shocks with the “sport” valving. I’d really wanted to do a coil-over step and 3-link like the Camaro, but that just wasn’t in the budget cards at this point. The whole install took a whole lot longer than I care to admit, but I’m very pleased with the result!
Another project during the car’s downtime was to address a coolant sensor issue. When I installed the EFI setup on the Mustang, I had to deal with how to handle the coolant sensor and the ’67 heater hose system. Late-model cars have a tube arrangement with a sensor bung in it, but unfortunately that doesn’t work very well with the ’67 heater hose routing. I’d been running a less than optimal arrangement with various fittings and adapters, but it never gave a sensor reading I was confident in, so I wanted to add a sensor hole to the manifold.
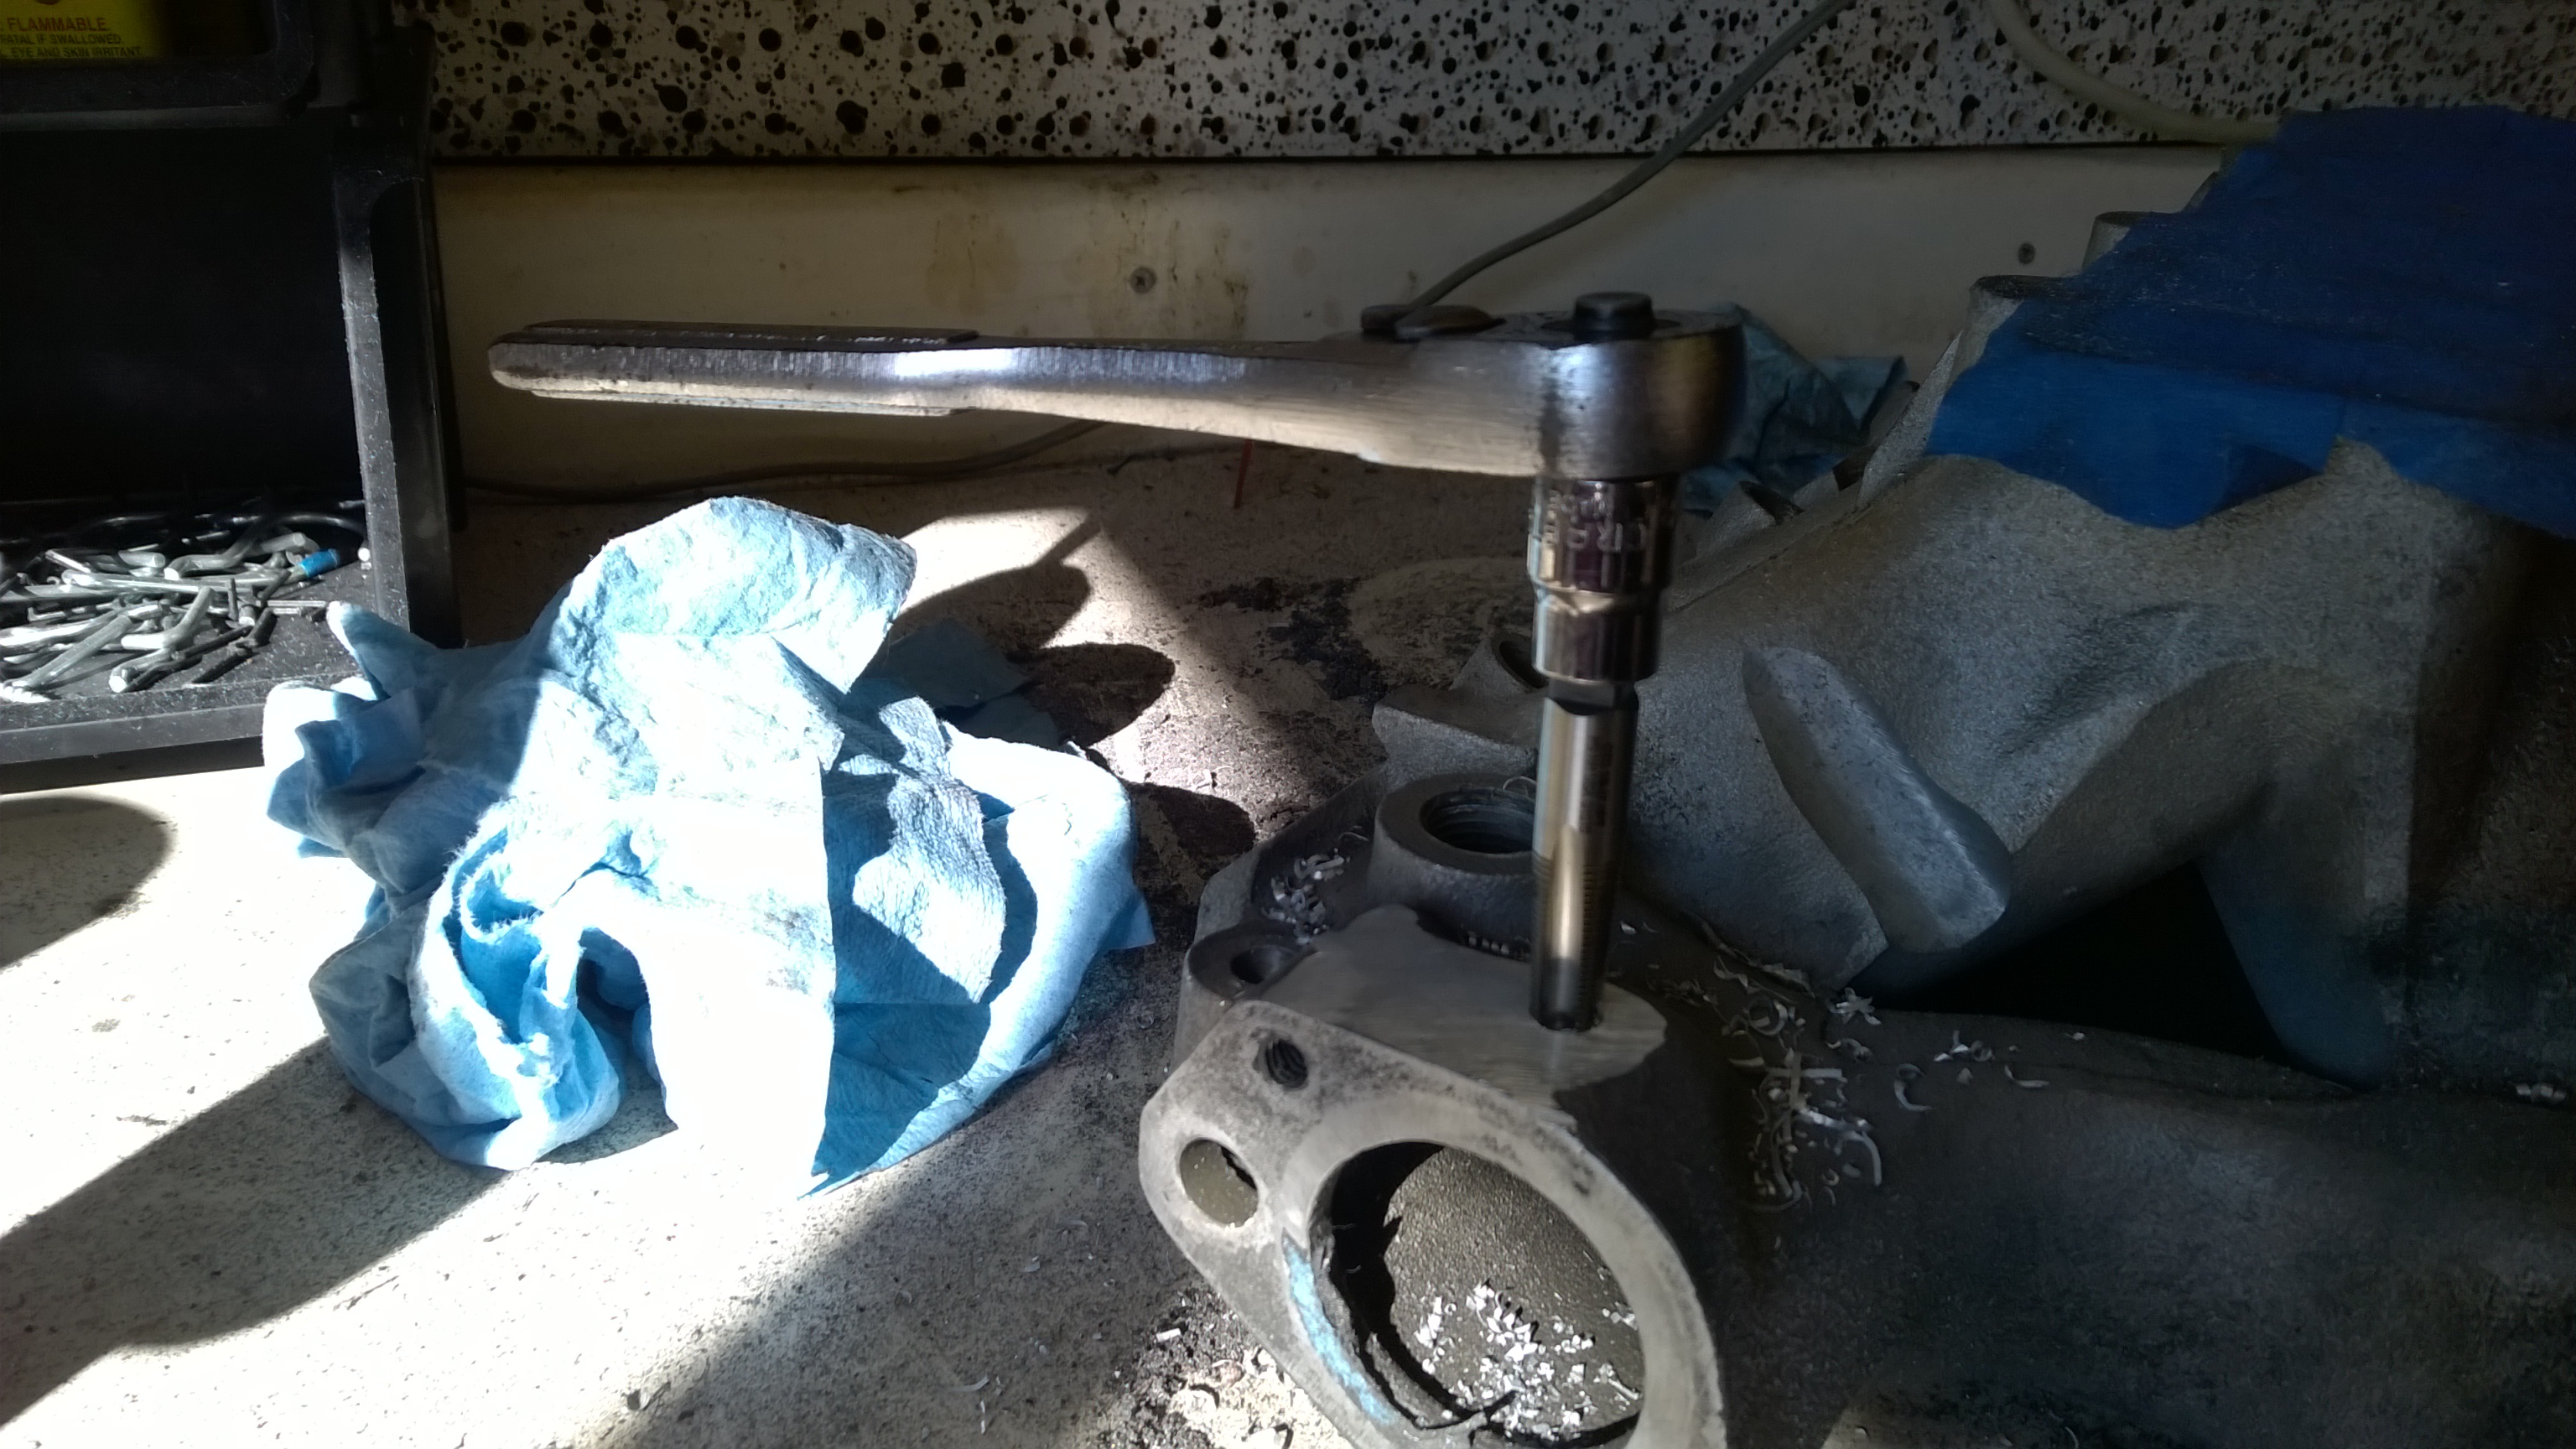
The thermostat housing had plenty of meat on it, so I grinded the surface flat, drilled a hole, and ran a tap into it.
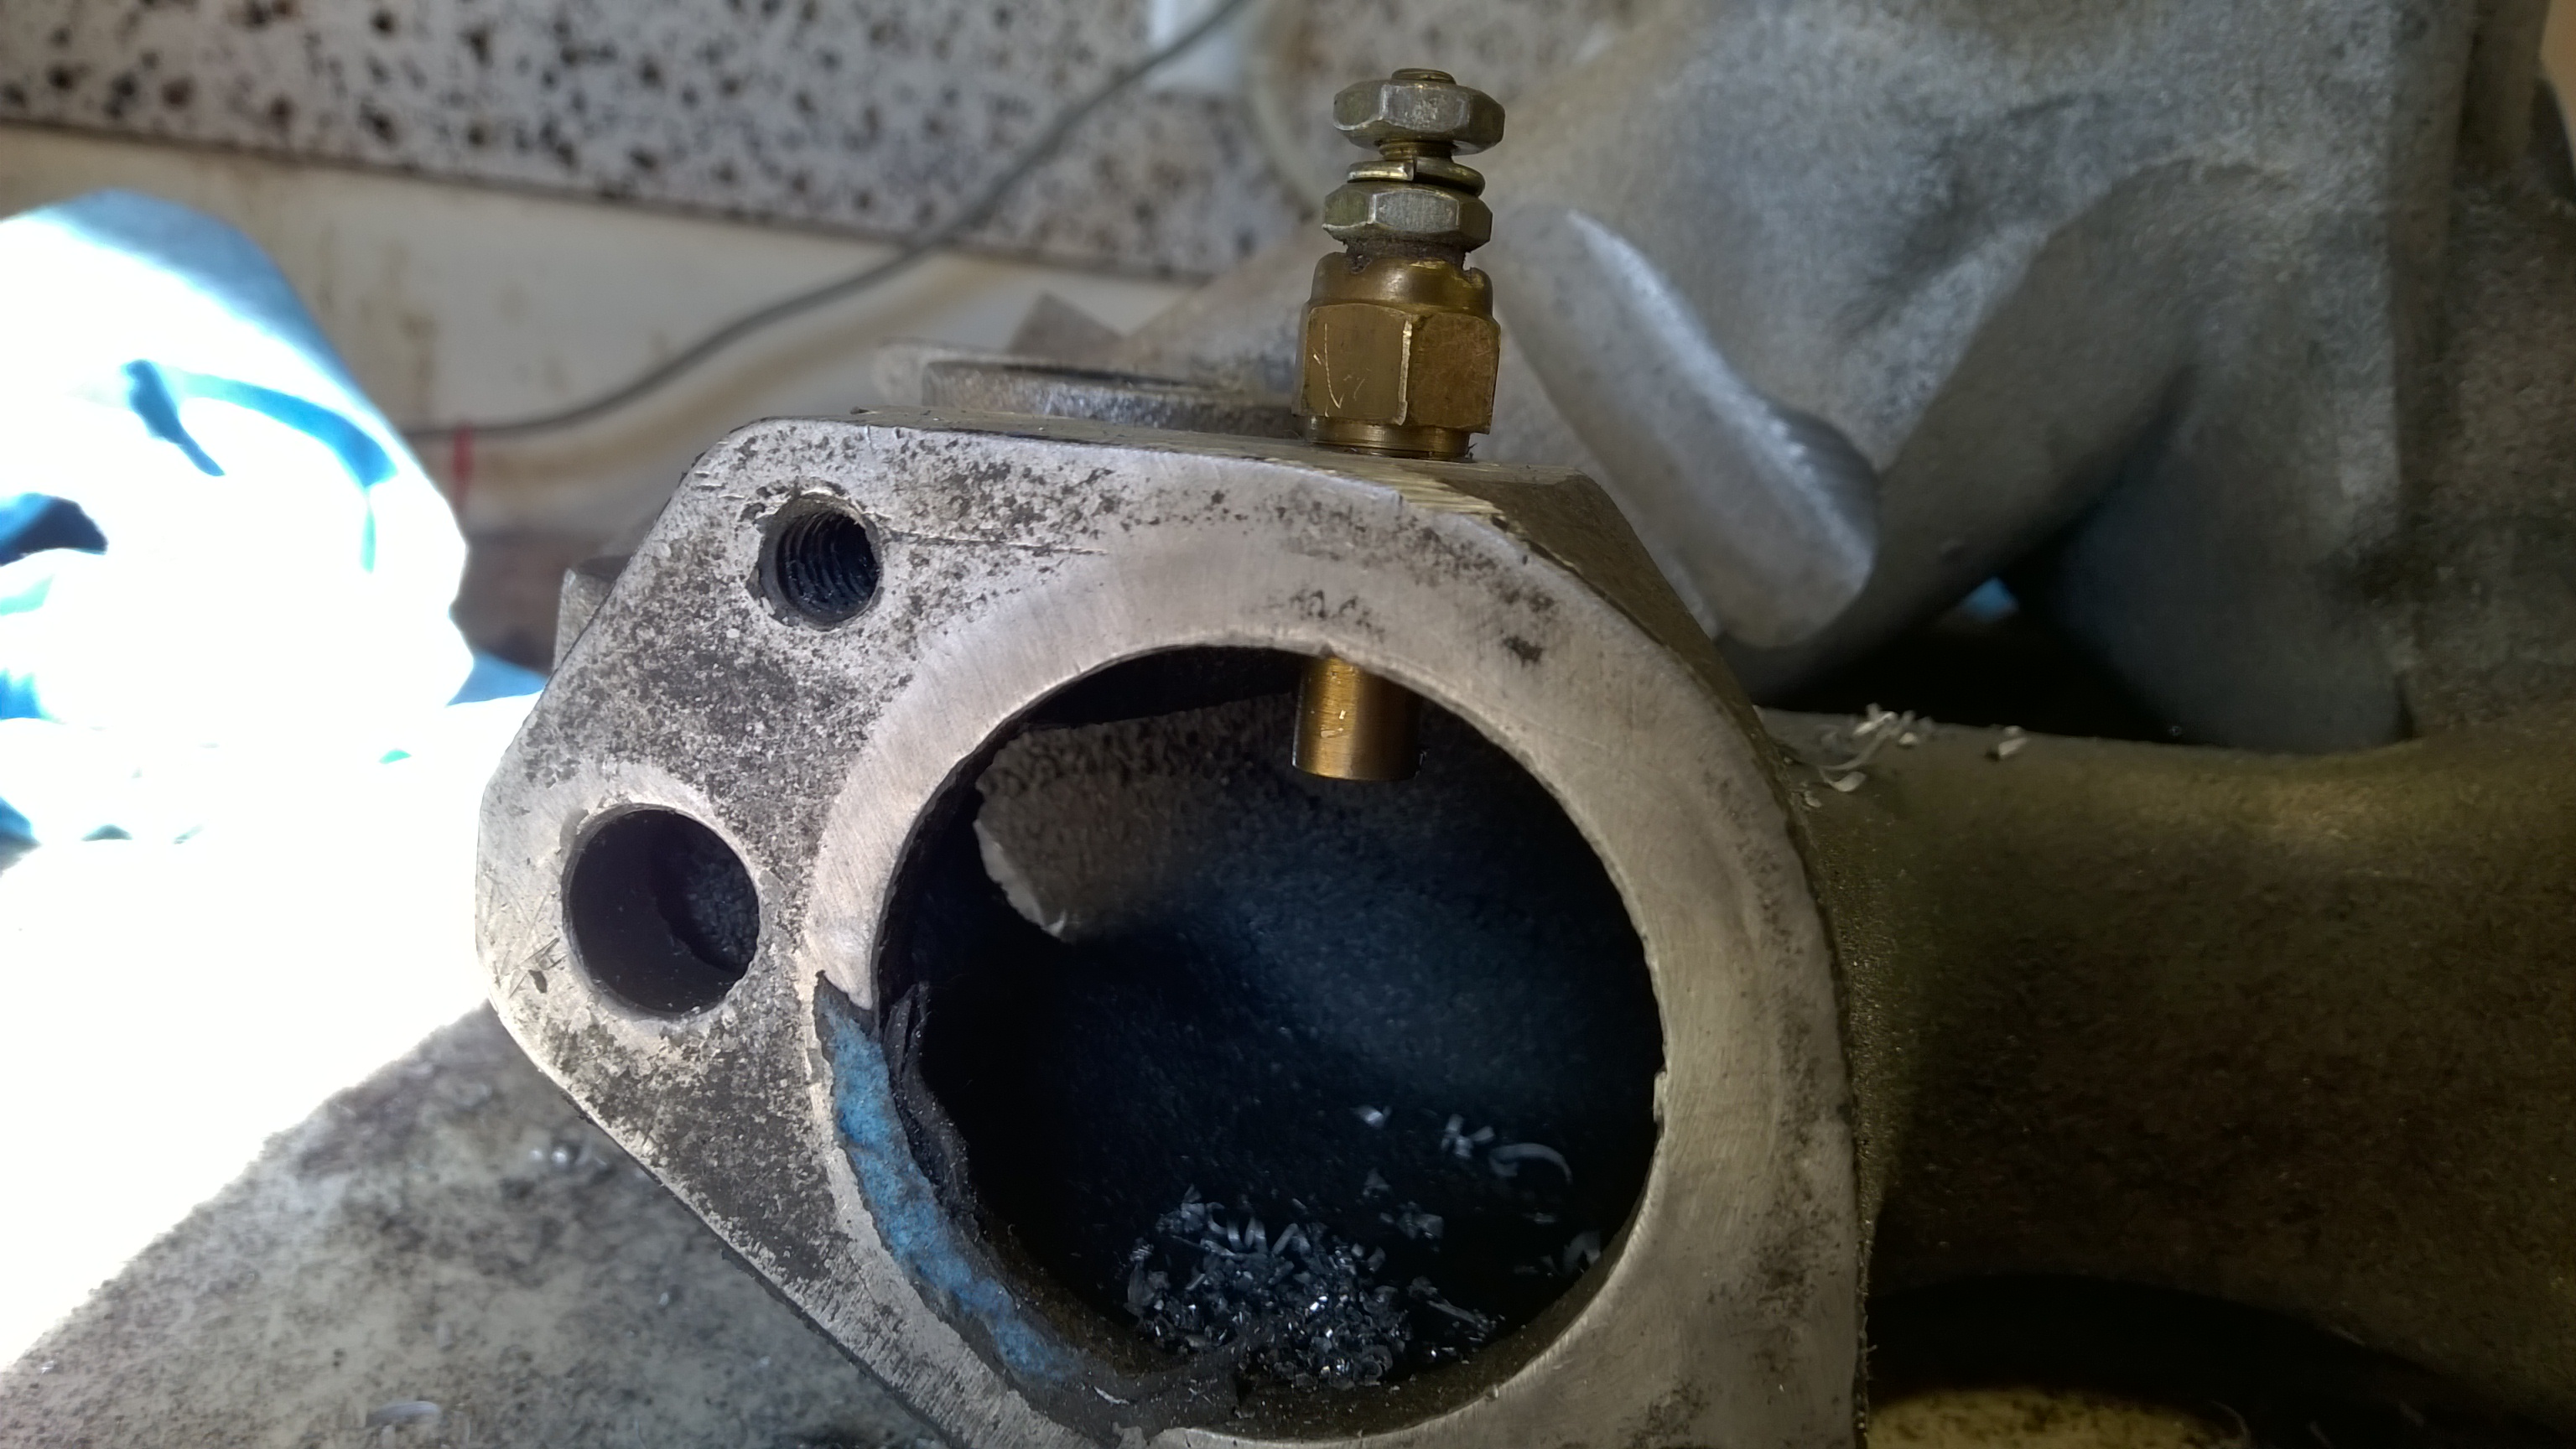
The sensor threaded in perfectly and put the sensor right in the coolant flow where I wanted it!
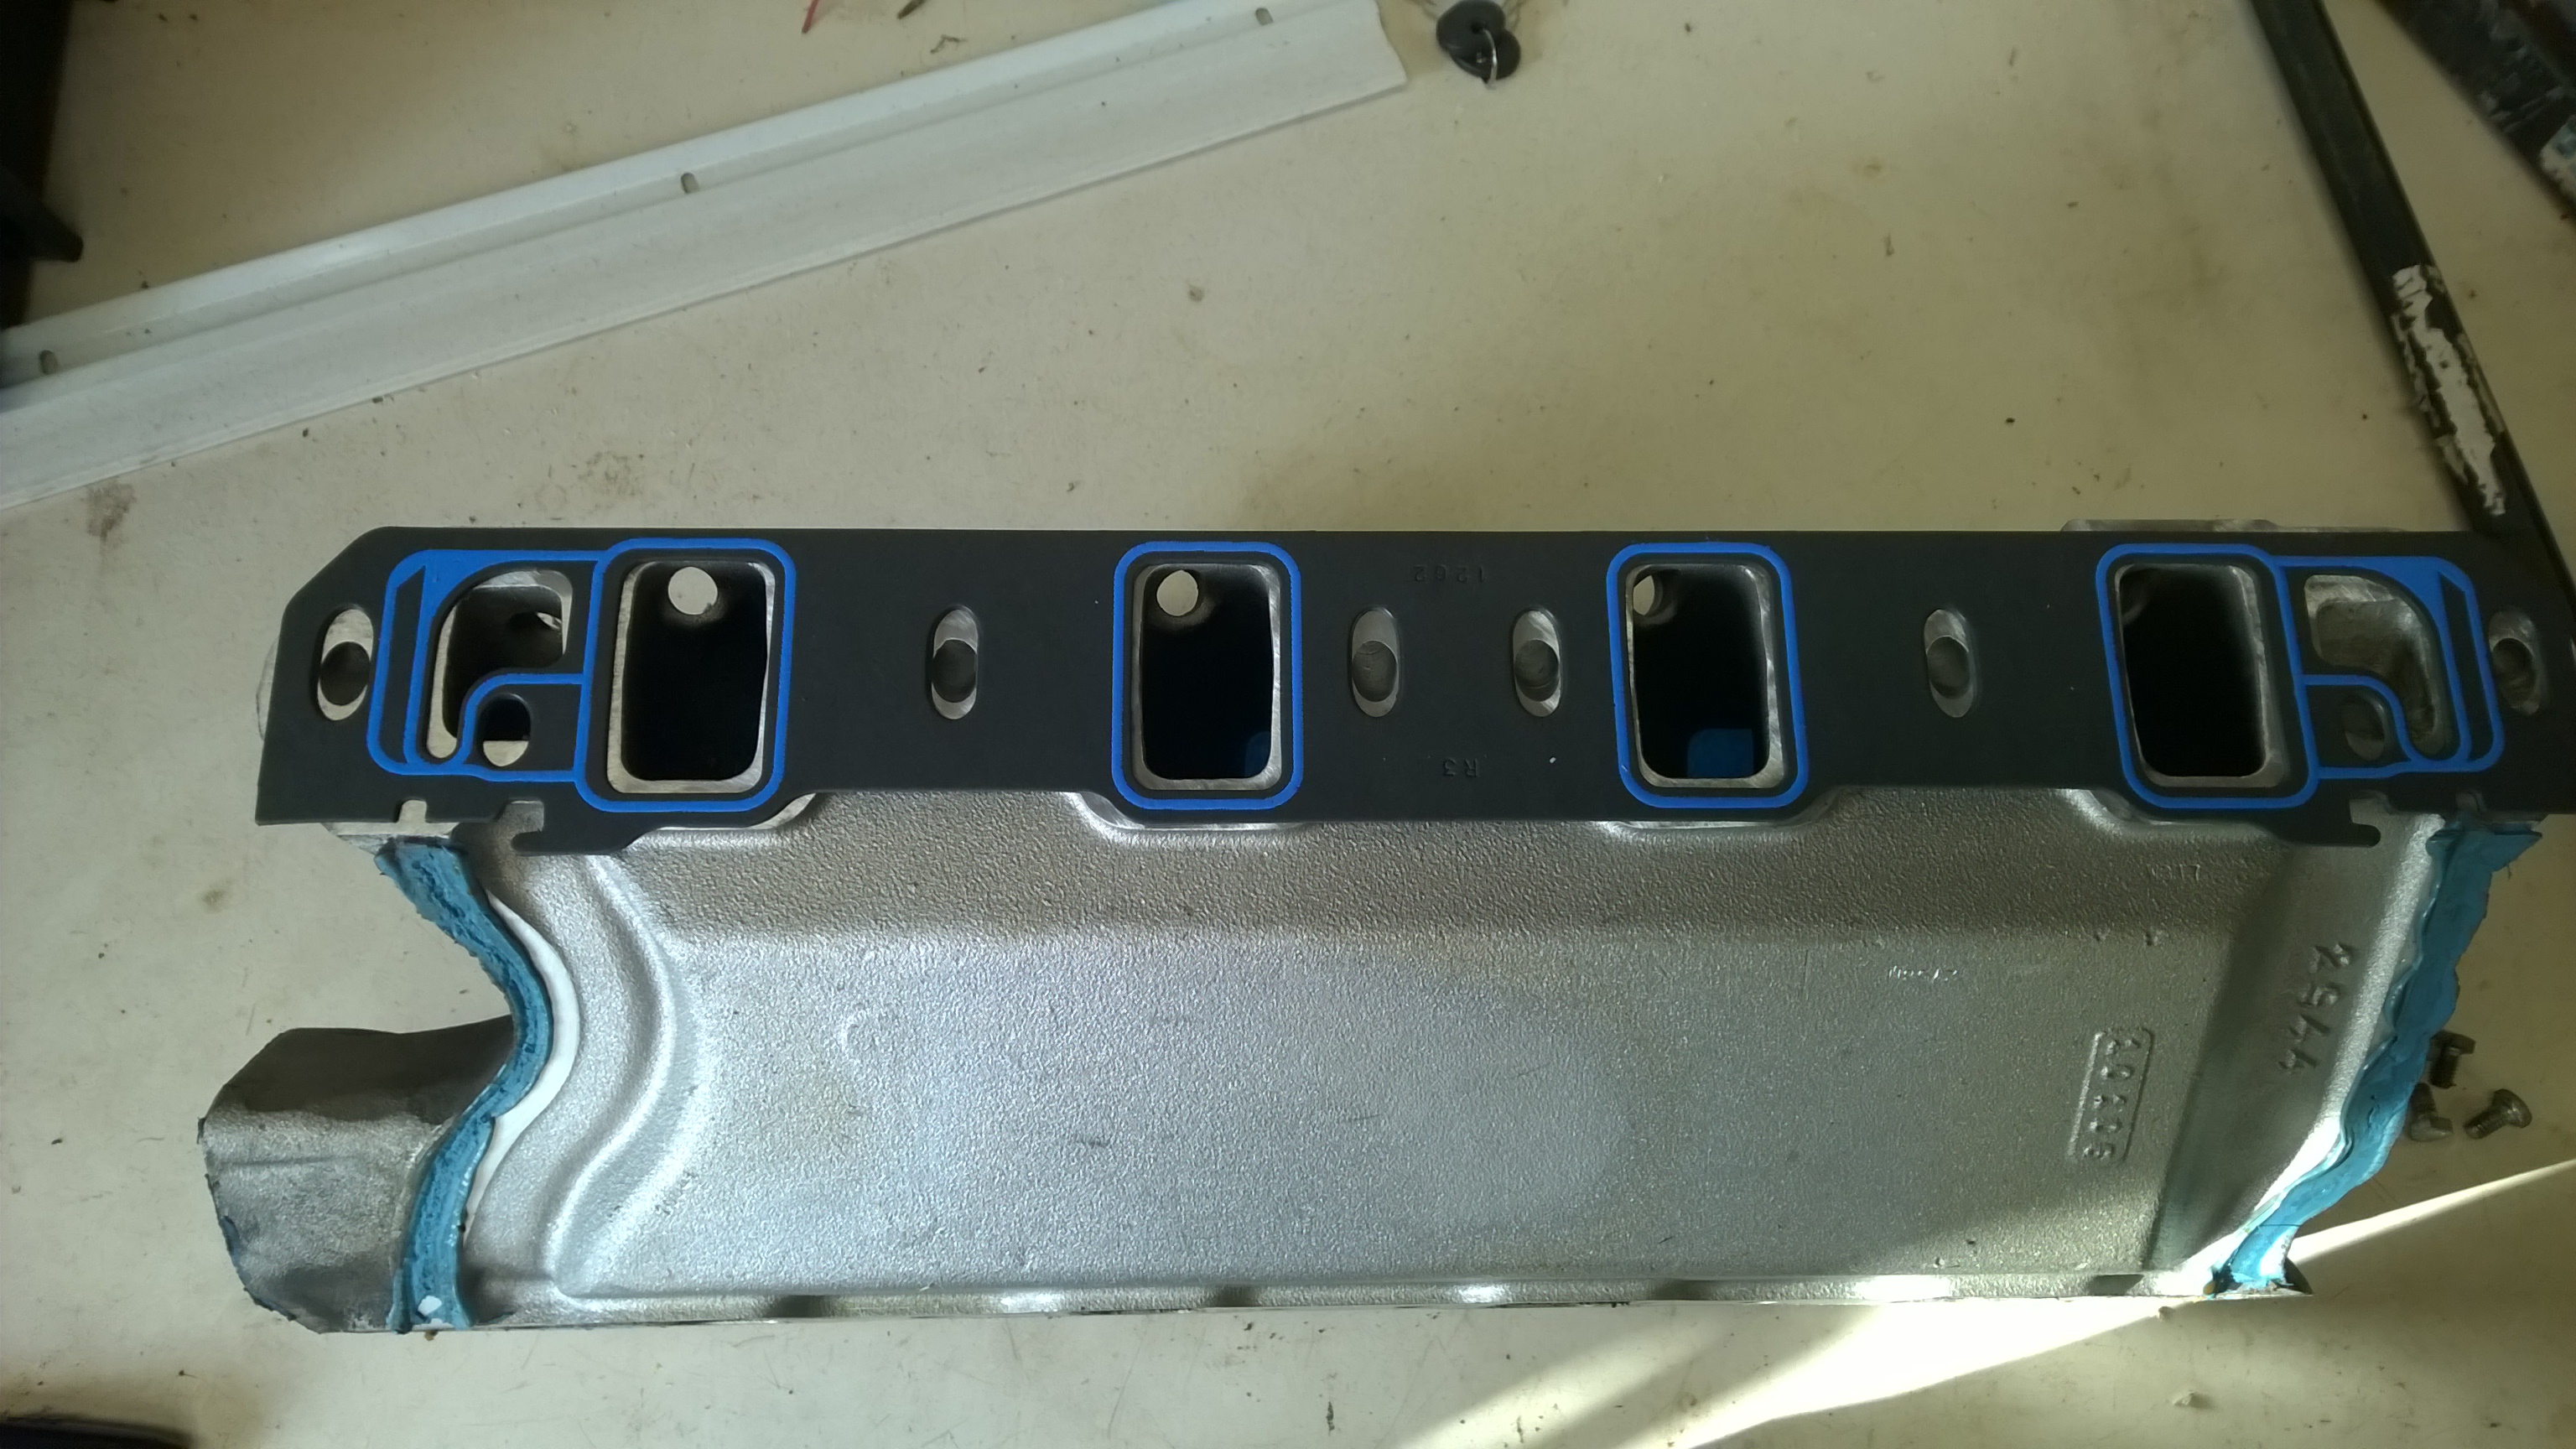
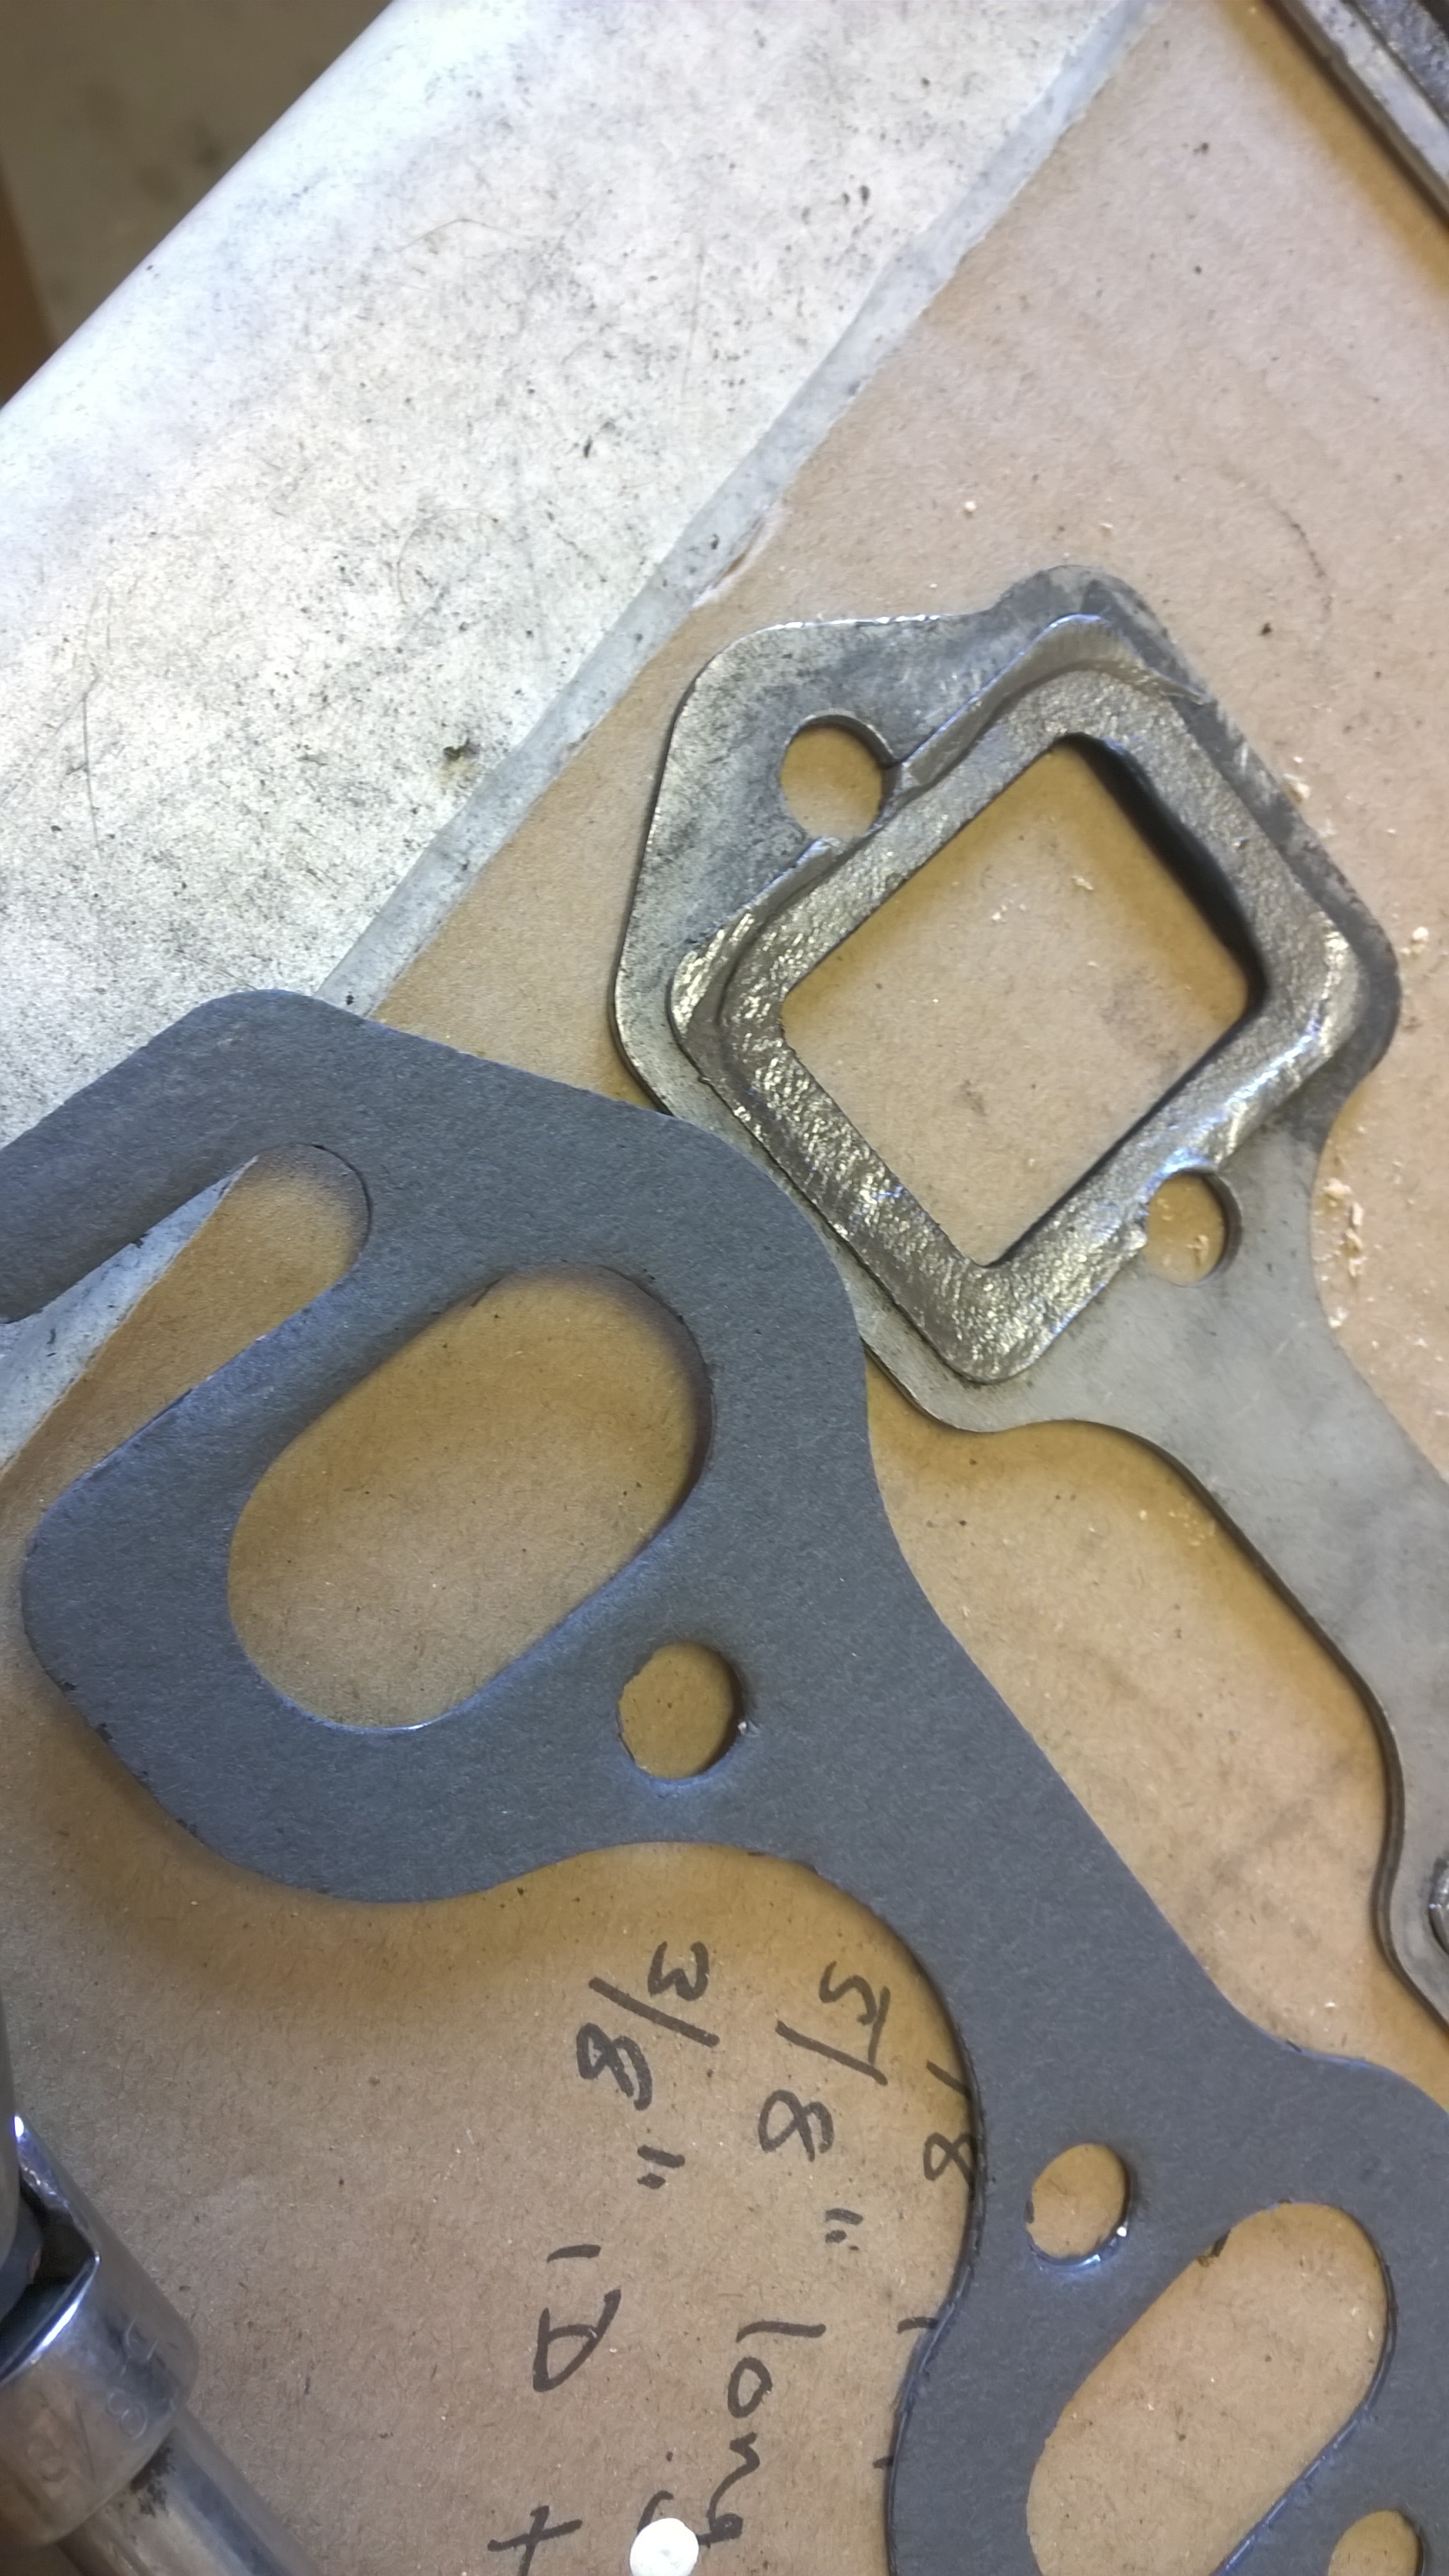
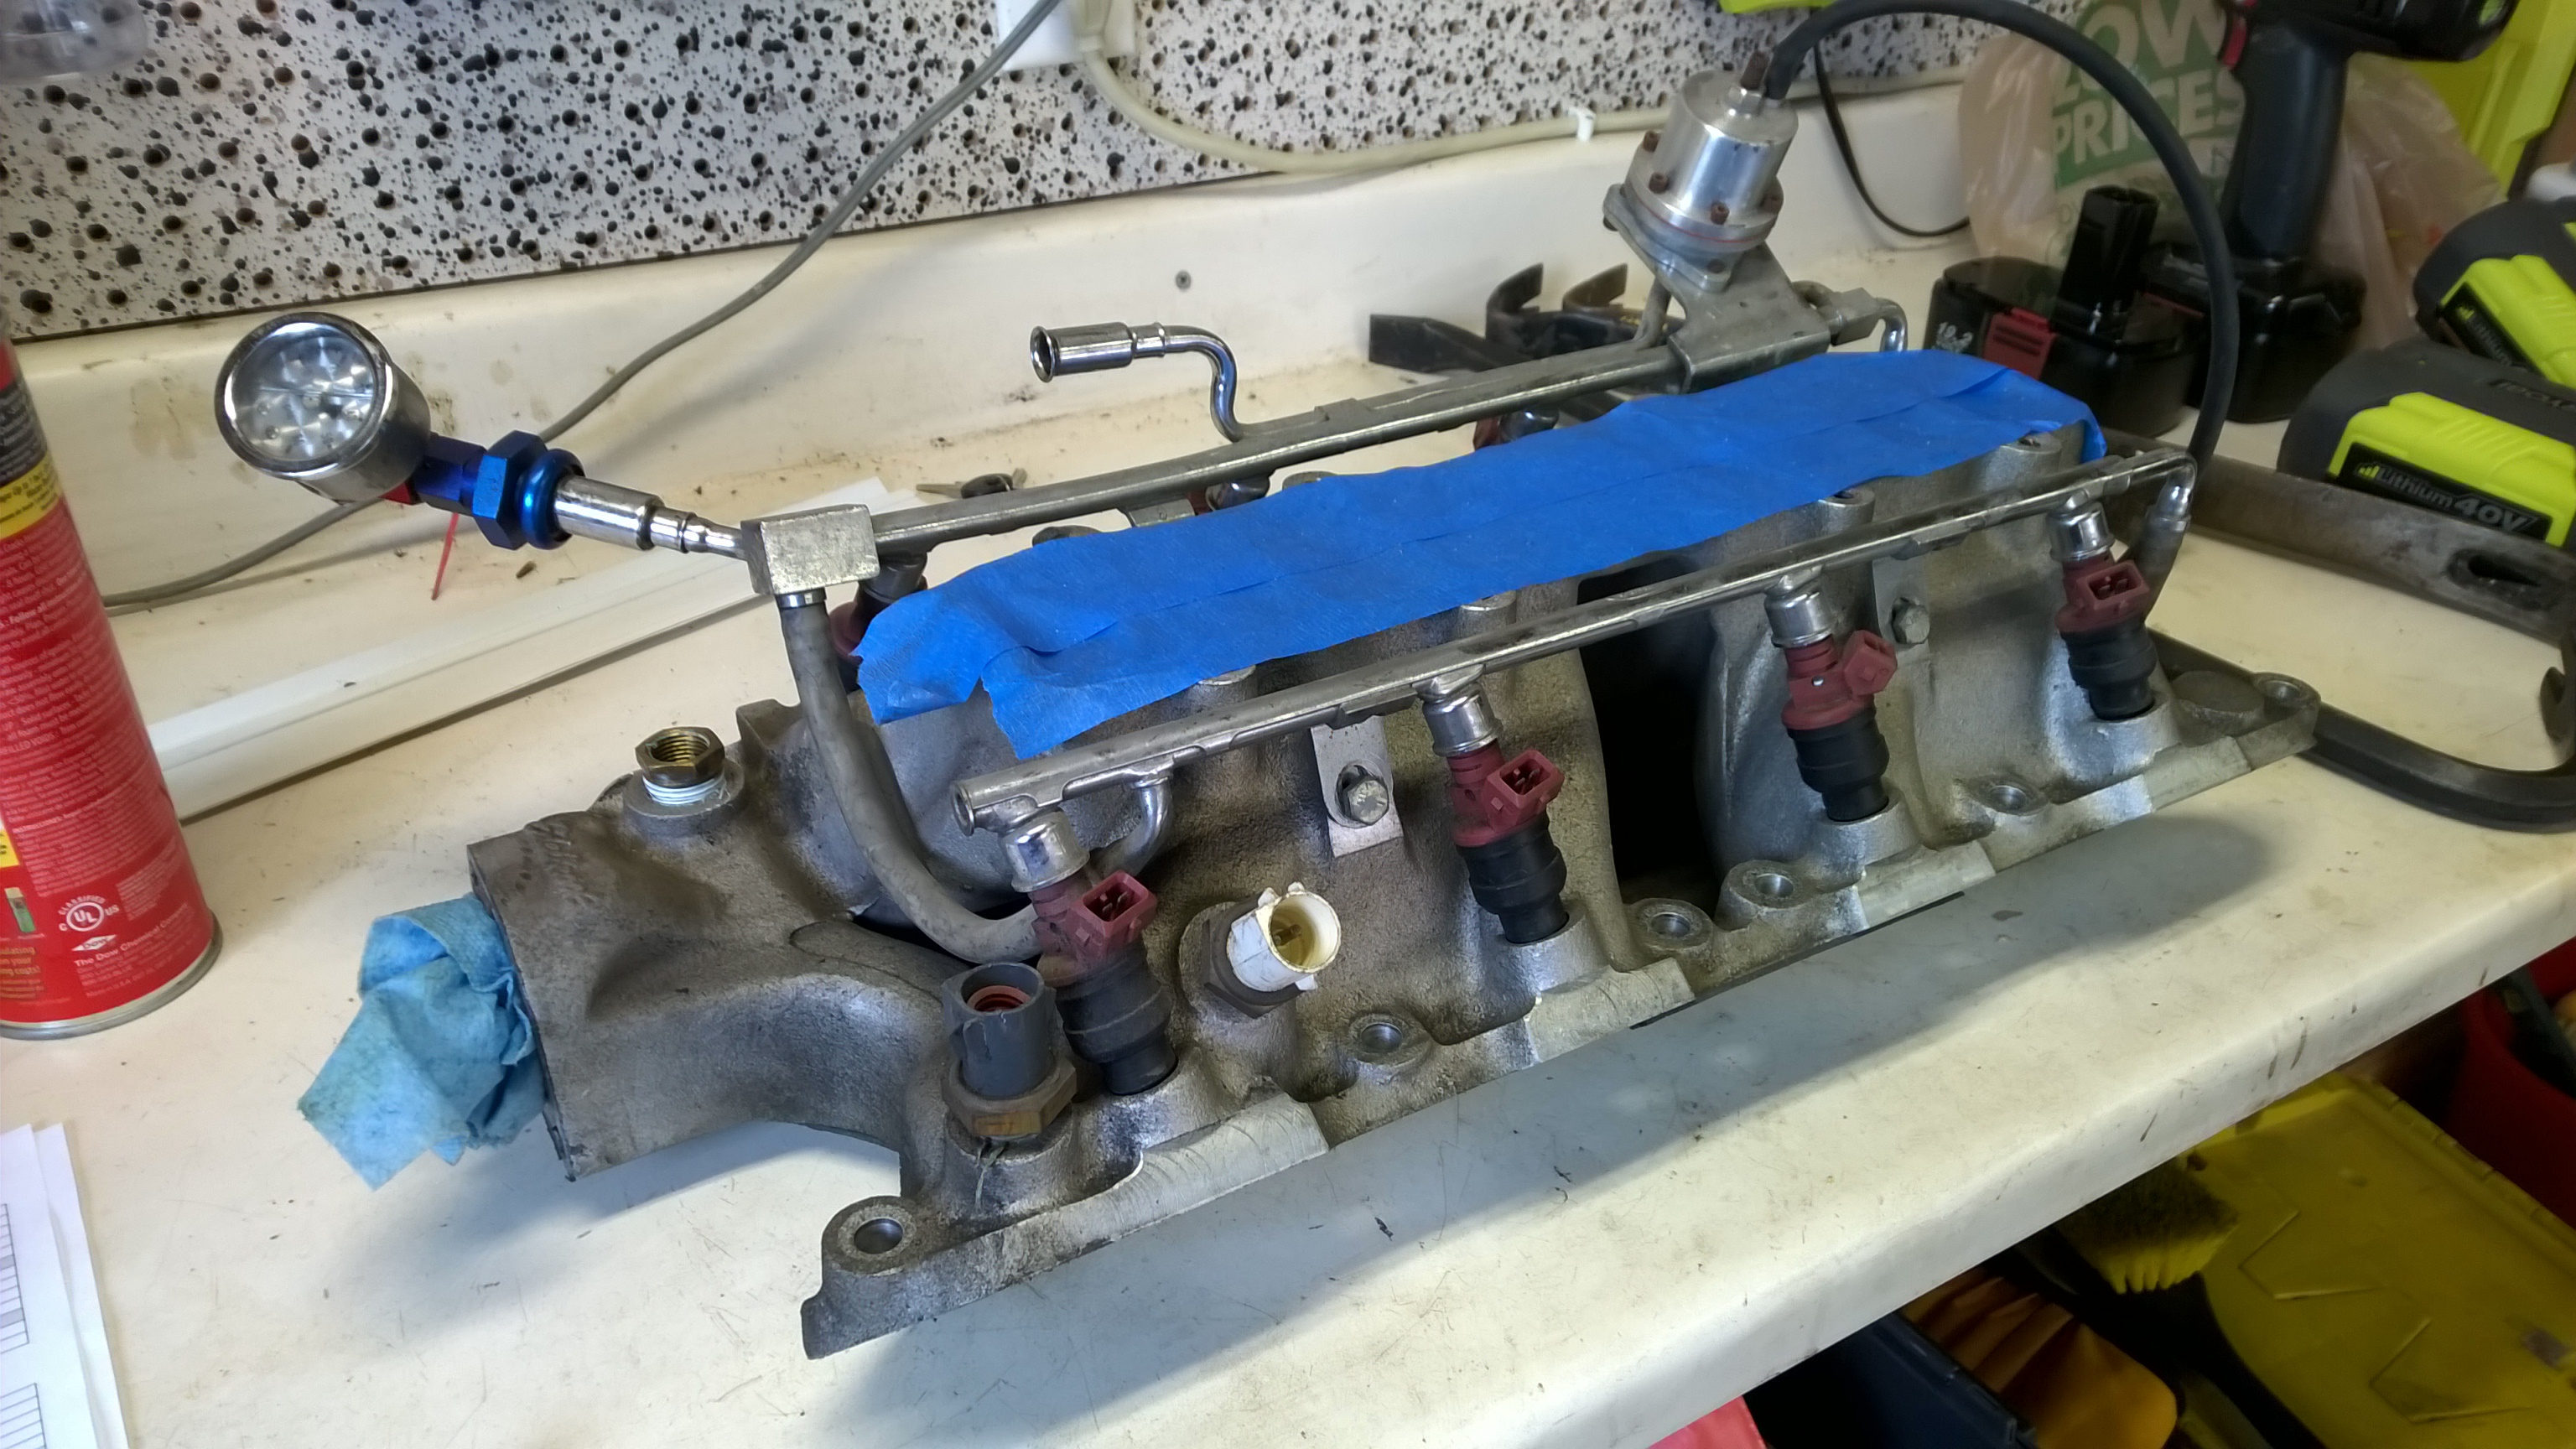
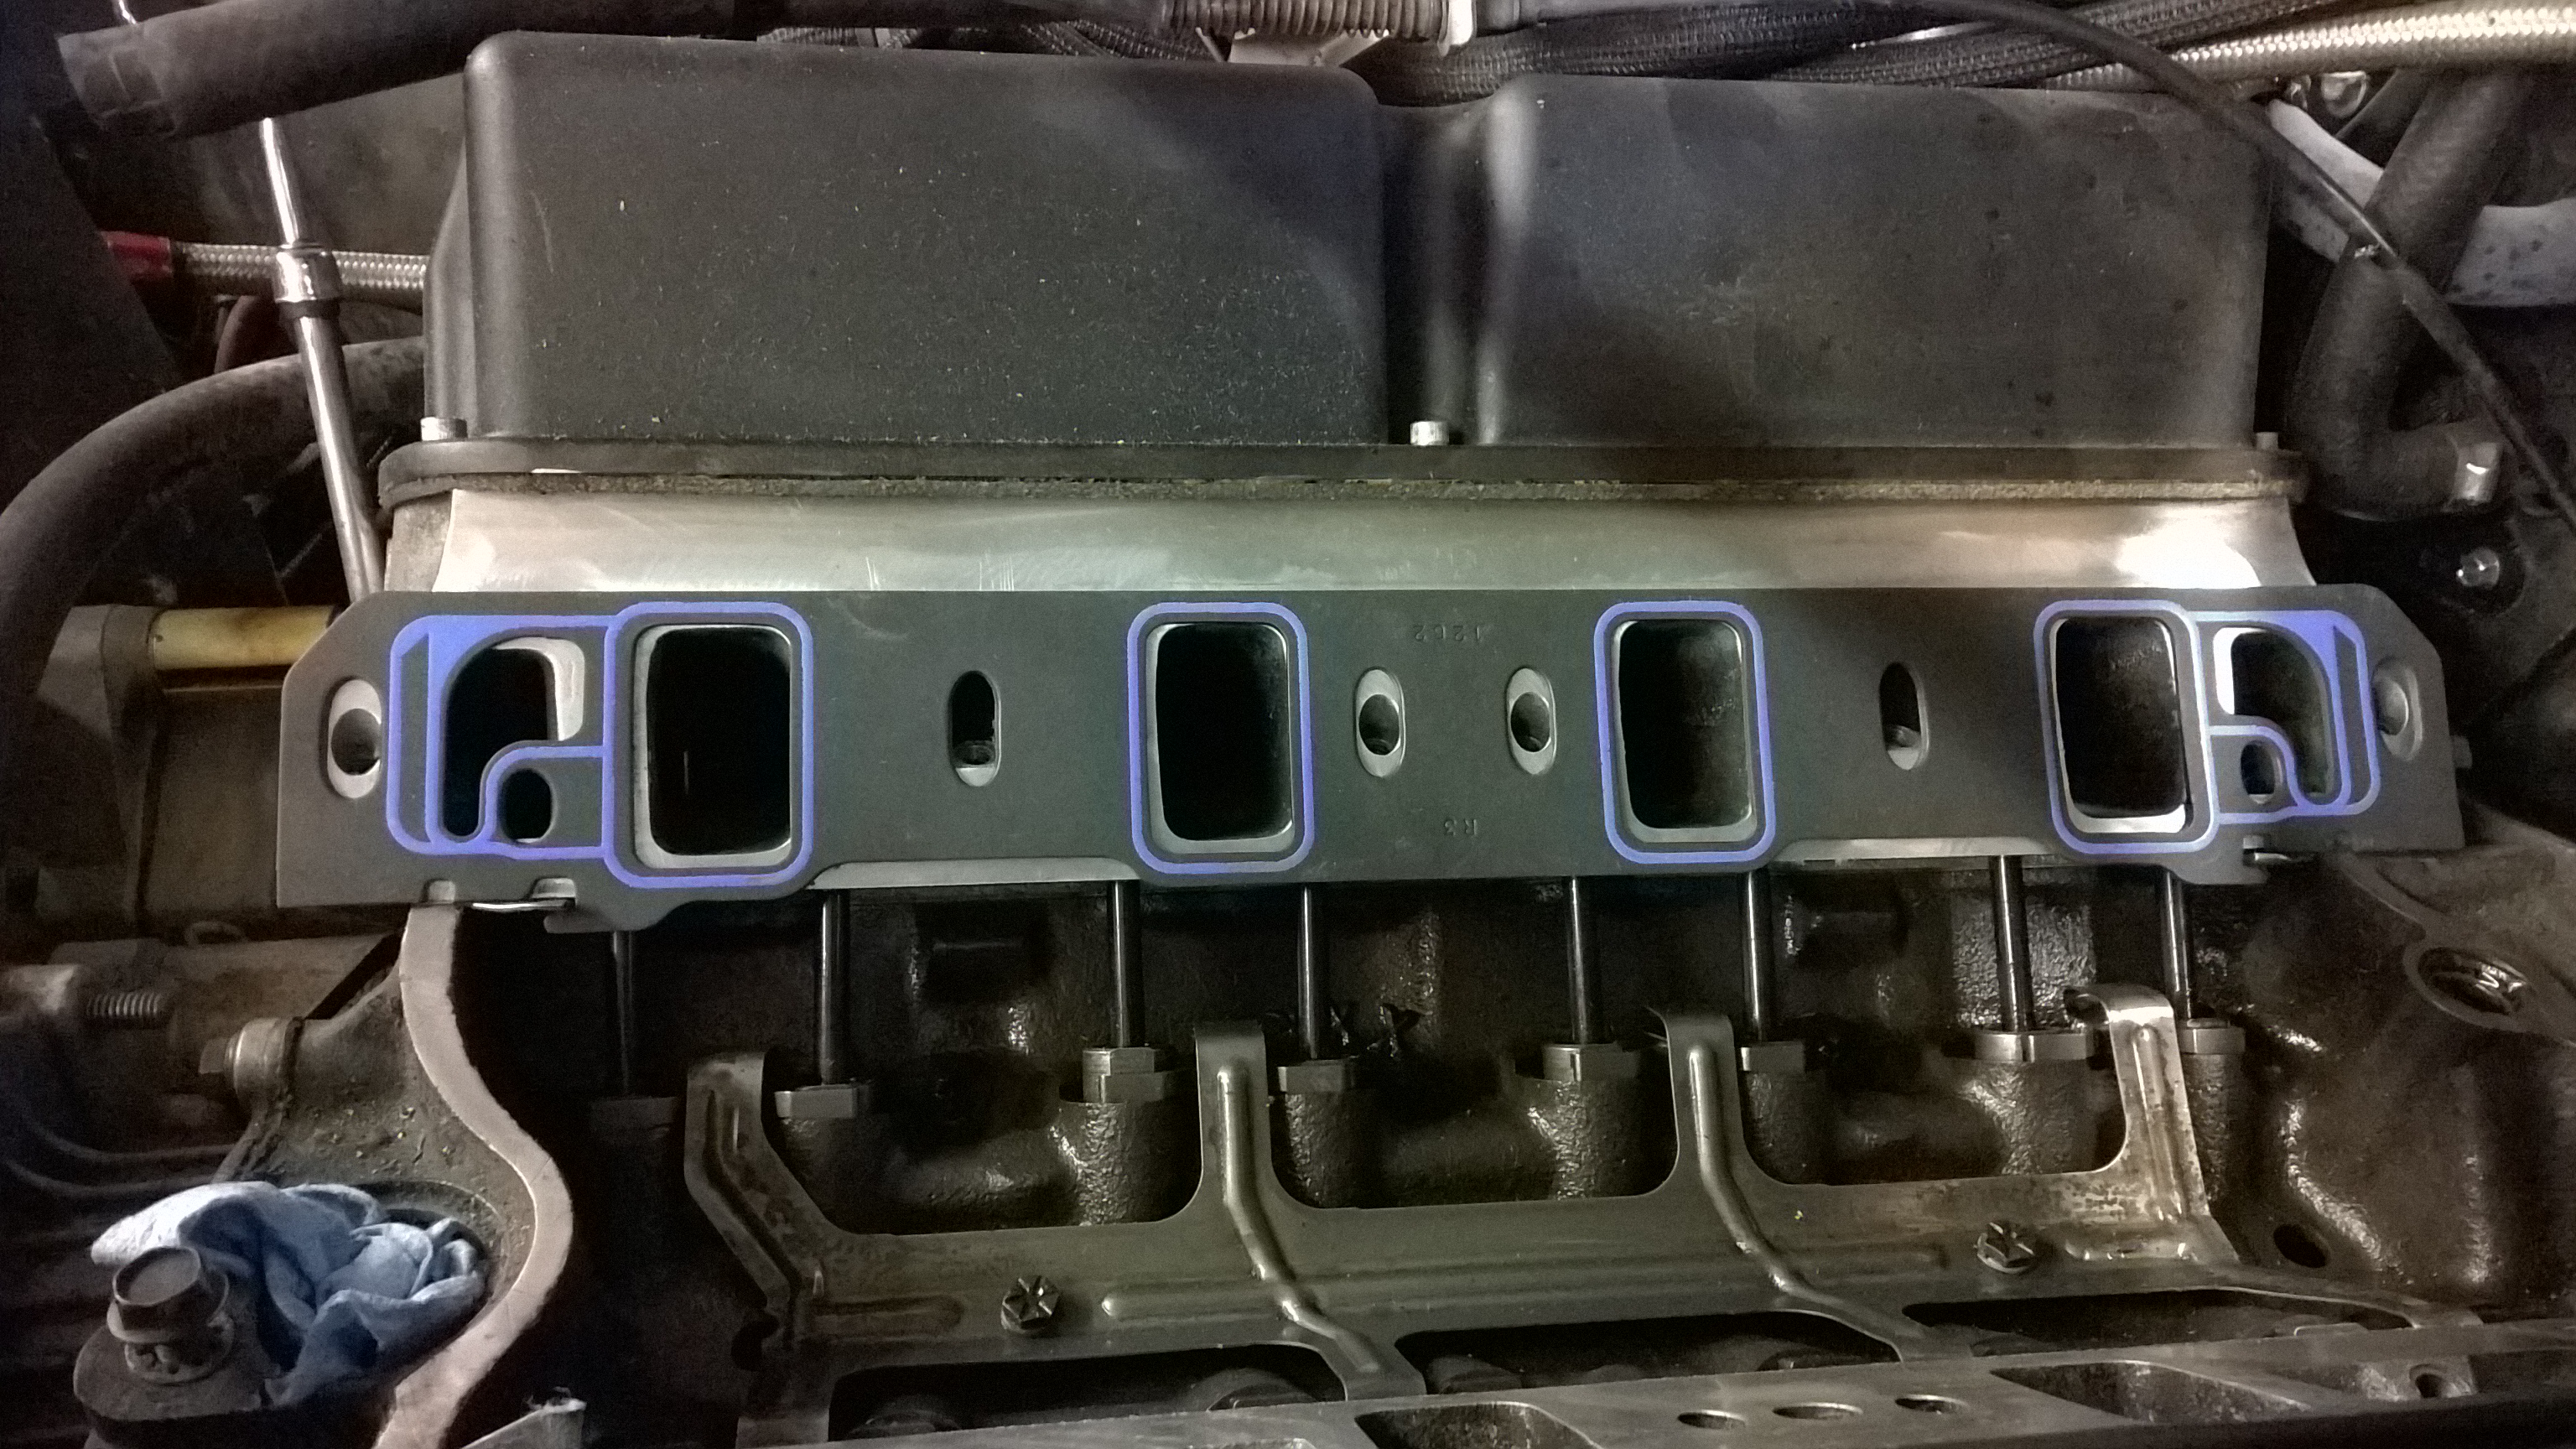
While I had the manifold out, I figured I’d give port-matching a shot. As you can see, there is some room for optimization to gasket-match the intake to the gasket.
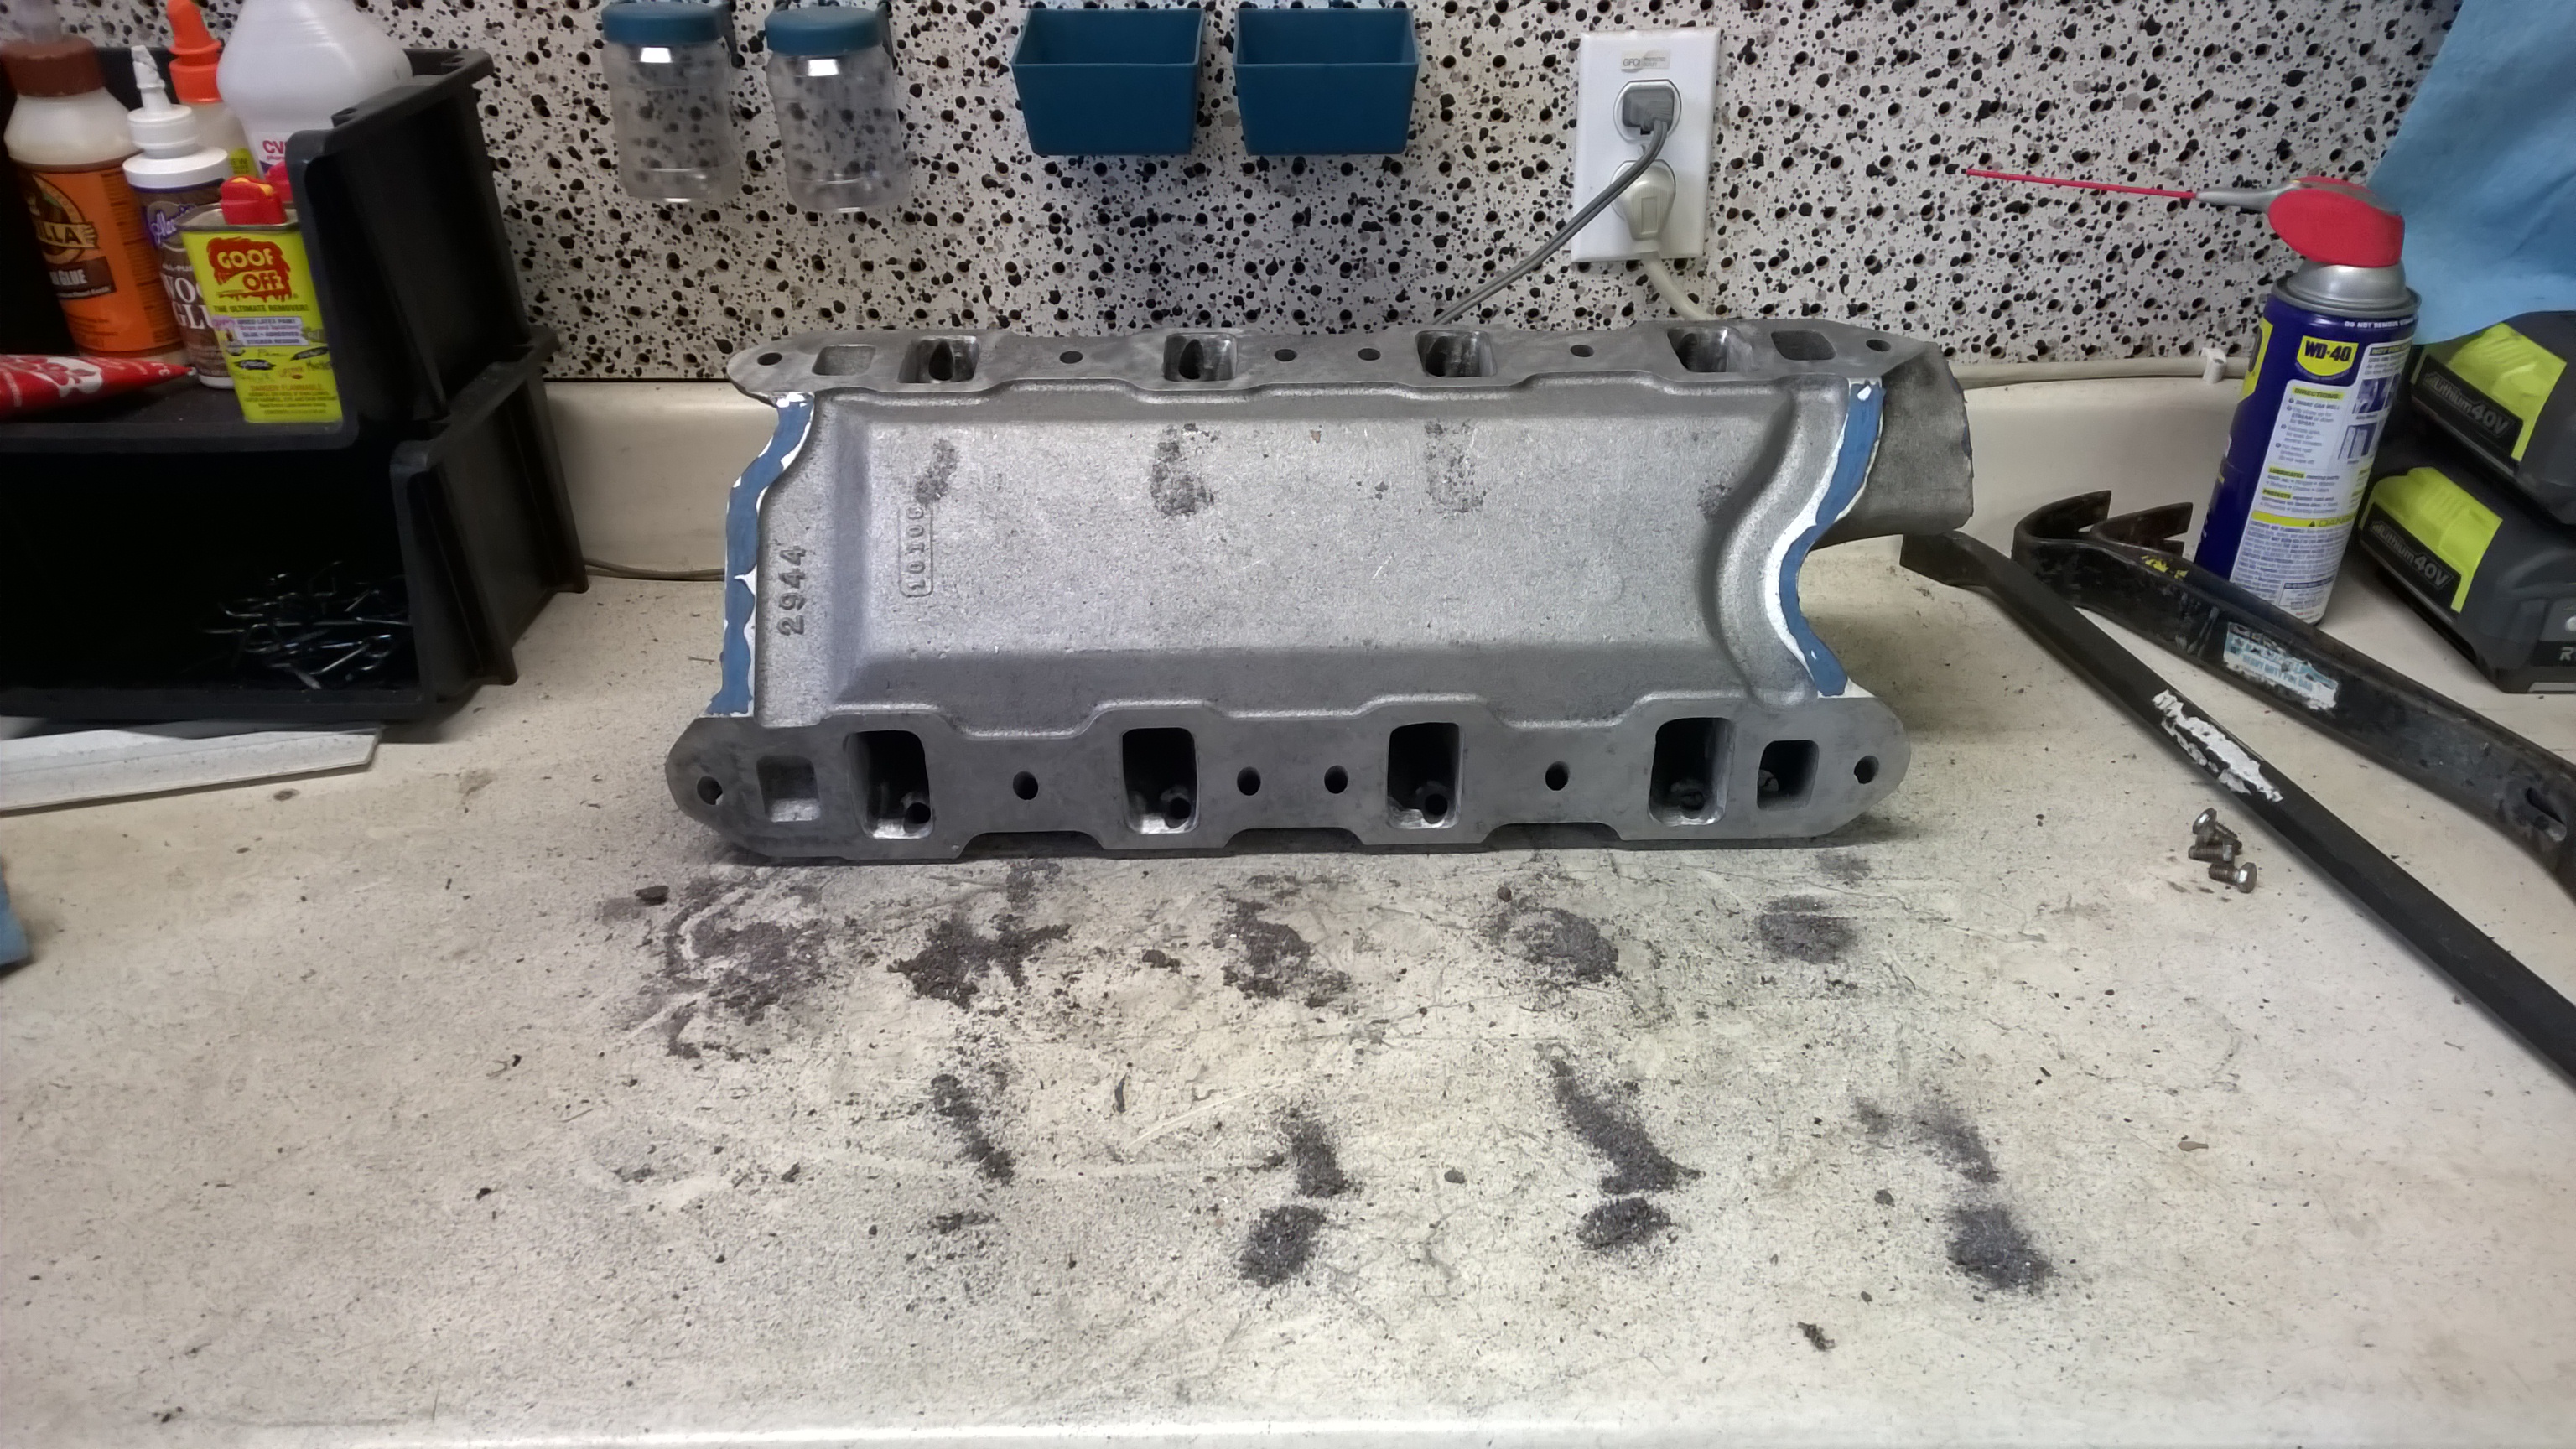
Using an abrasive kit and a lot of patience, I worked each of the ports in the manifold.
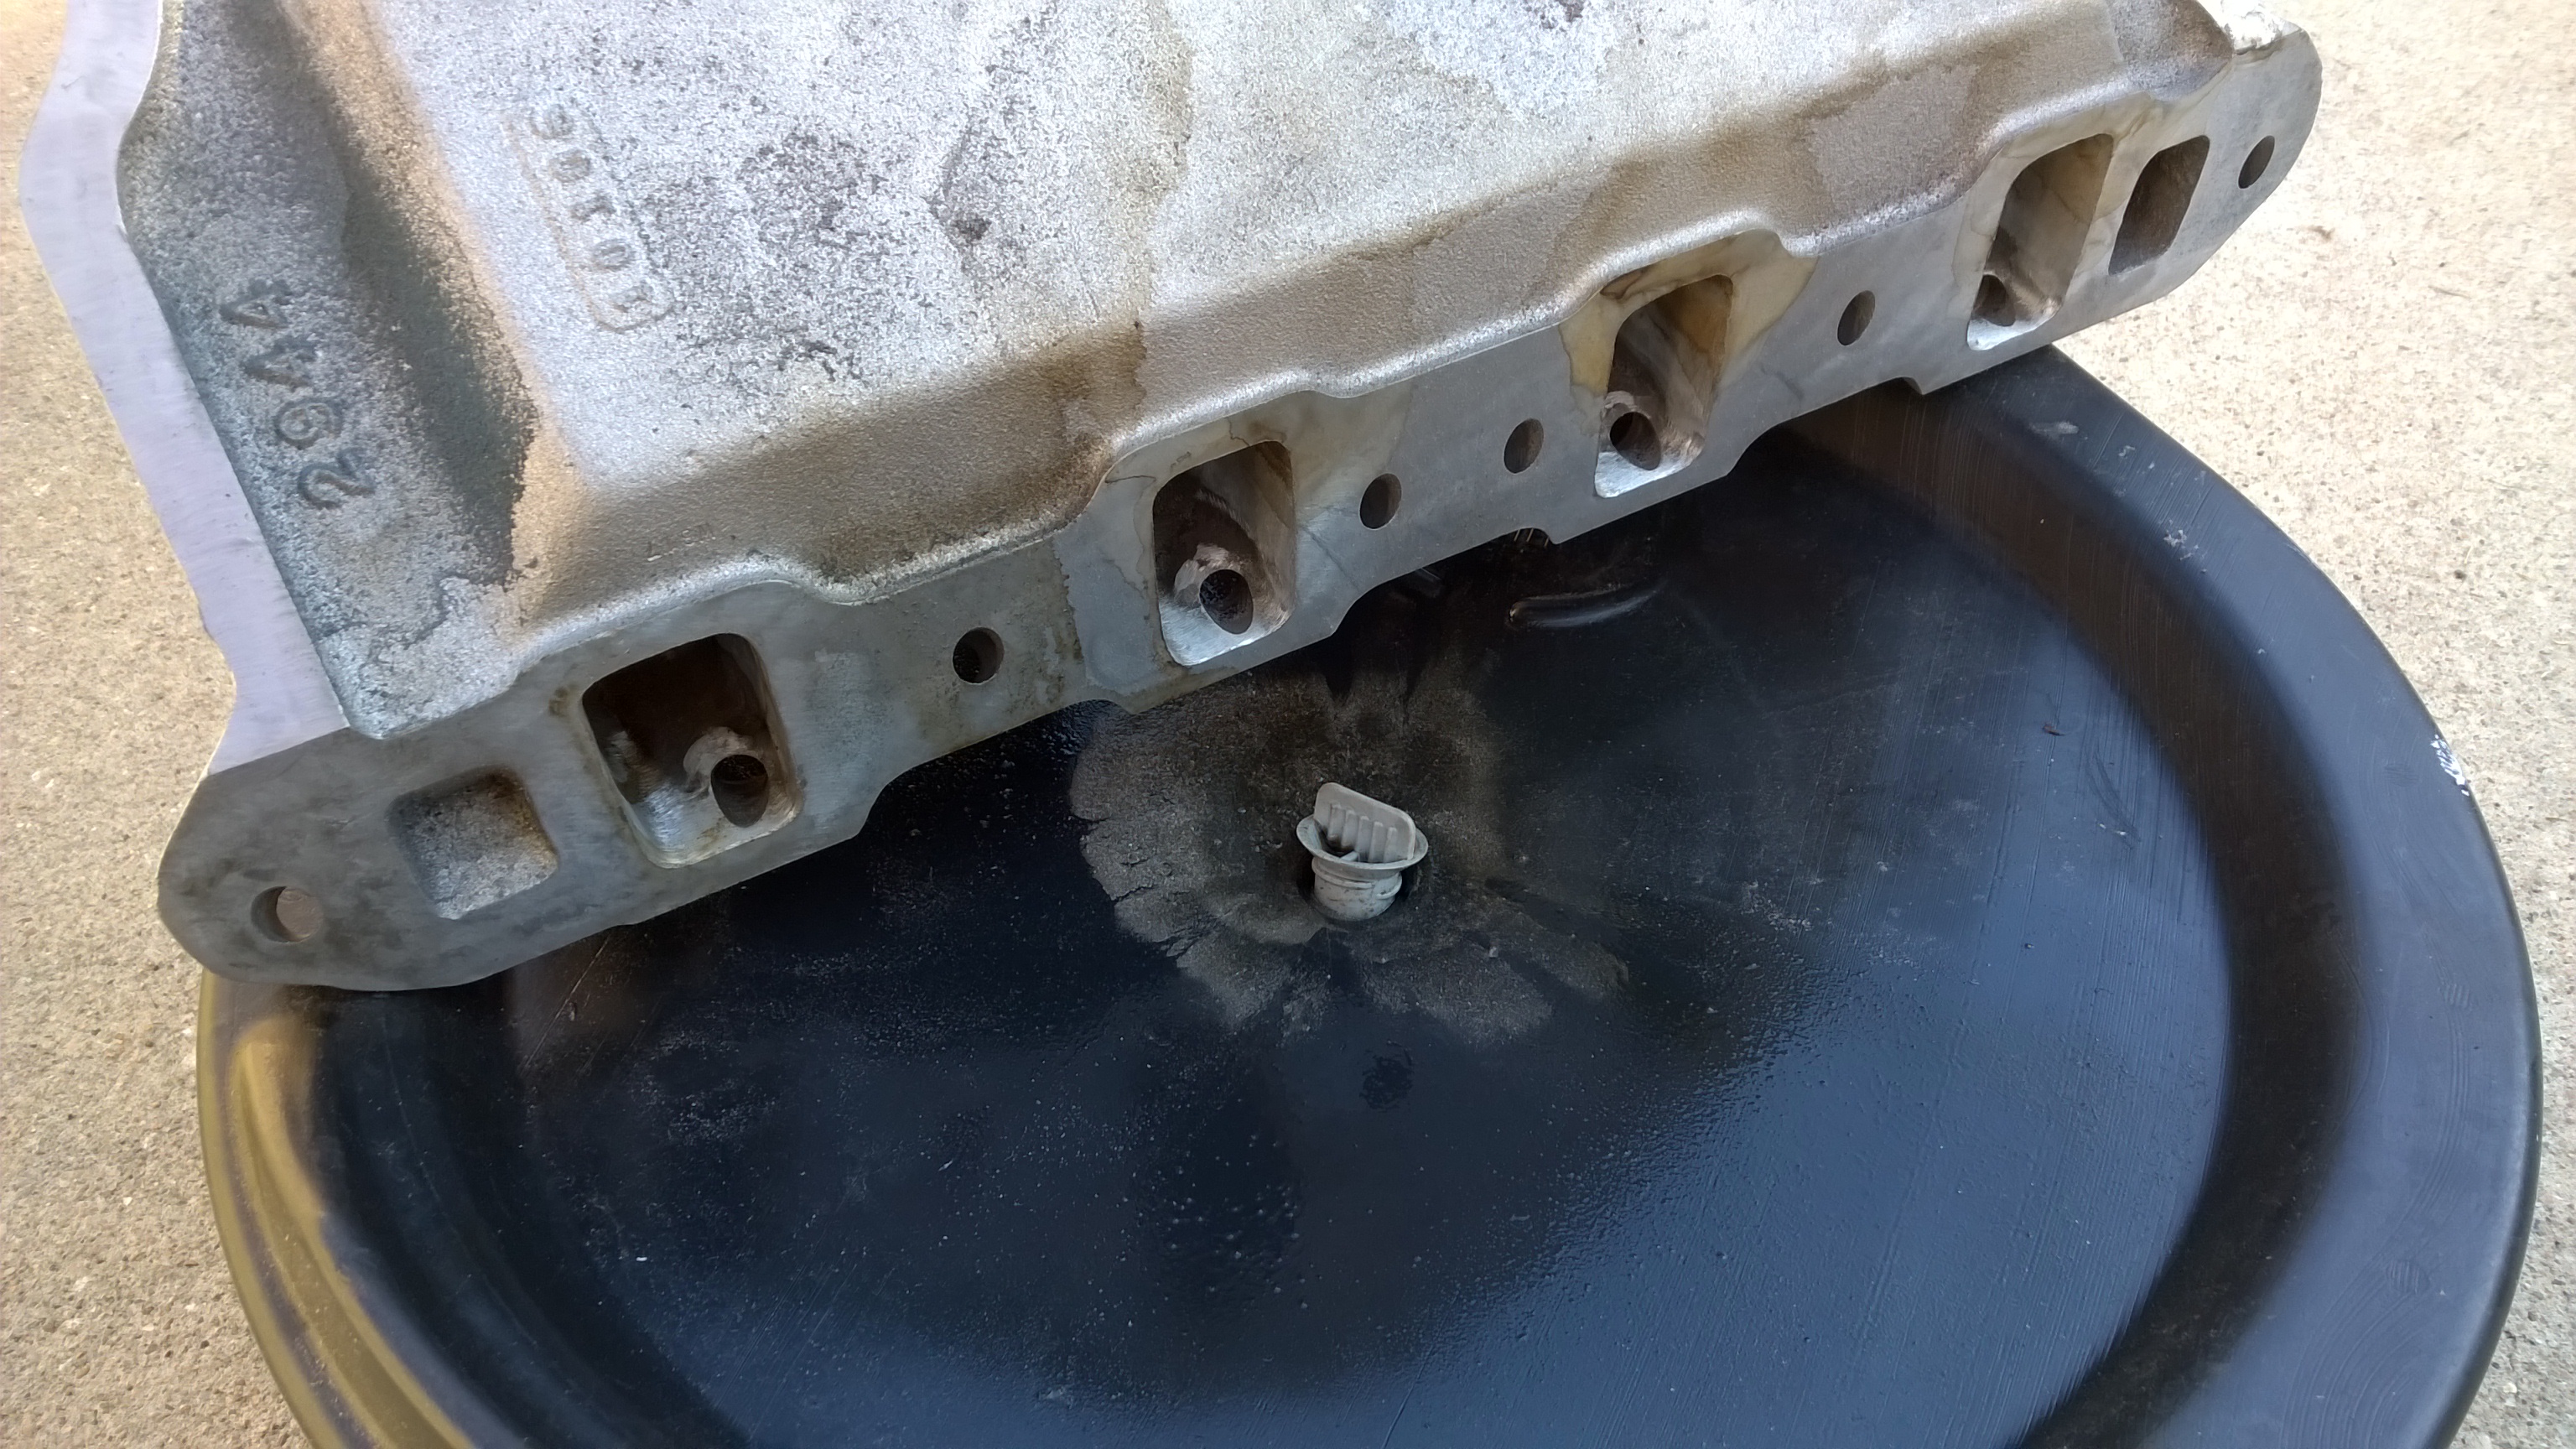
You end up going through a few different levels of abrasive before you get to the final product. I wouldn’t say the ports ended up like a pro would, but I’m pretty happy with the result for a first time effort.
The heads will have to wait for a later date! At the same time as this was going on, my wife and I were waiting on the birth of our child. After Aly entered the world, things slowed down a bit as you might imagine! In between feedings and playing with Aly, I was able to sneak out into the garage to tackle smaller projects off an on. One of the projects I’d been meaning to tackle was a revamp of the center console since it never really hit “finished” in my mind.
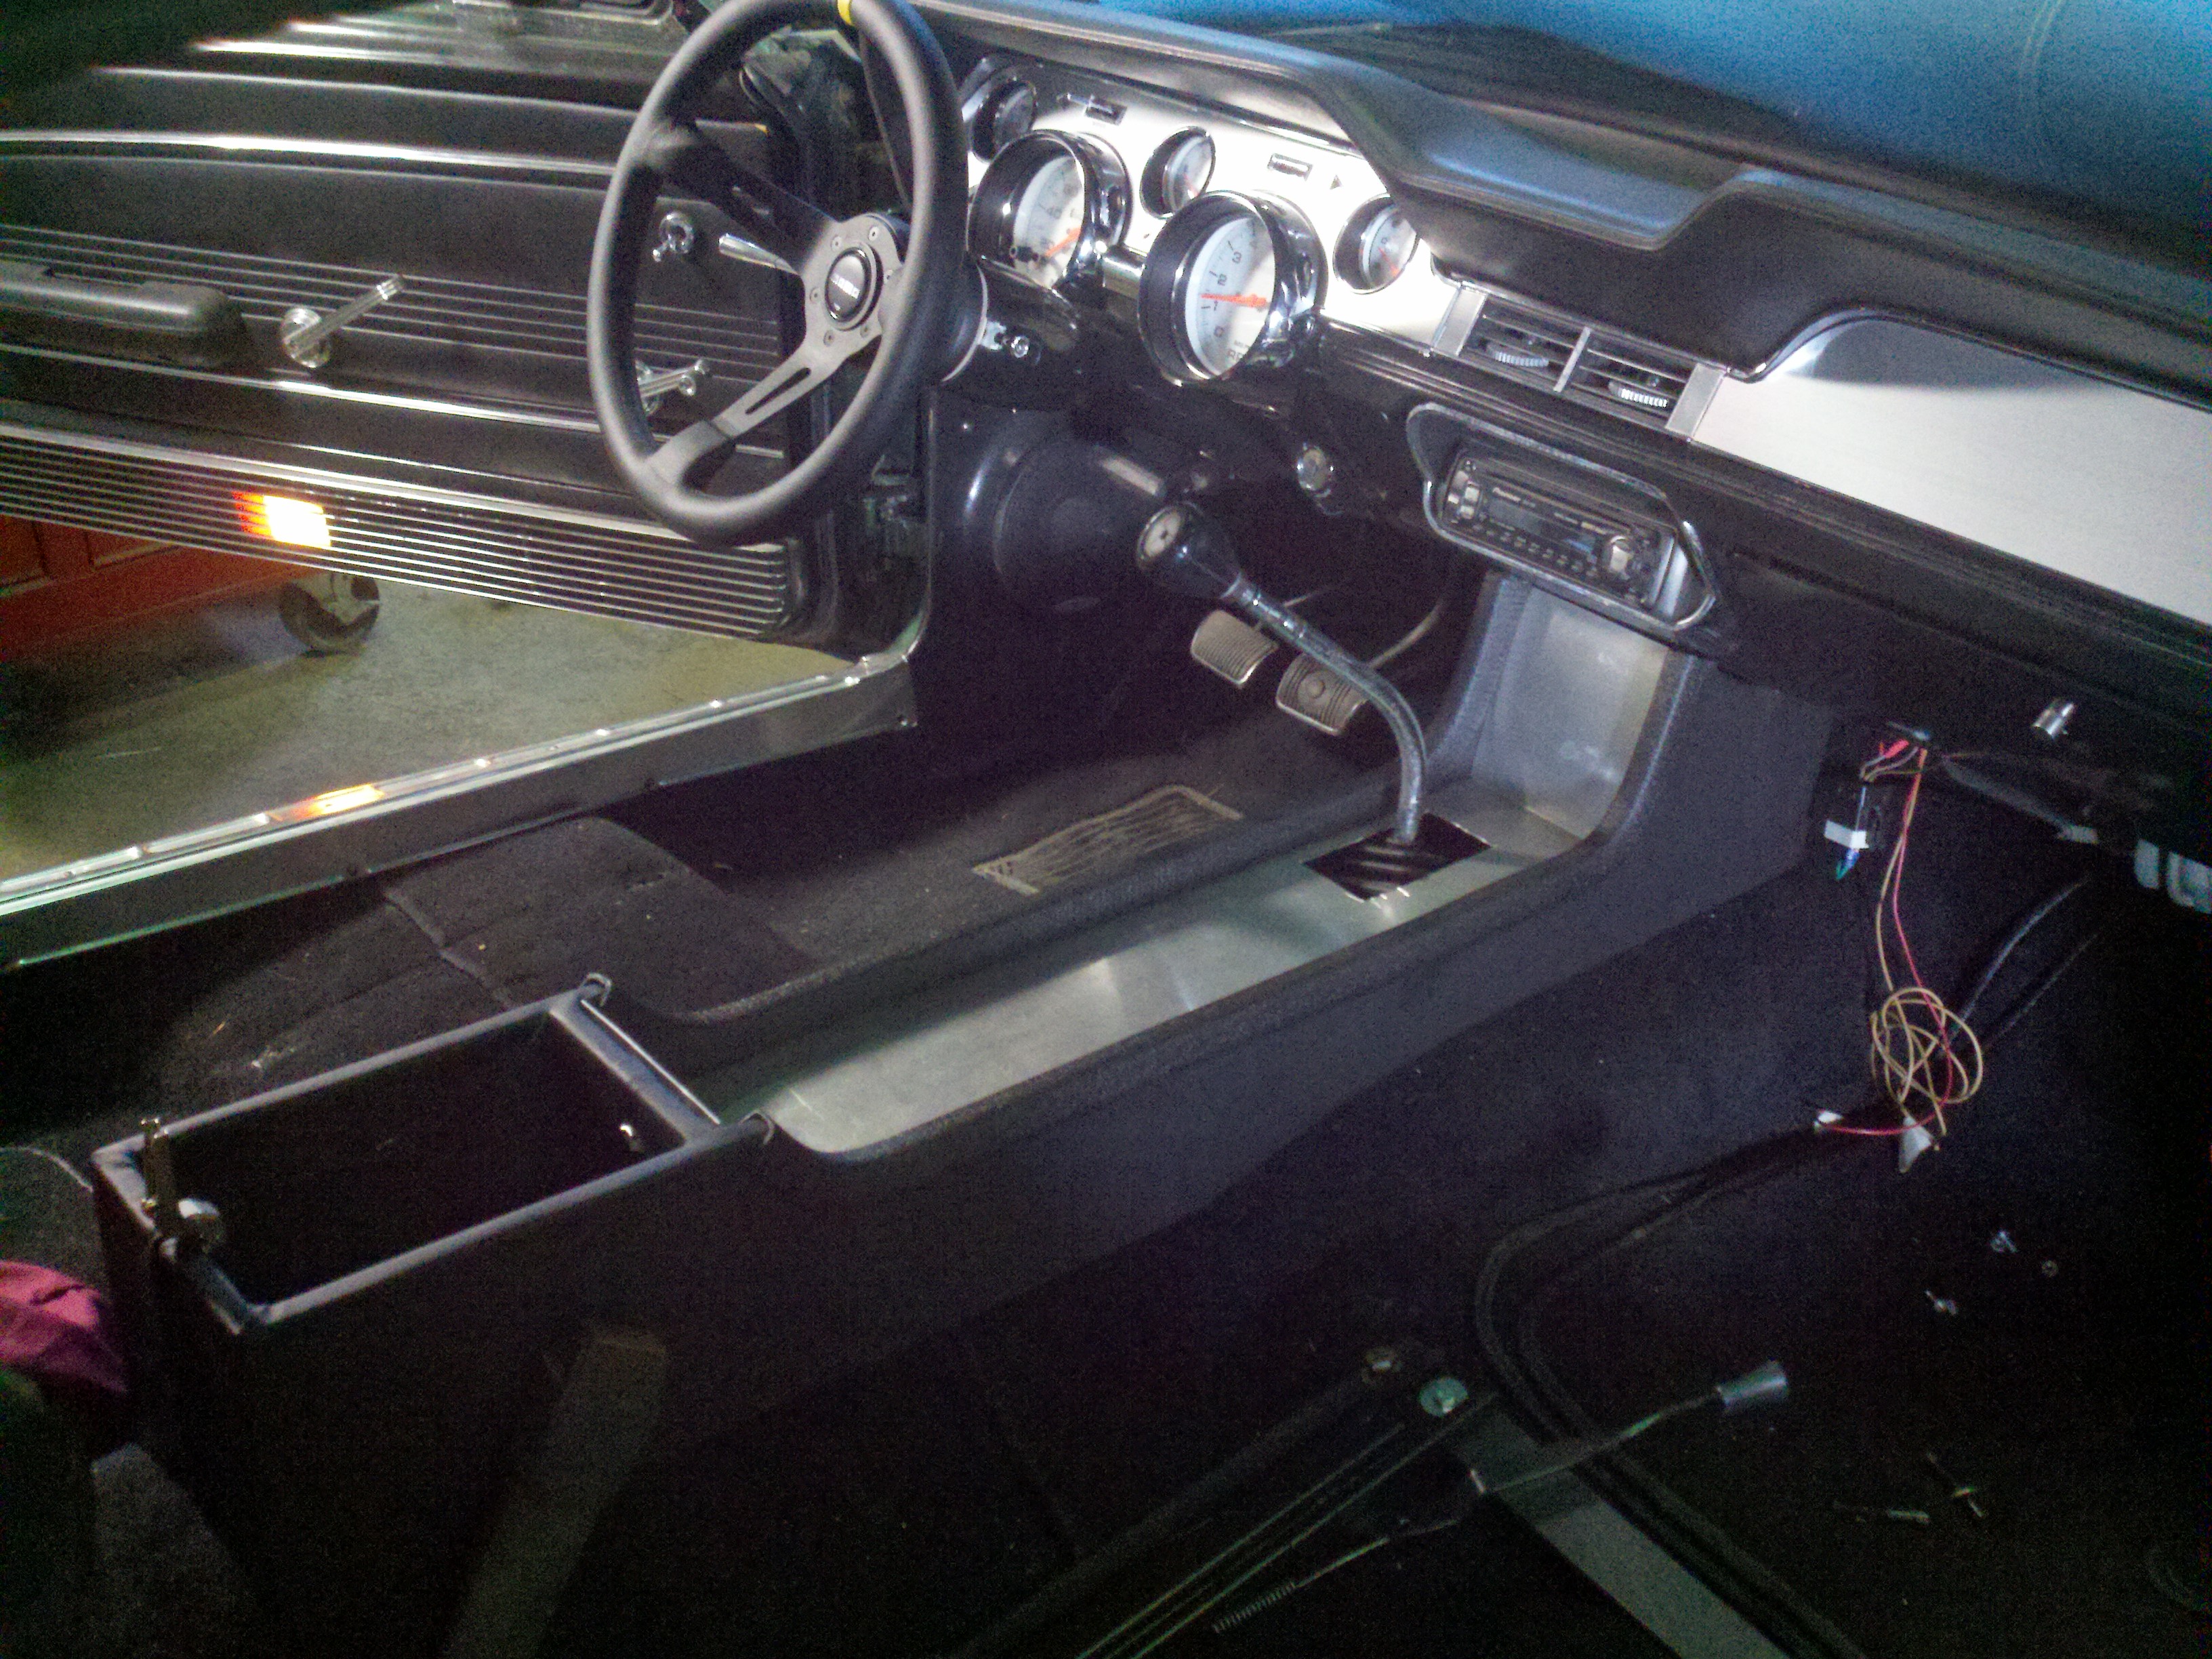
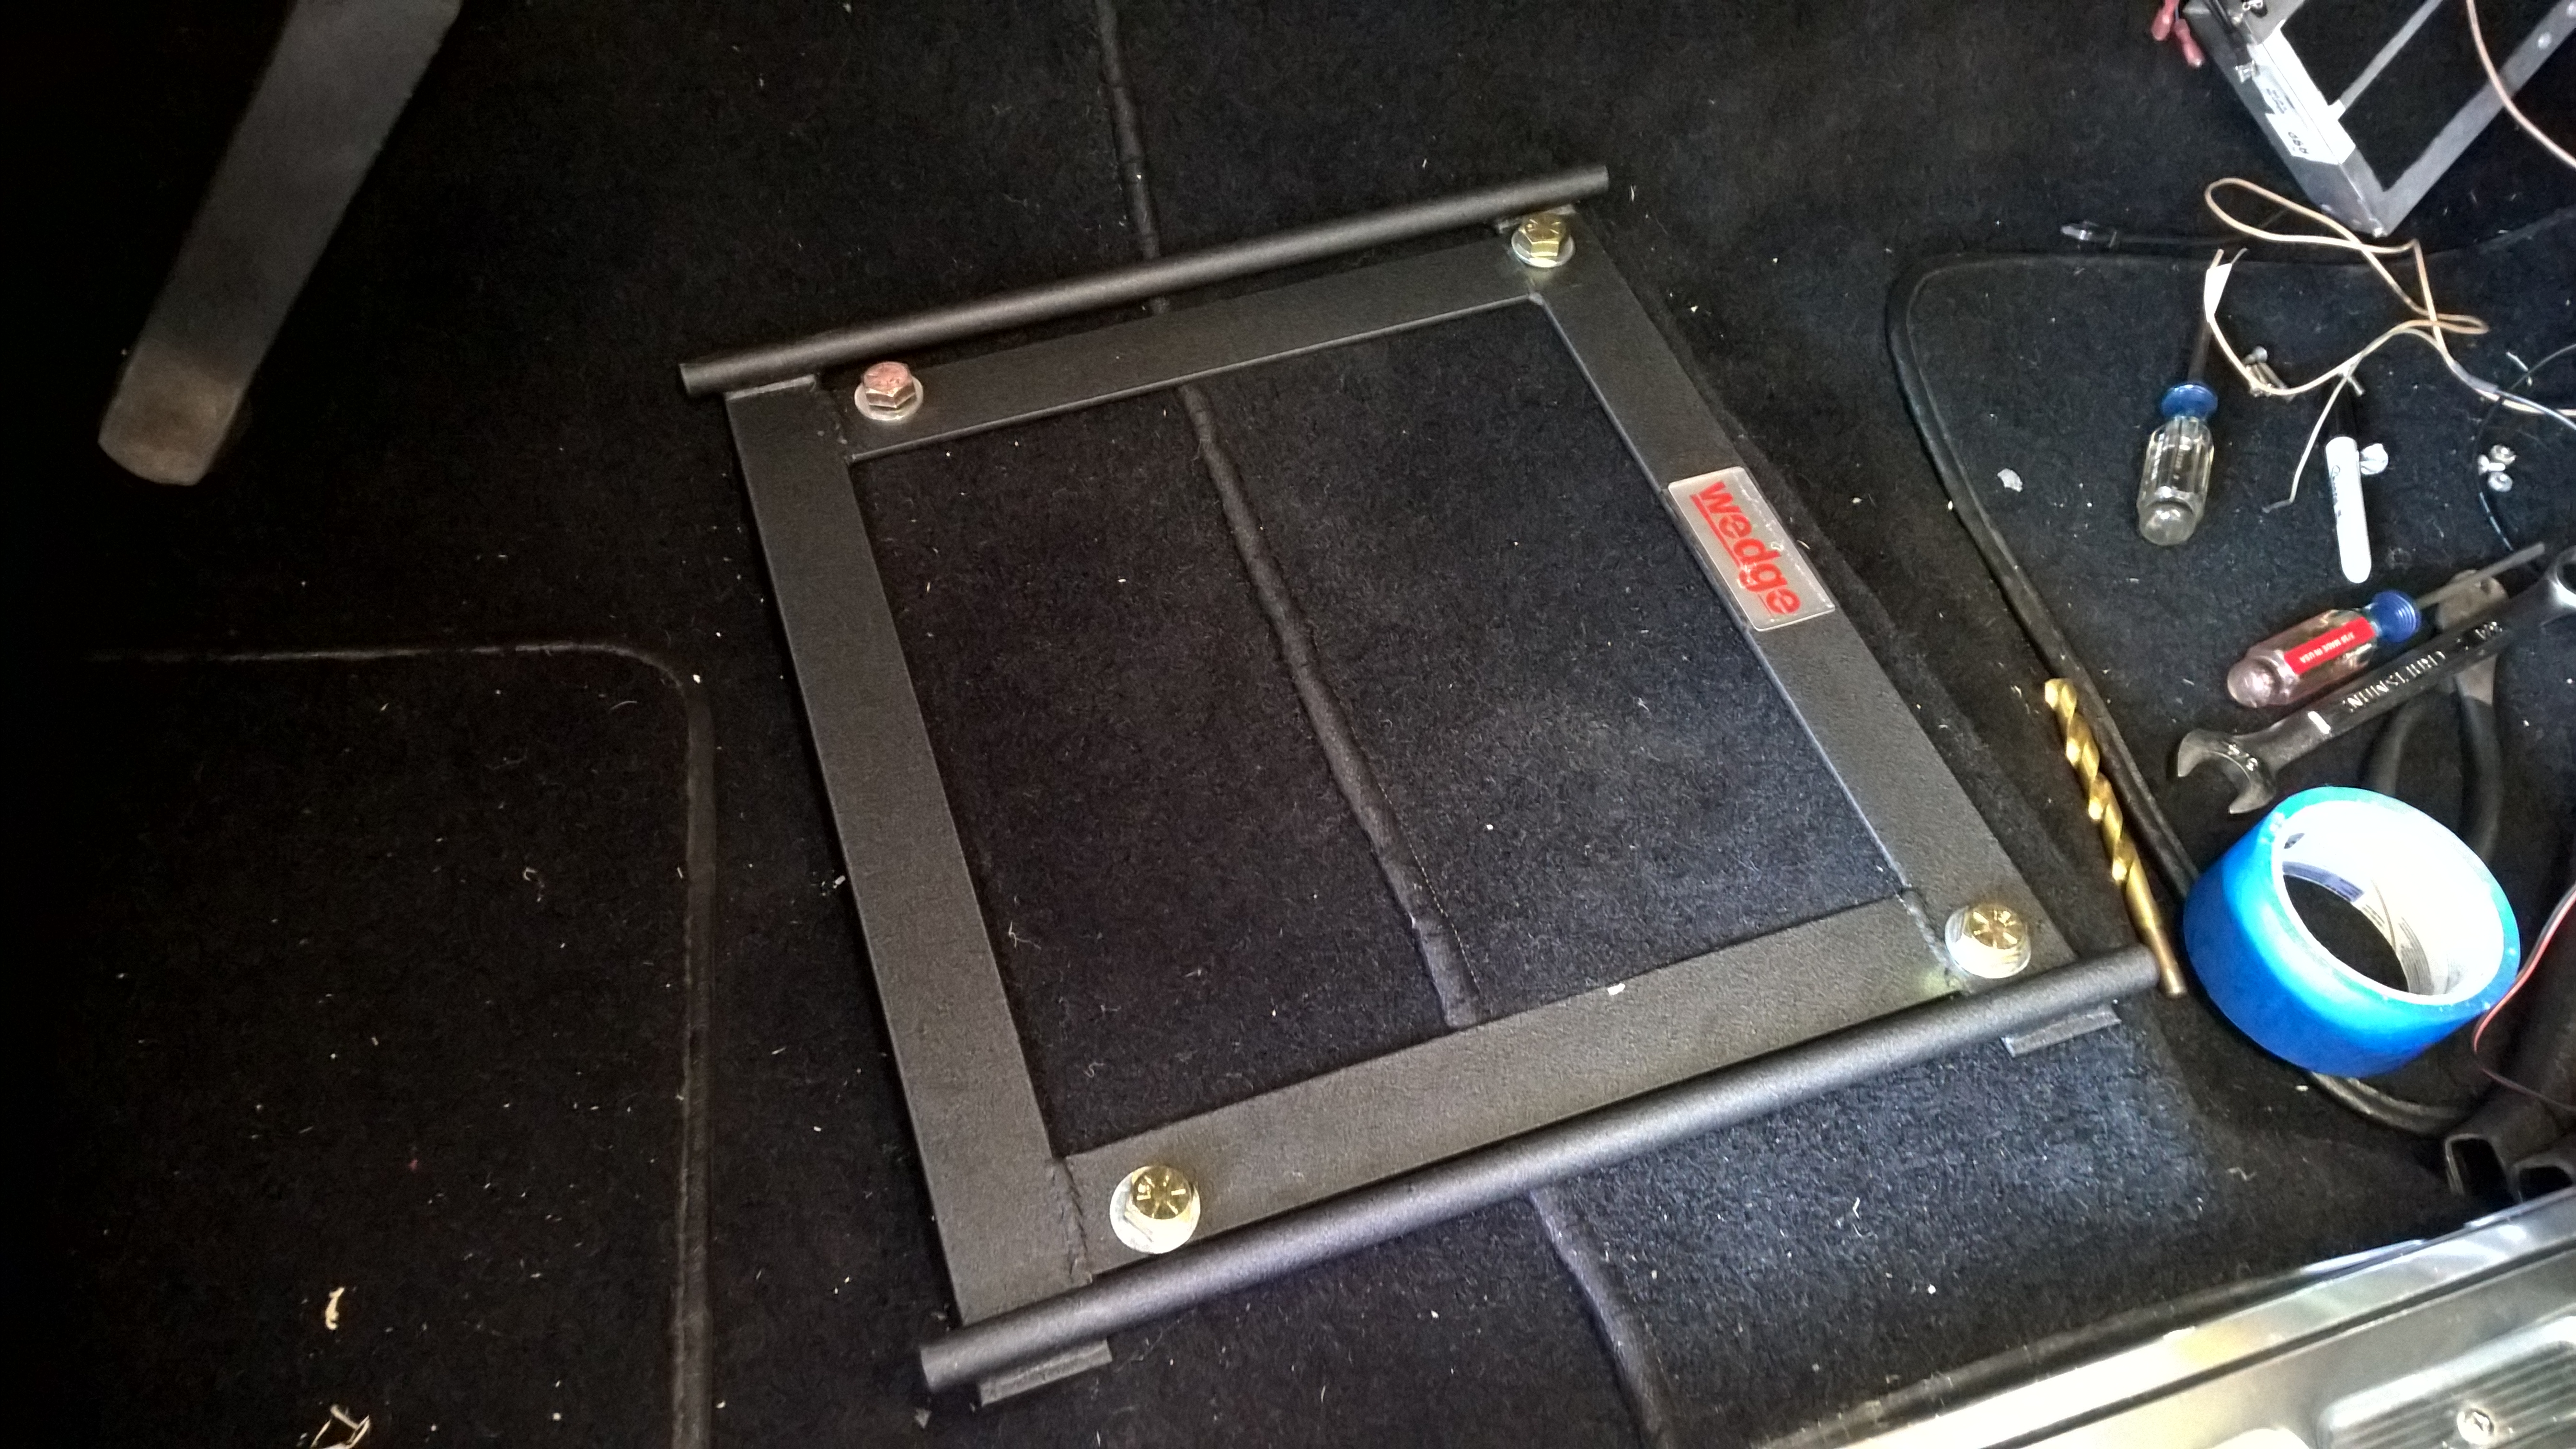
My console was never fully finished. Though the body of it I was pretty happy with, the aluminum plate wasn’t brushed and didn’t look very good. I set out to make a new plate which would allow me to have a shifter boot in place, some warning lights, switches for essential functions, and also eventually open up for some storage.

I planned to cut the plates out of 1/4″ and 1/8″ aluminum. Not knowing exactly how I was going to secure my boot, I planned on a sandwich plate on the bottom to hole it into place. I drew the plates up in CAD and made templates. To start with, I cut these out of wood to make sure my concept was going to work.
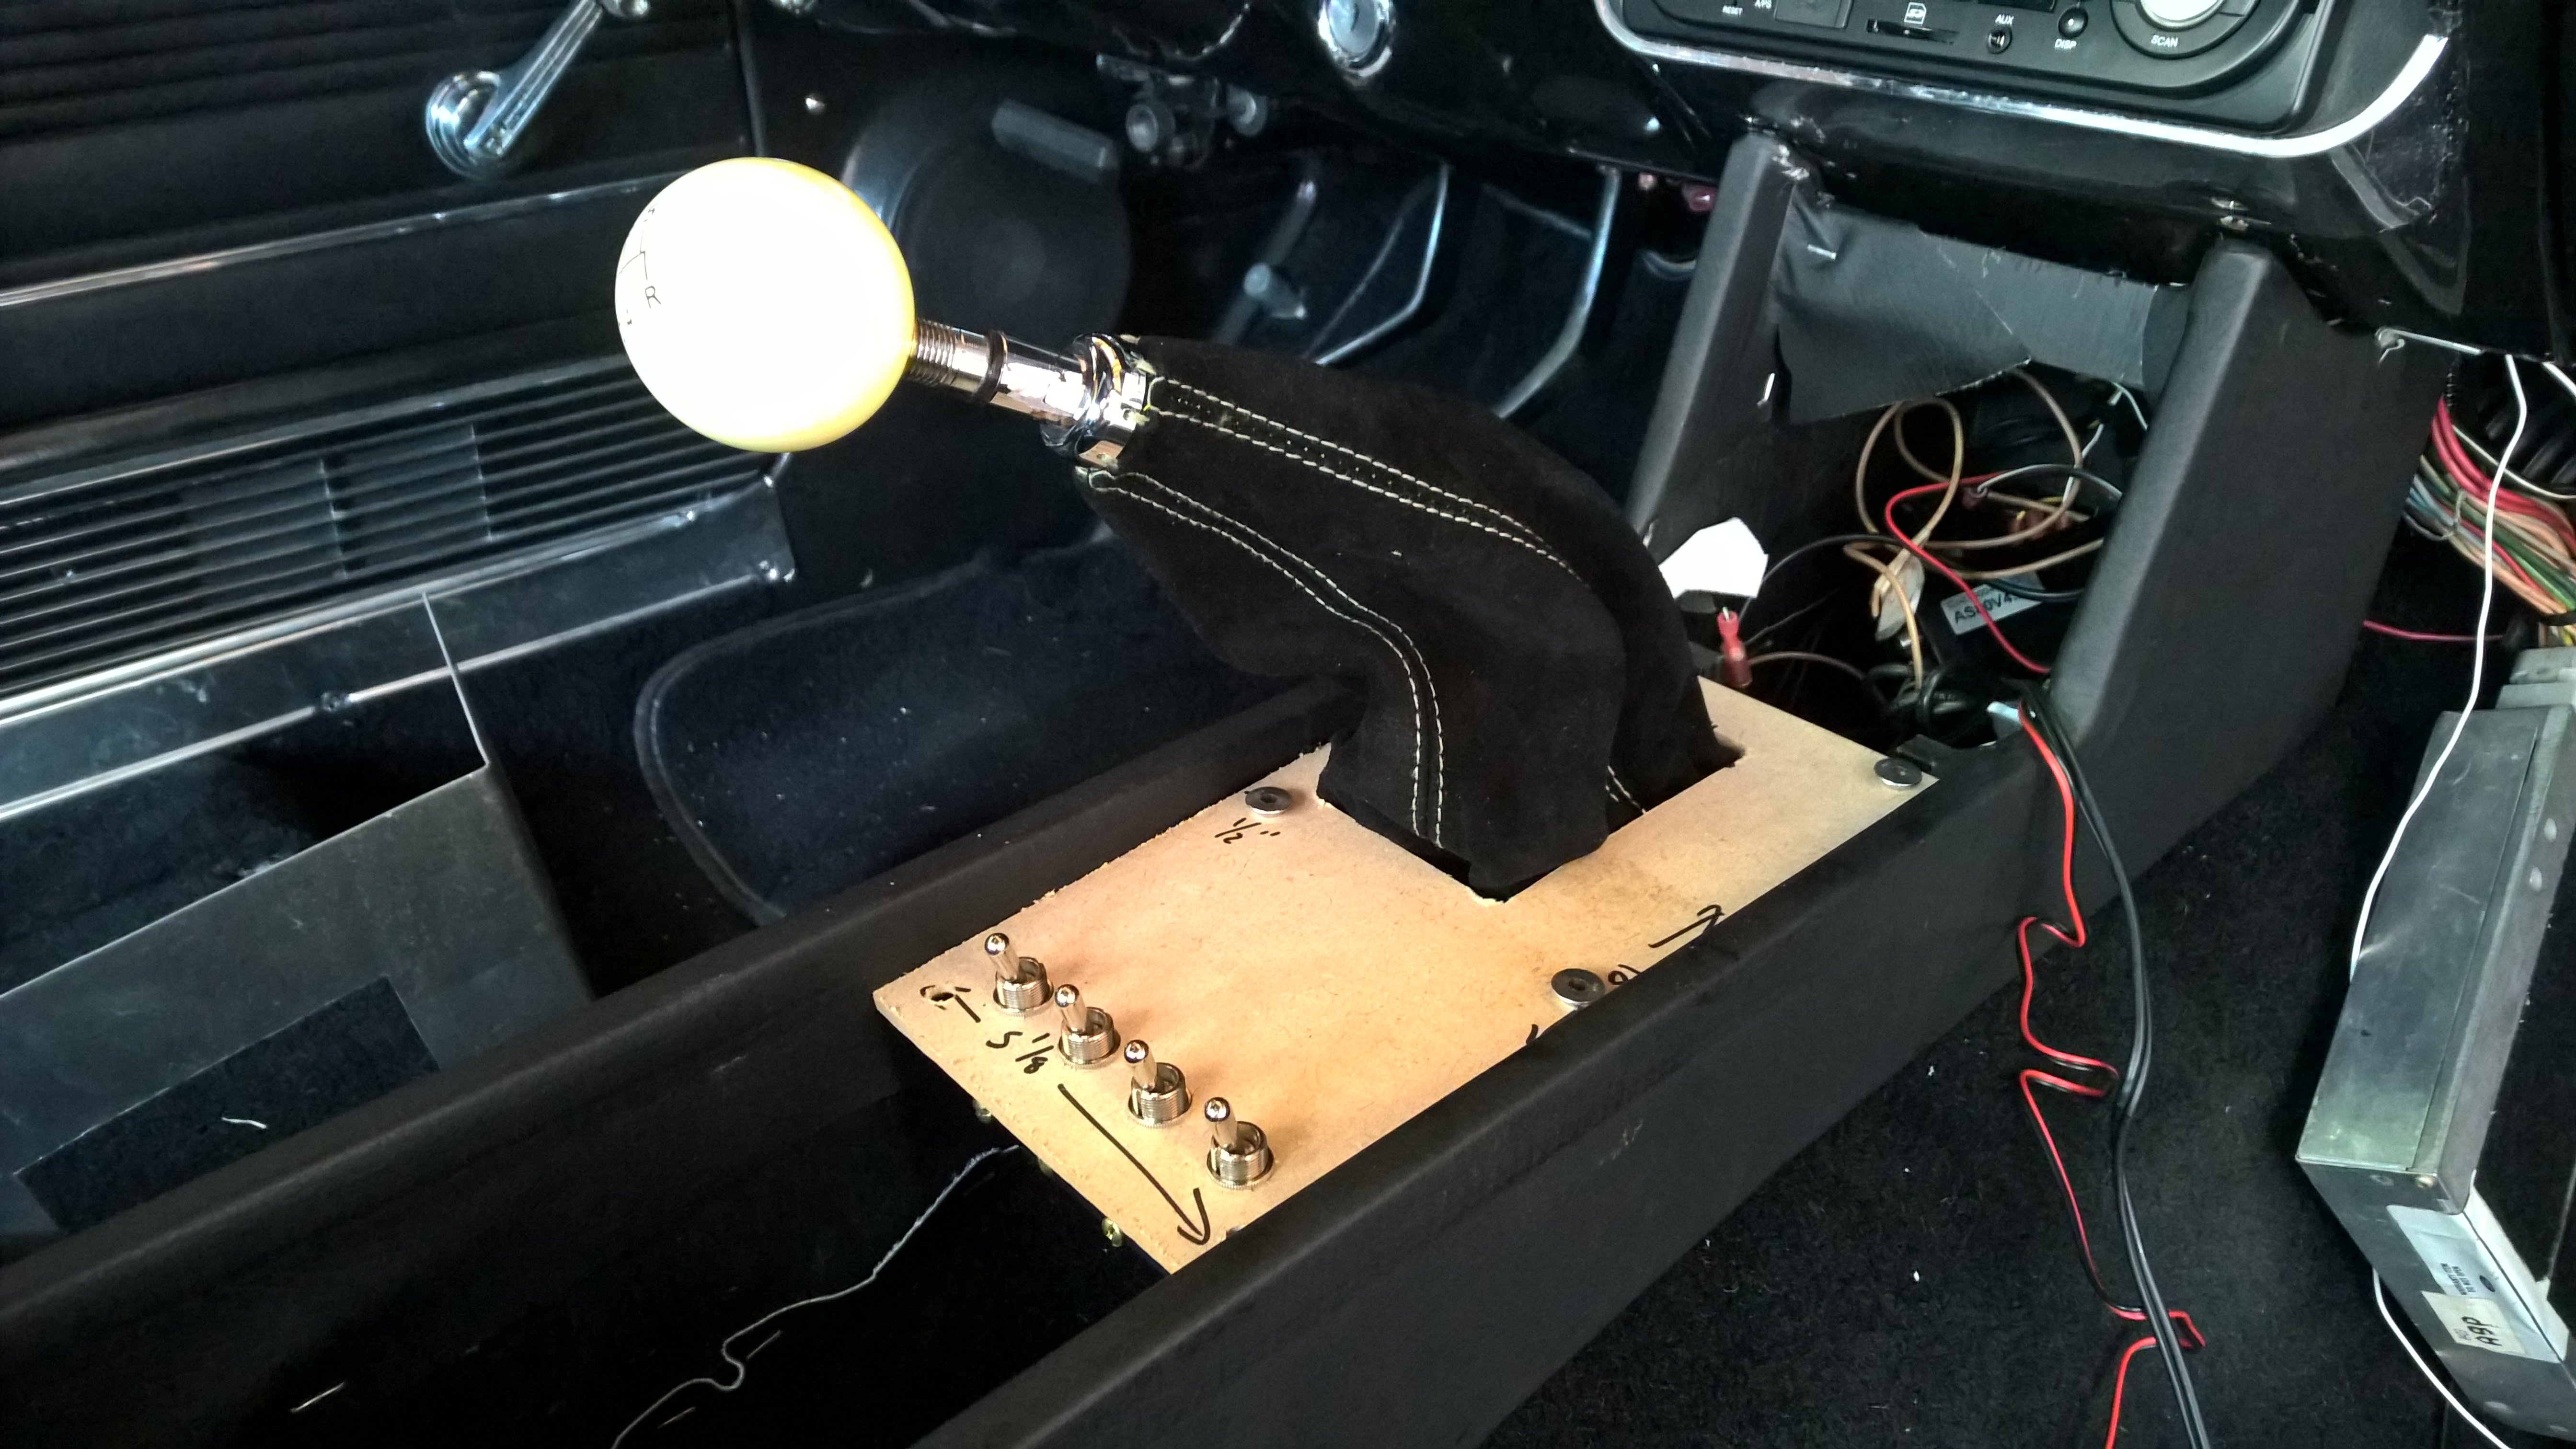
You can see the main plate fitted here with the switches installed. The shifter boot is a generic one I sourced off of Amazon. It’s not the most beautiful, but it’ll work for now. Concept proven, I moved onto aluminum.
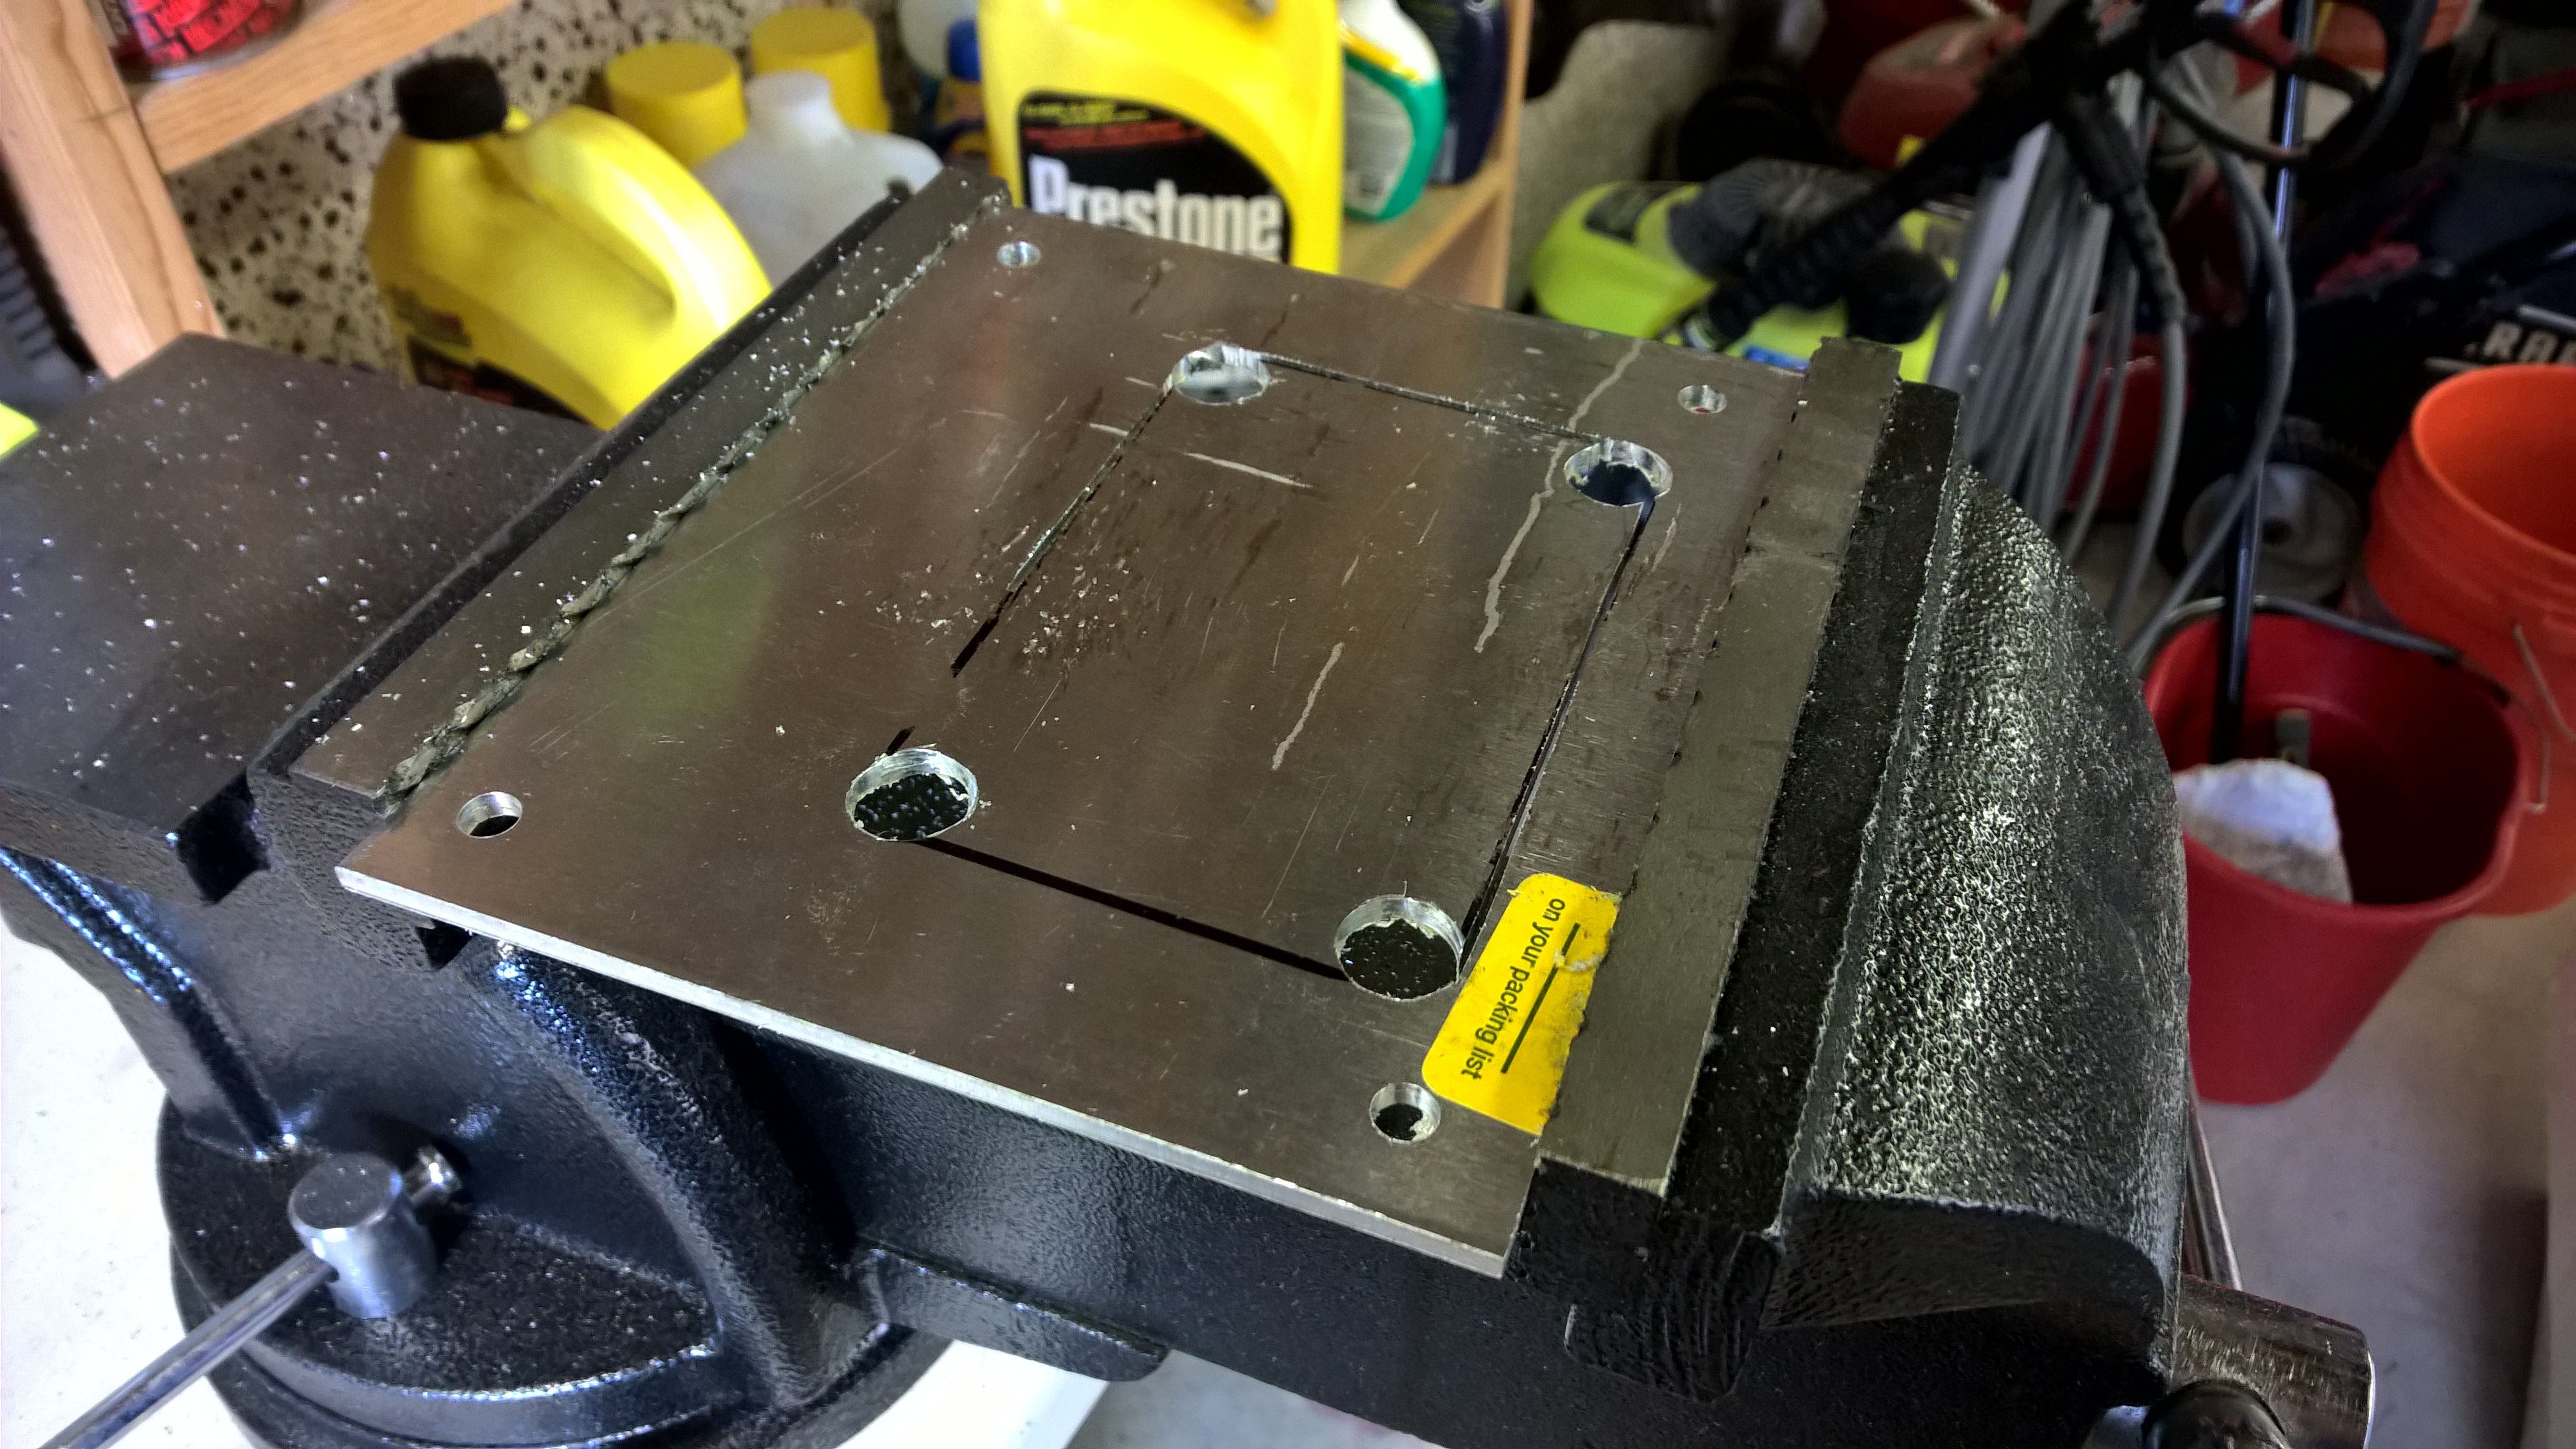
McMaster provided the brushed aluminum which I then cut down to size in my bandsaw, before drilling the holes. Unfortunately I don’t have a drill press yet, so these were done manually (more on that in a minute). A jig saw finished out the hole segments.
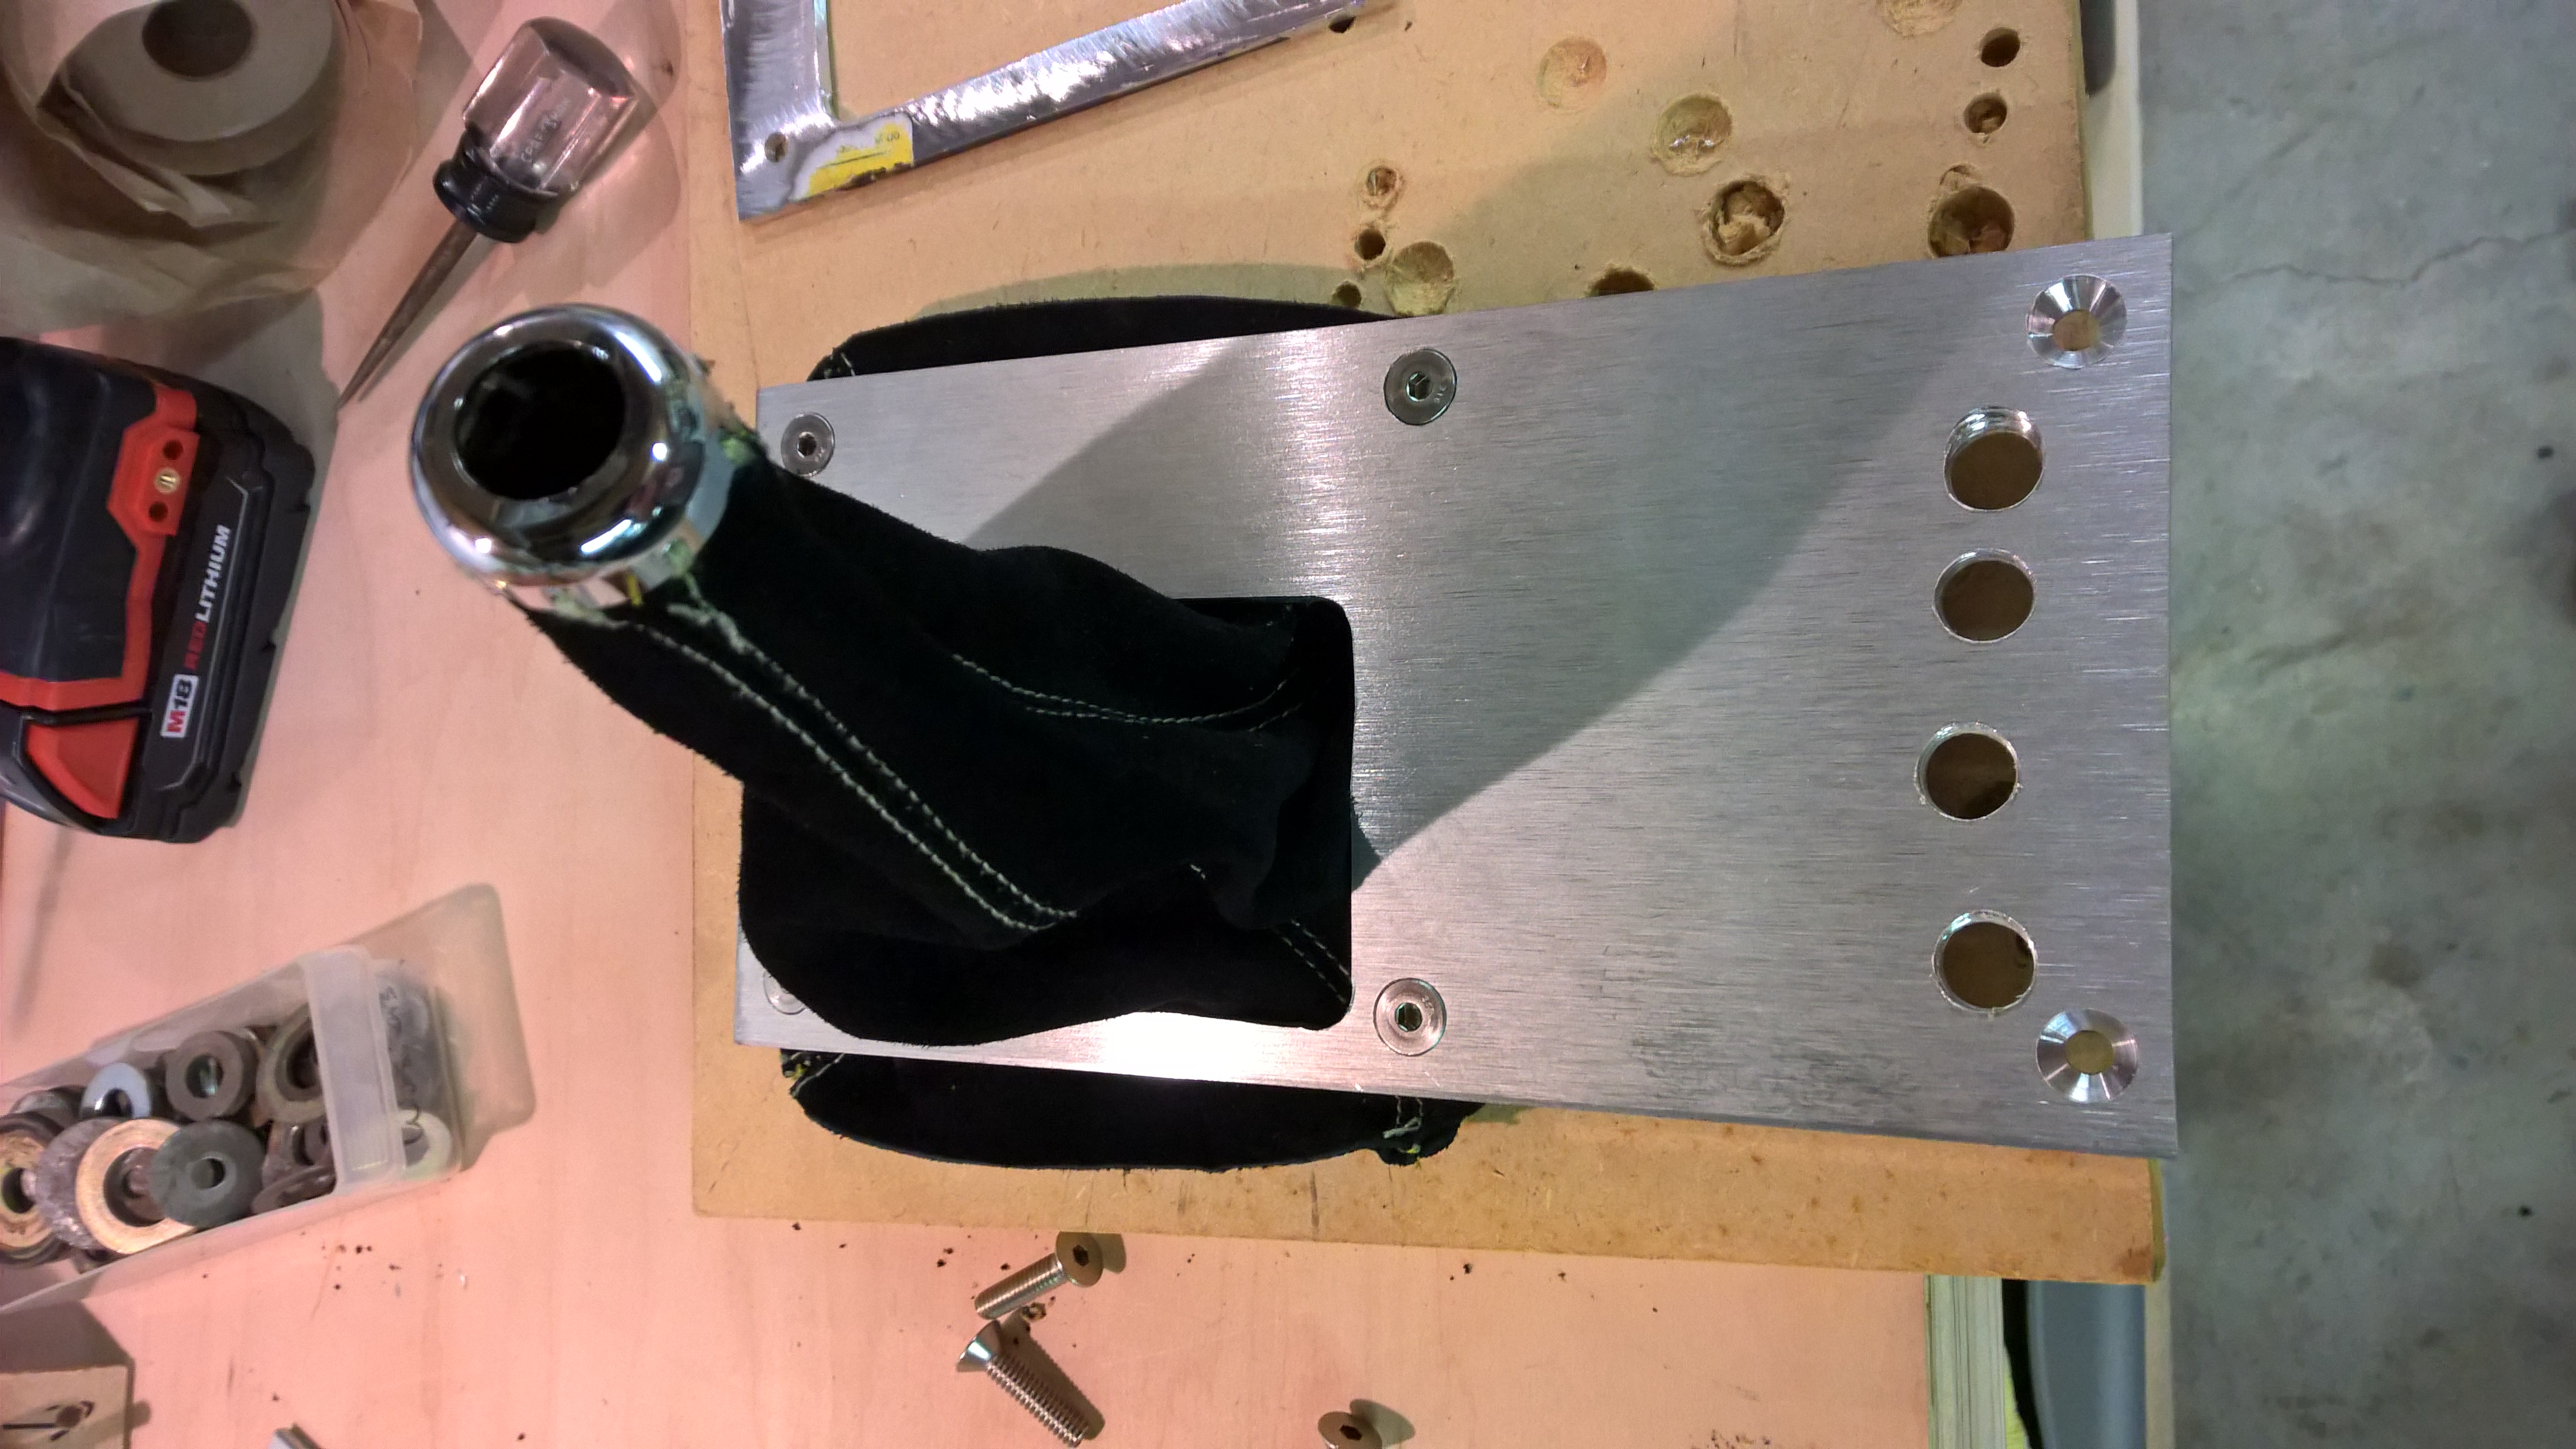
Here’s the main plate. Before drilling the holes I used a center punch through the paper template to make sure the drill bit would be centered… Unfortunately as you can see above, this worked a whole lot better on the wood than it did on the aluminum. I’ll probably re-do this piece later, but it’ll do for now. I also discarded the sandwich concept and found that I could simply bolt through the shifter boot and it stayed in place nicely.
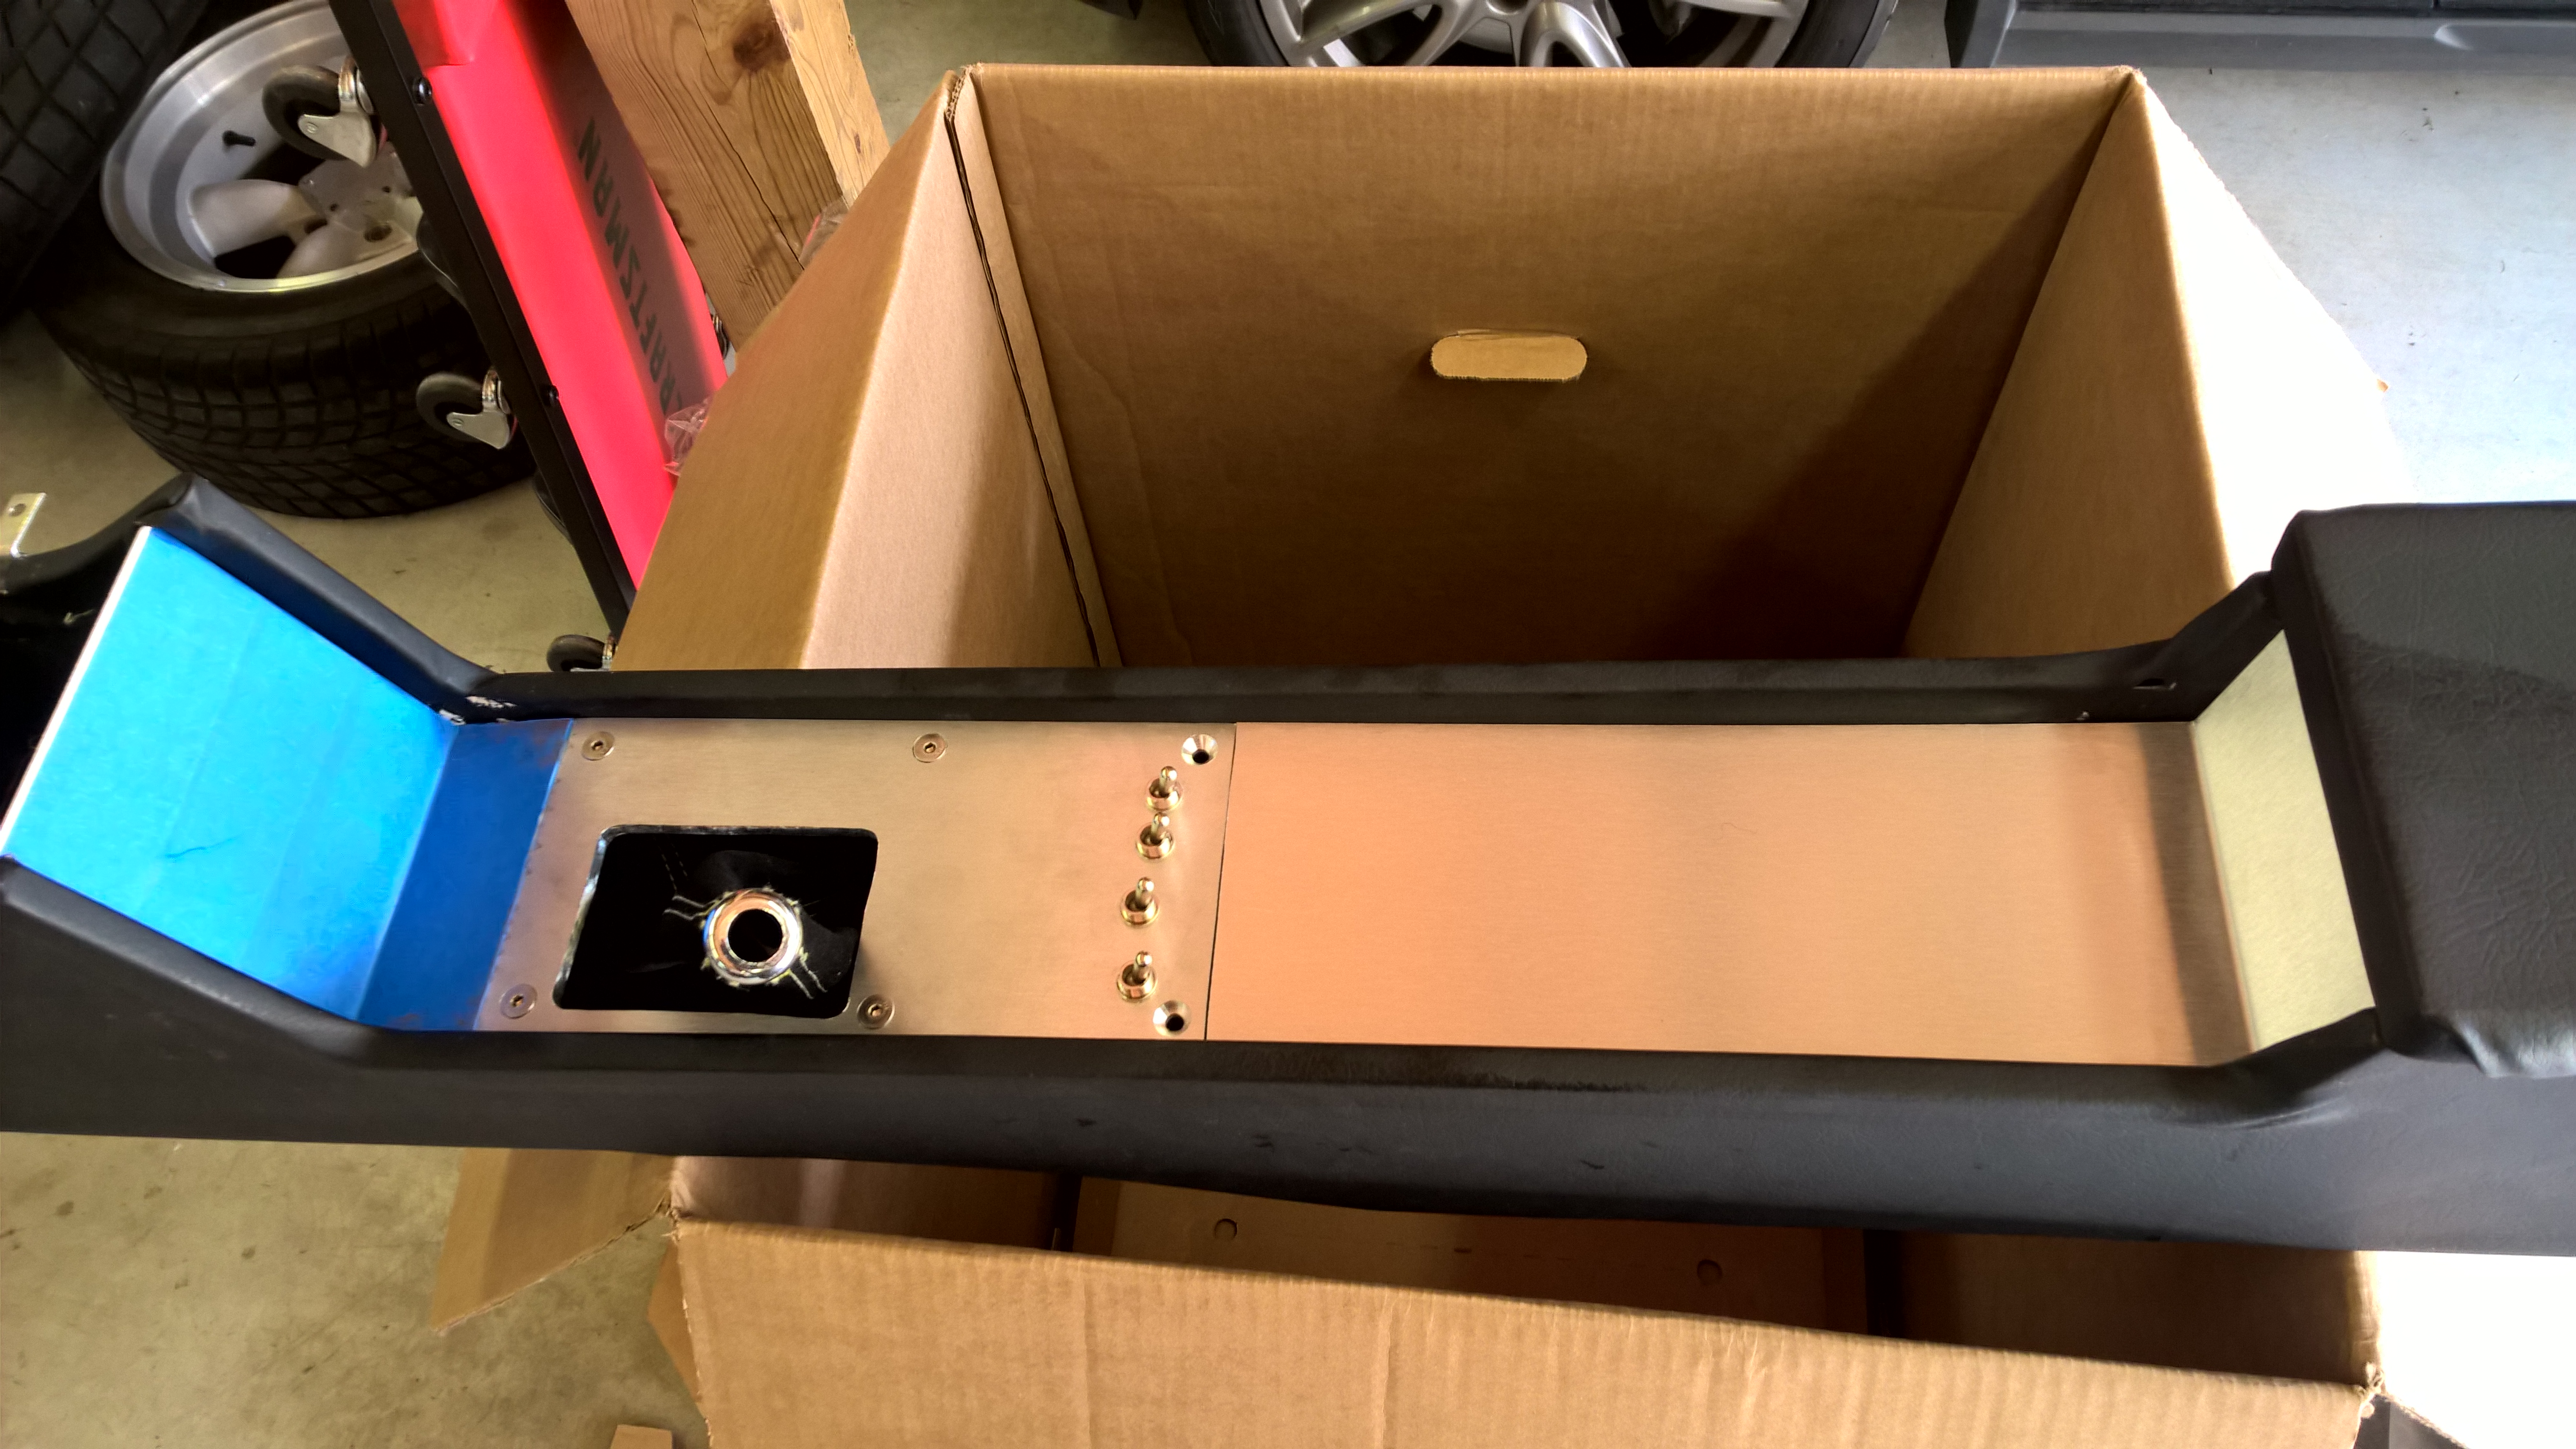
I bent up two thinner gauge pieces and fit them in. Overall it’s not 100% perfect, but it’s a big improvement from where it was before!
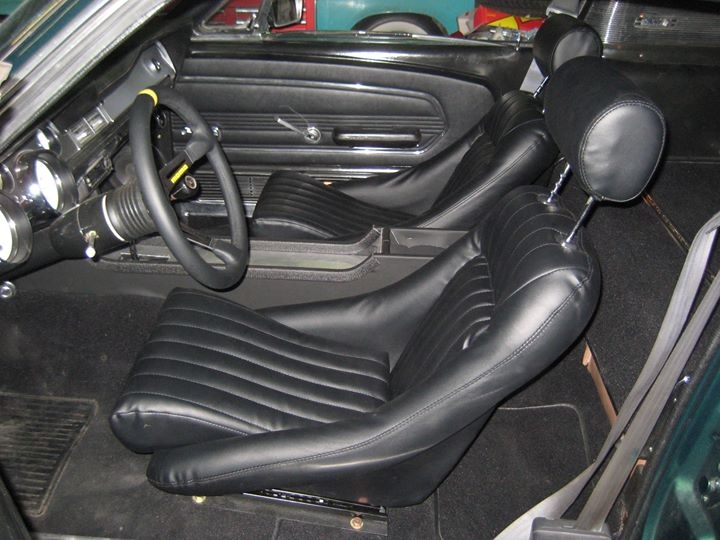
Another item on the interior needing attention was the seats… If you’ll recall from an earlier post, I had bought these Corbeau Classic Bucket seats. Though I loved the look, I haven’t gotten skinnier over the years and the seats were simply too uncomfortable to keep. I searched far and wide for a replacement set of seats with price once again in mind. After looking at Corbeau GTS II, ’85/86 Fox Mustang Recaros, BMW E30 Recaros (recovered), SCAT Procar Elites and others, I finally decided to bite the bullet and buy what I really wanted – Recaros. Every seat I looked at was mirroring the Recaro Specialist seats.

Recaros are not cheap and I was looking at more than double the investment that I would have had in some of the other offerings, but I was tired of swapping seats out every few years (this would be the 4th set of seats in the car, not counting the originals!). Not wanting to invest this much without sitting in the seats first, I looked around and found that Pro-Am Auto in Houston has seats in their showroom that I could try out.
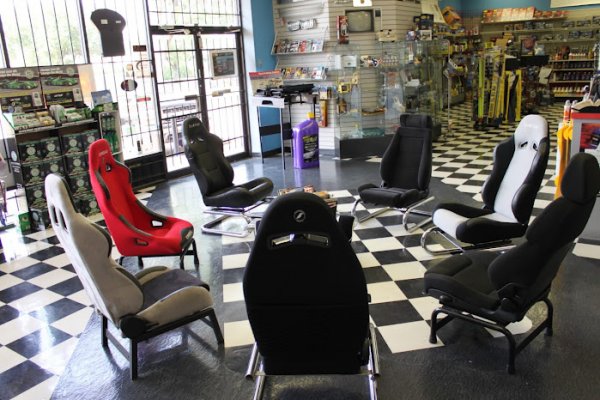
At Pro-Am I was able to test sit in multiple seats, including the Specialist, Expert M, Flofit (Recaro clone), and the Corbeau GTS II. I ended up settling on Recaro’s Expert M. The seat provided a lot more bolstering than the specialist and a flatter bottom cushion which makes it easier to get in and out of the car.

The Expert M seat features a lot of adjustability including the bolsters, seatback angle and has a pull-out thigh cushion as well. I struggled a bit trying to figure out what covering I wanted, ultimately settling on the Artisa fabric insert with leather bolsters. The thinking being that the fabric would hold you in place better (and be cooler!) and the leather would wear better on the bolsters. At the same time, I opted for the rails and custom brackets to mount the seats in the car. The Pro-Am salesman assured me they sold a ton of these seats to other Mustang owners and none had headroom issues which was a major concern for me.
A few weeks later my seats arrived and I rushed home to install them. The wedge seat adapters go down first. This is a sturdy piece with the seat rails threading into the tubes. It minimizes the height, which still retaining good strength.
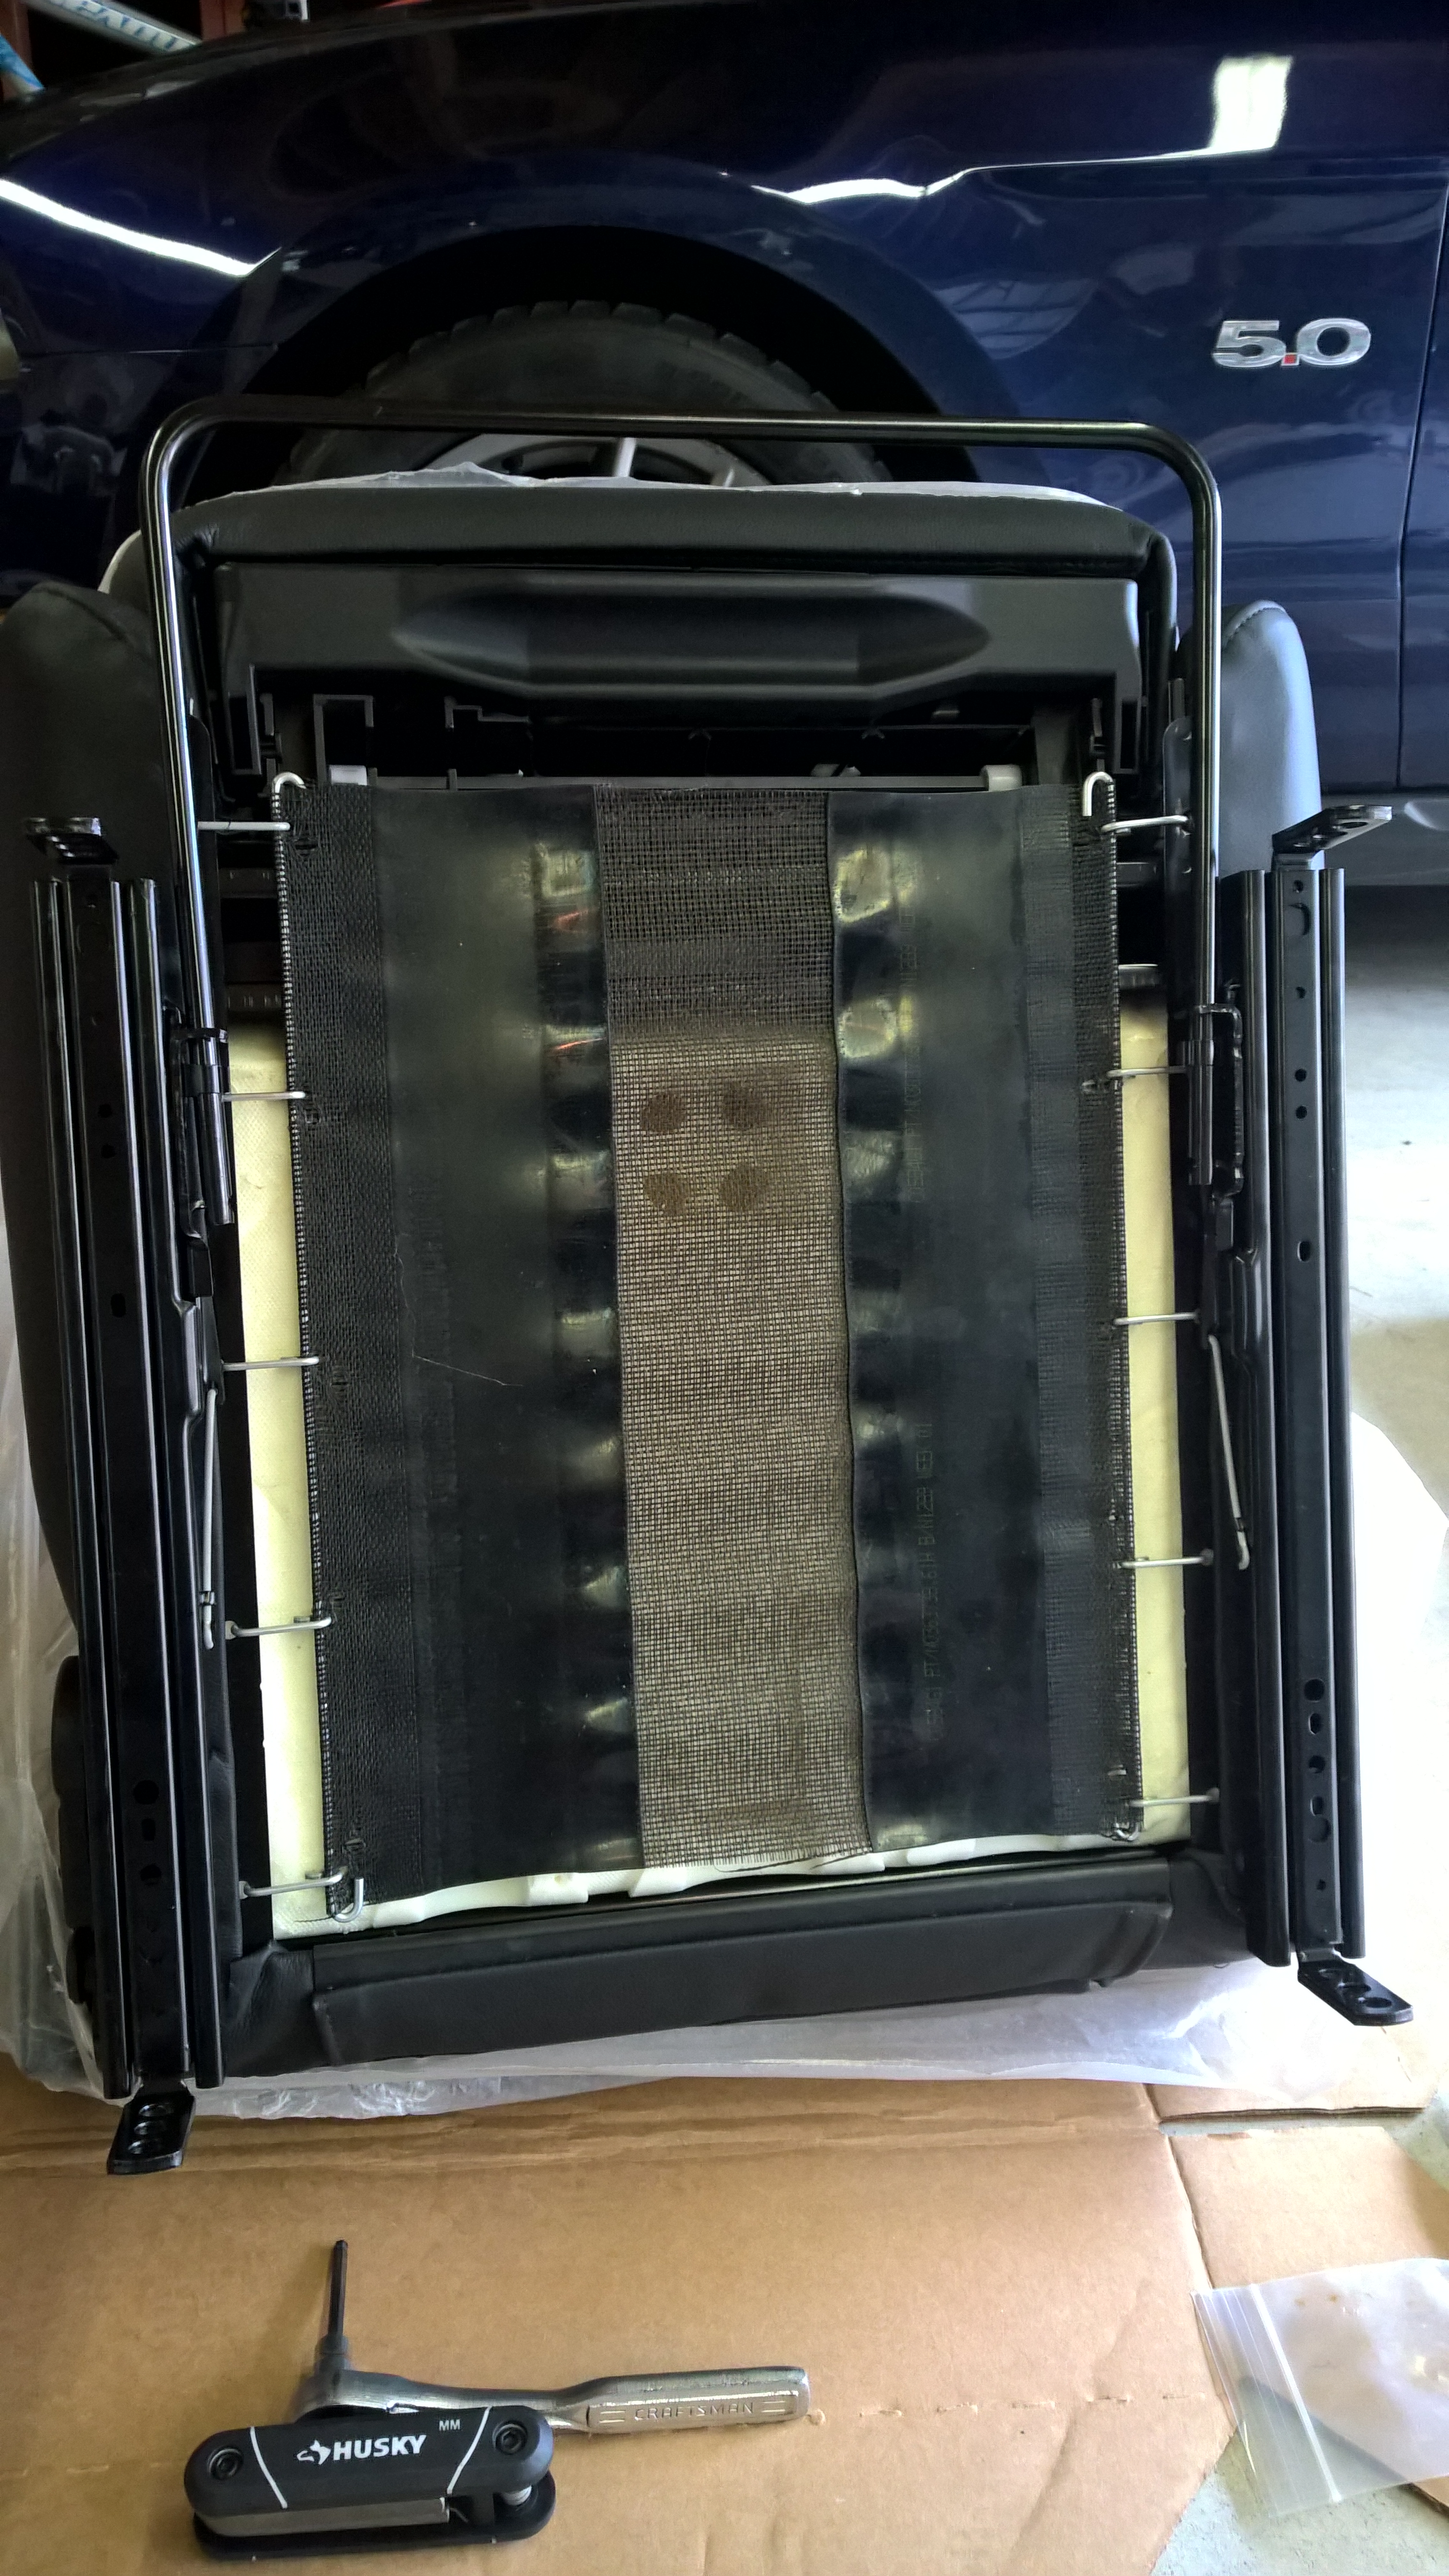
The rails then mount to the bottom of the seat. The vertical segments are bolted through to the threaded tubular pieces on the floor bracket.
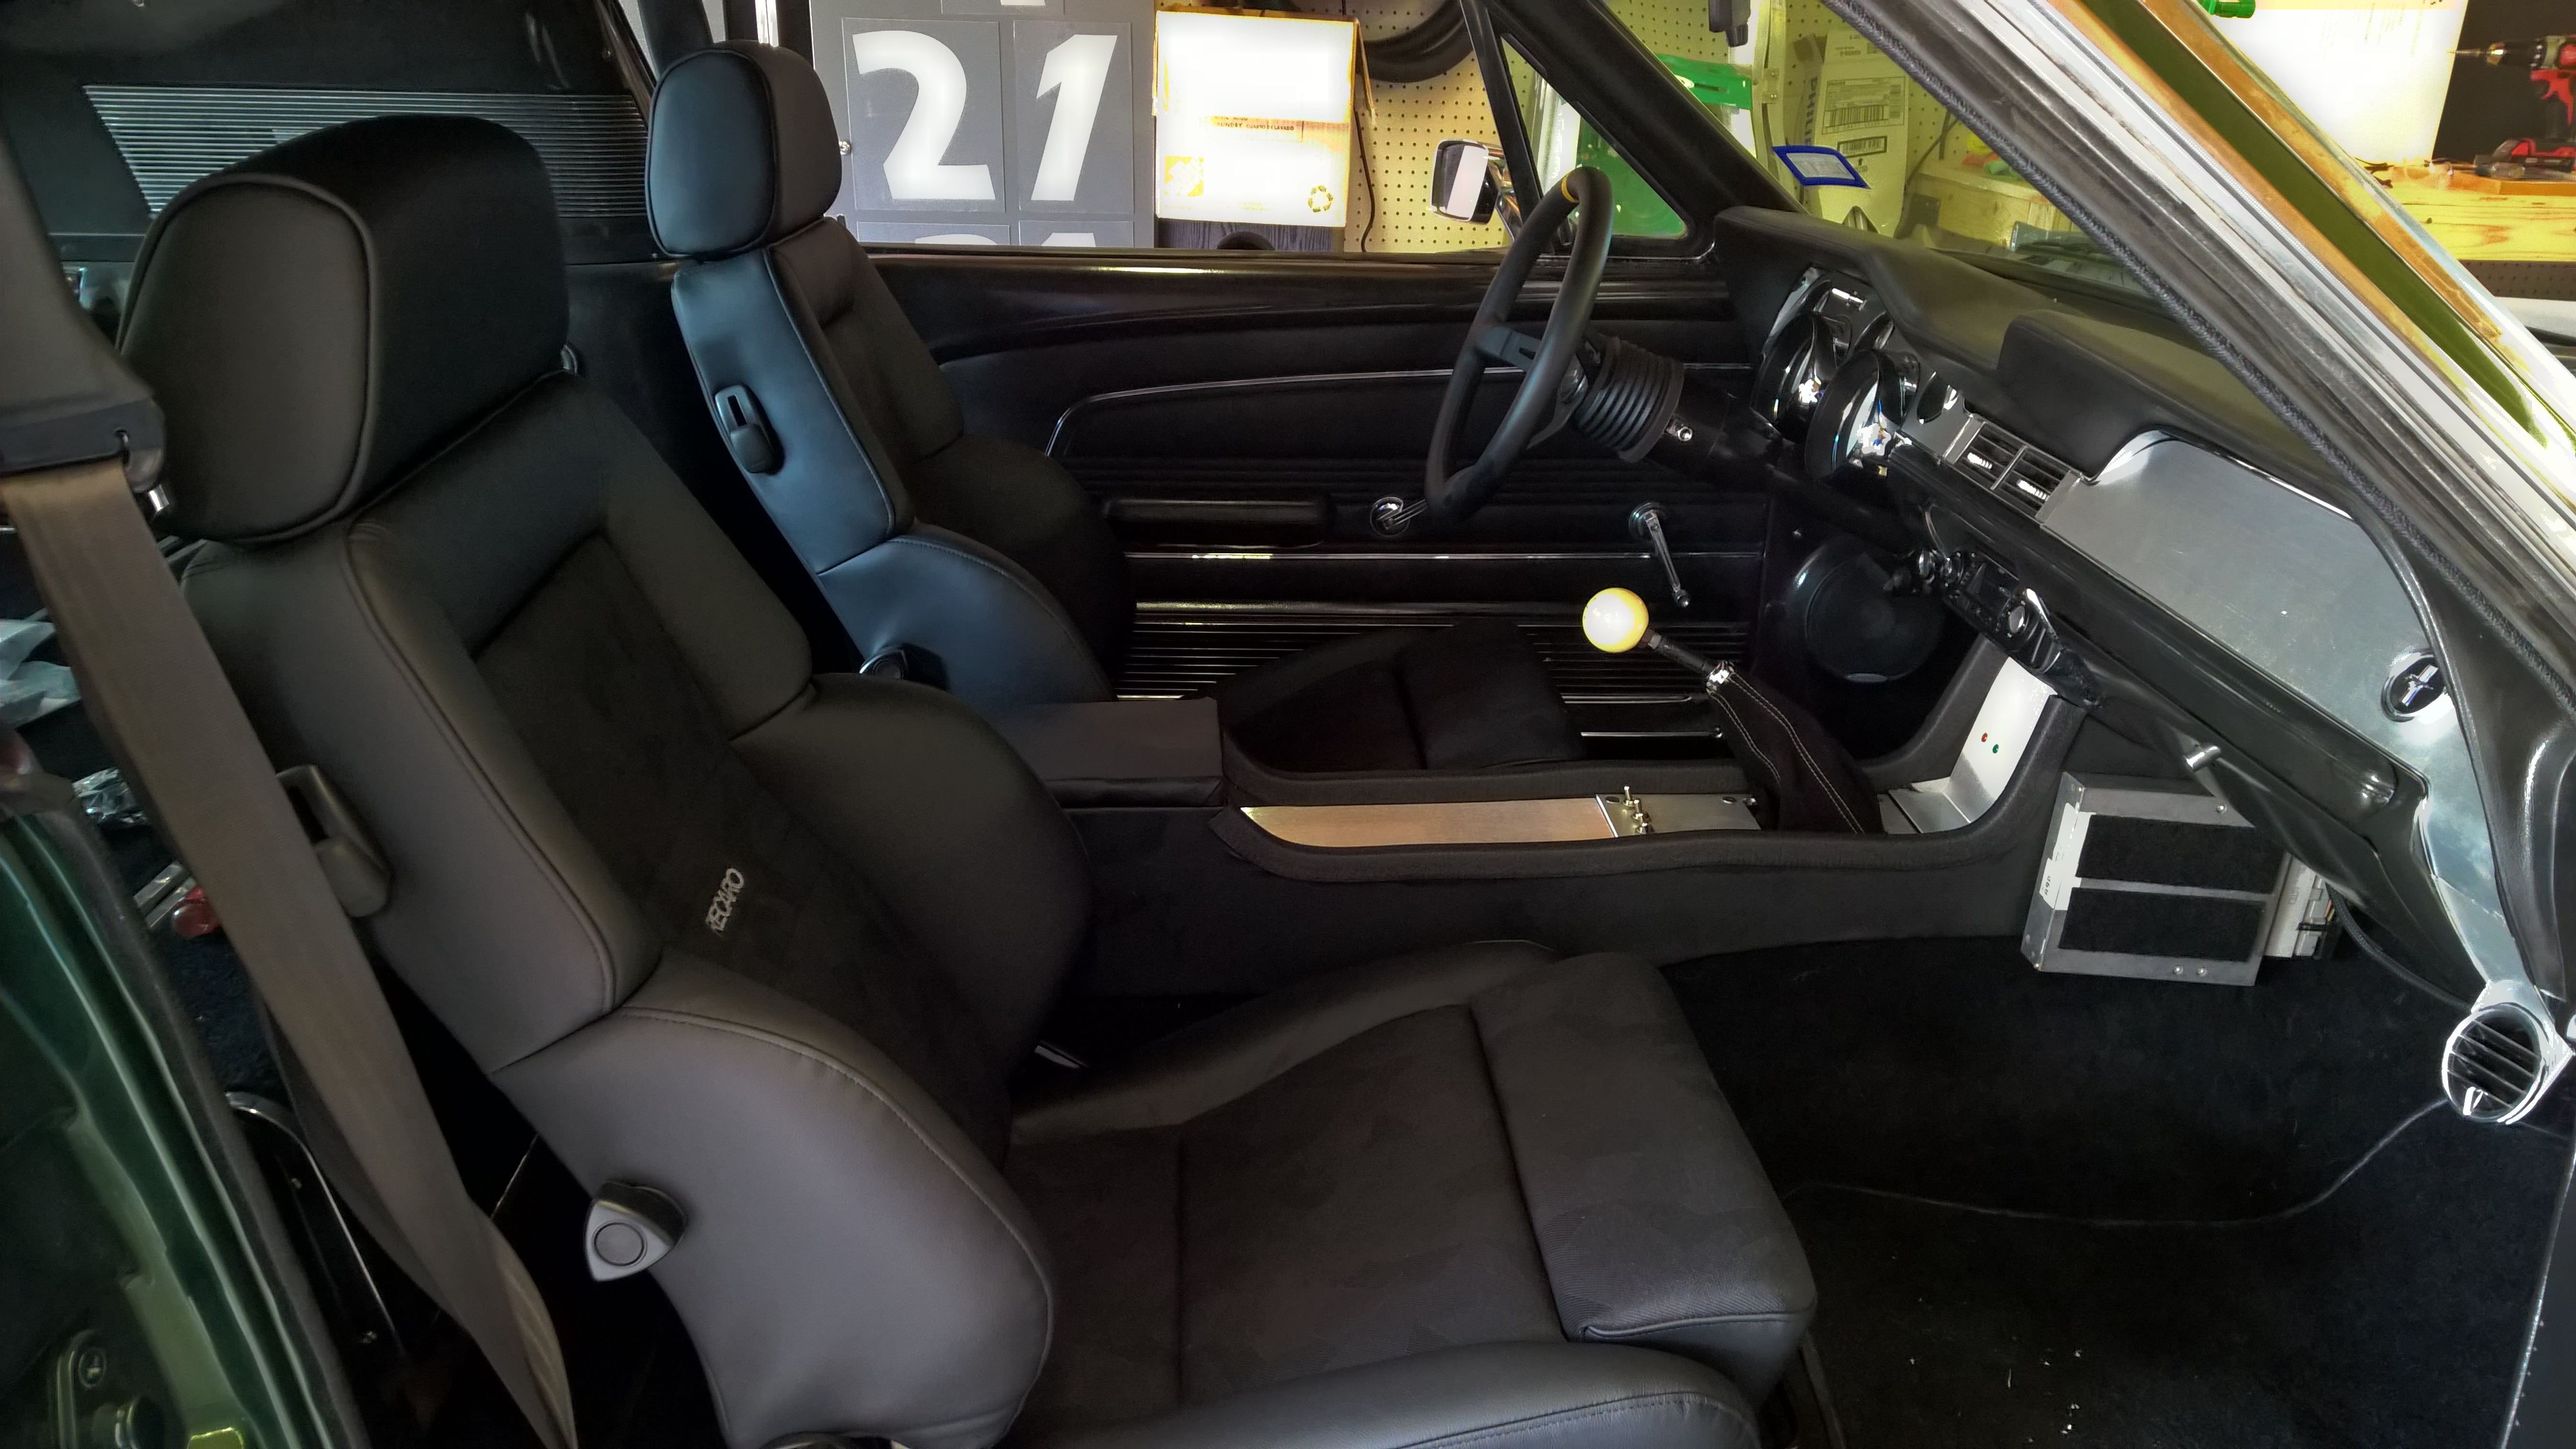
Here’s the seats installed. I love the look and the comfort level was worth every penny. You can also spot the almost completed console. All this work was done in a rush to try and get the ’67 ready for my Dad to take it to SCCA Nationals. In terms of rulebook, for the CAM class it’s pretty thin, but SCCA does have some safety related rules that I was a little worried about.
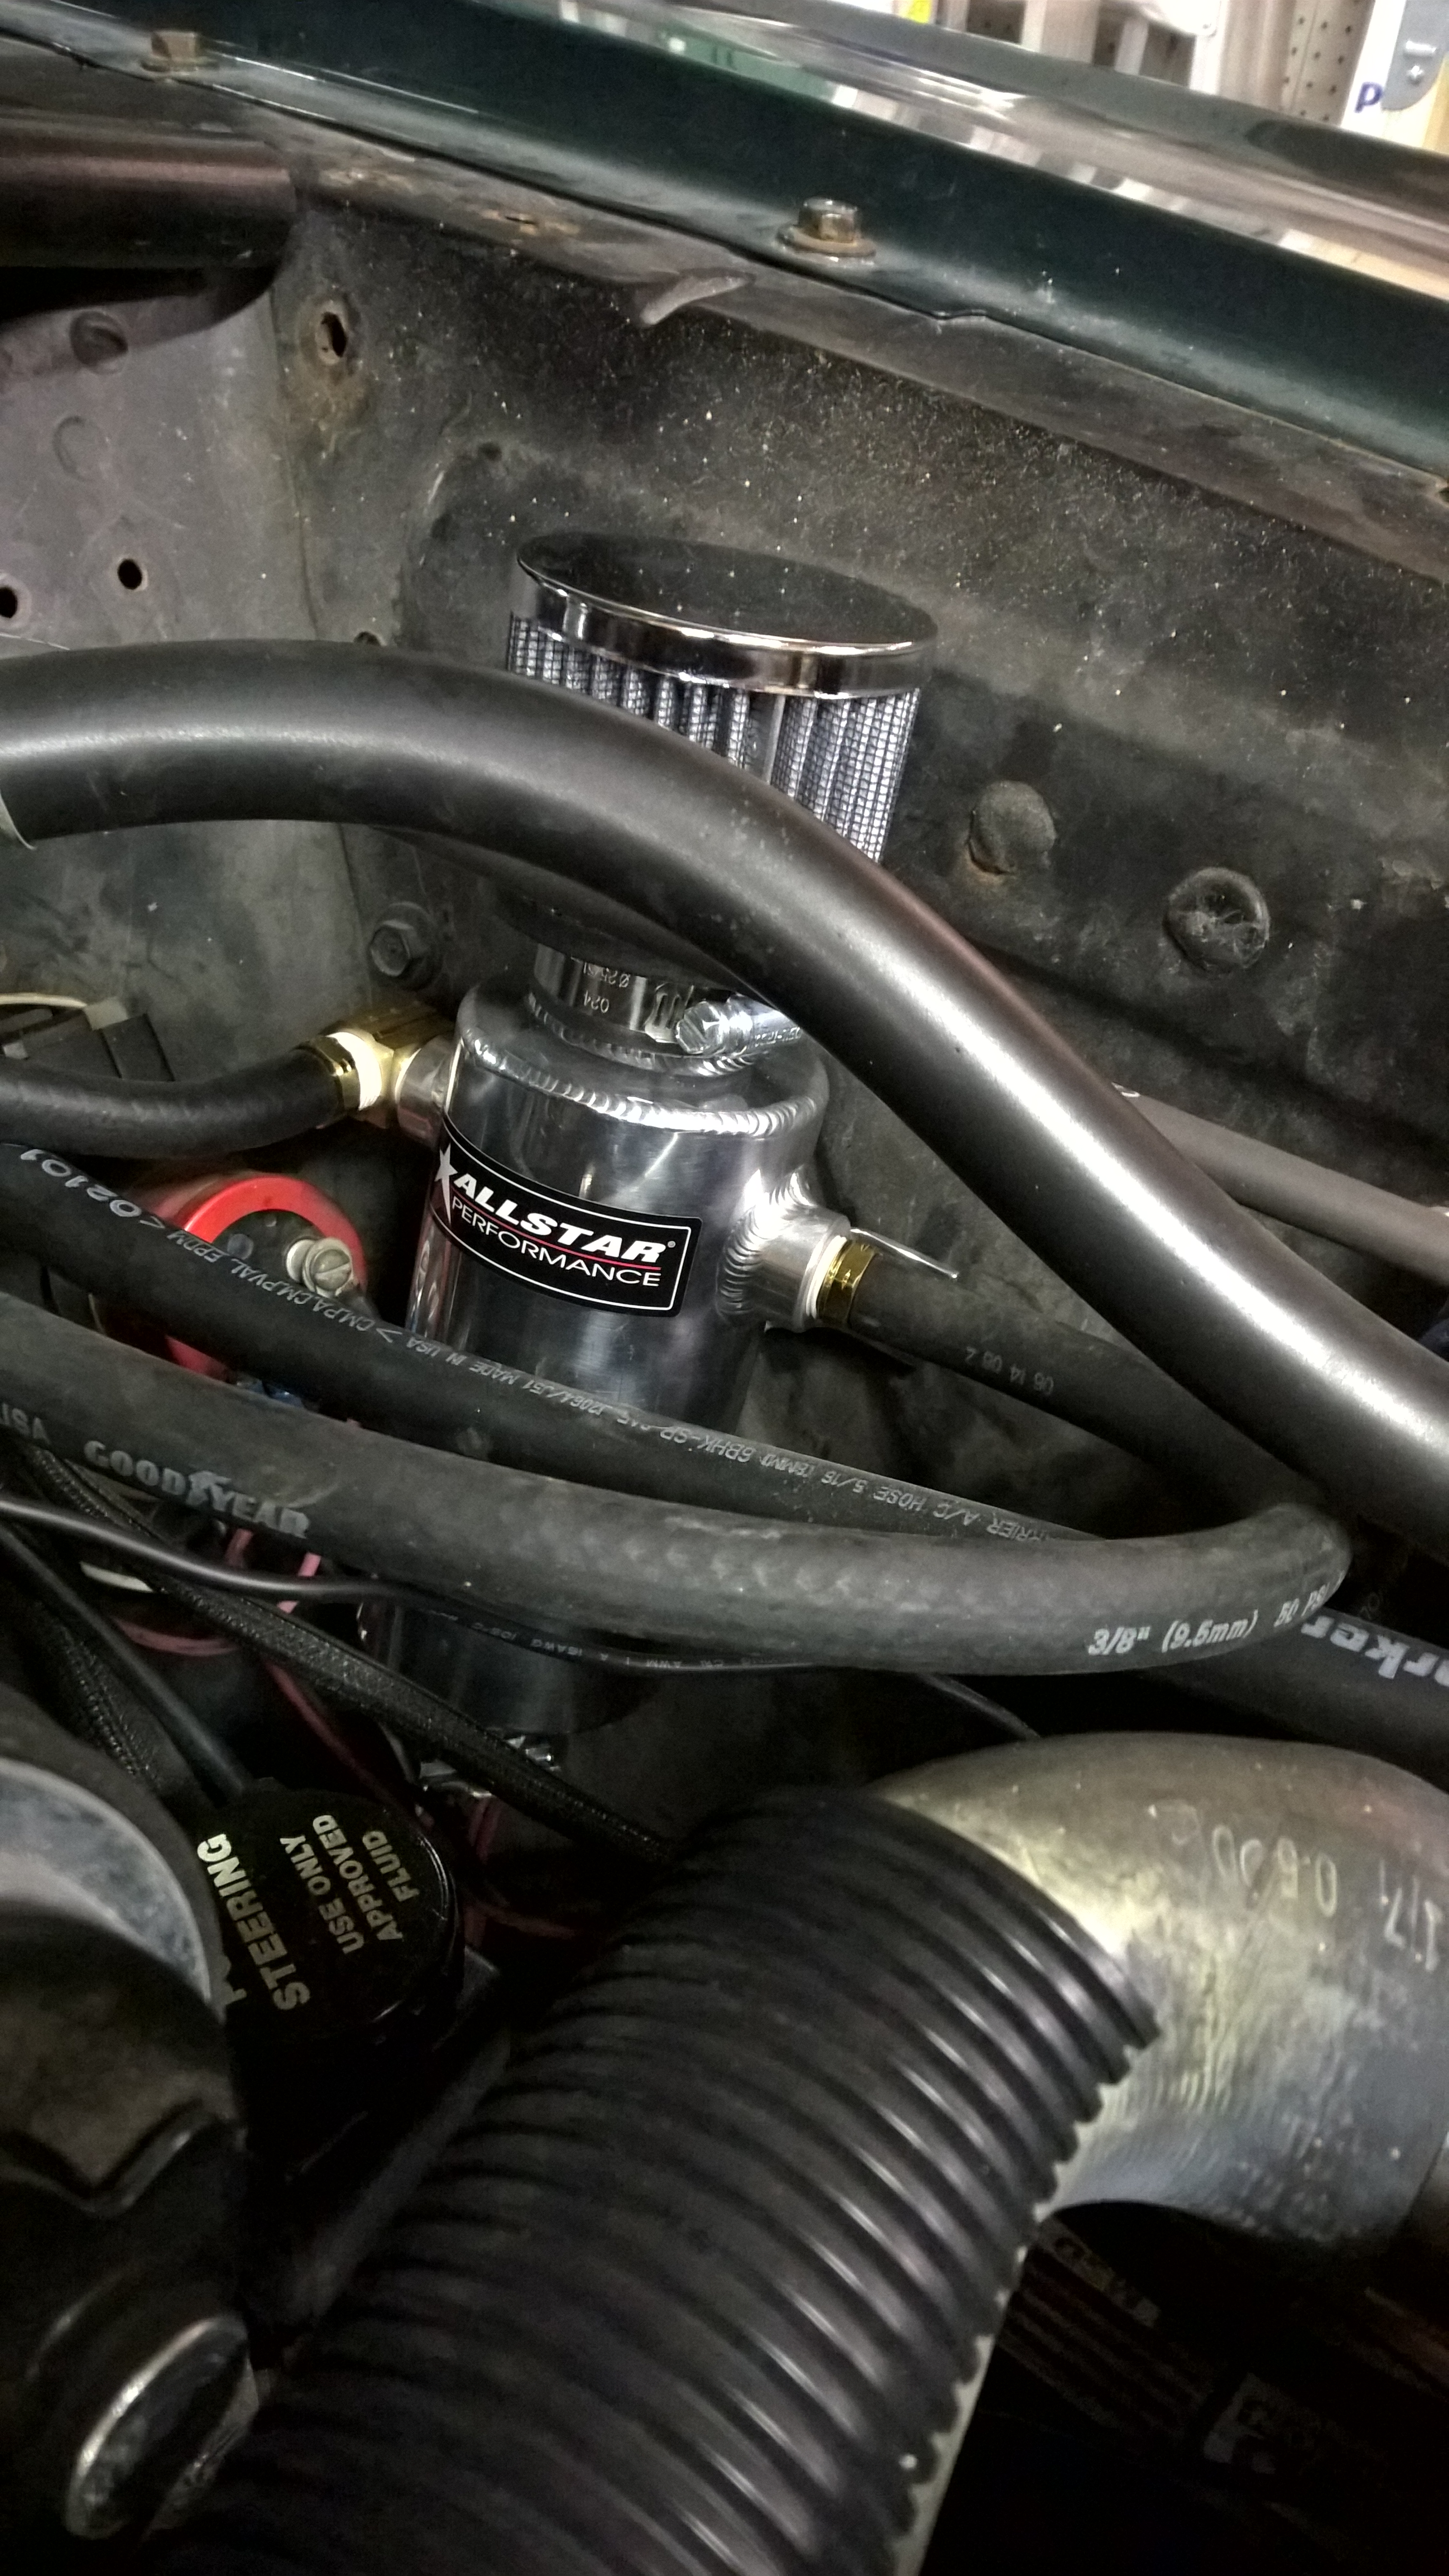
The rulebooks states that any ventilation system (like a crankcase vent) has to terminate in a 1 quart container. The valve covers on the ’67 don’t have any sort of PCV system and I had just been running a hose off of them onto the ground. The motor doesn’t drop any fluid really from this, but it didn’t satisfy the rulebook. So out came my washer tank reservoir (which wasn’t hooked up anyways) and in went an Allstar air/oil separator tank to collect any crankcase fluids.
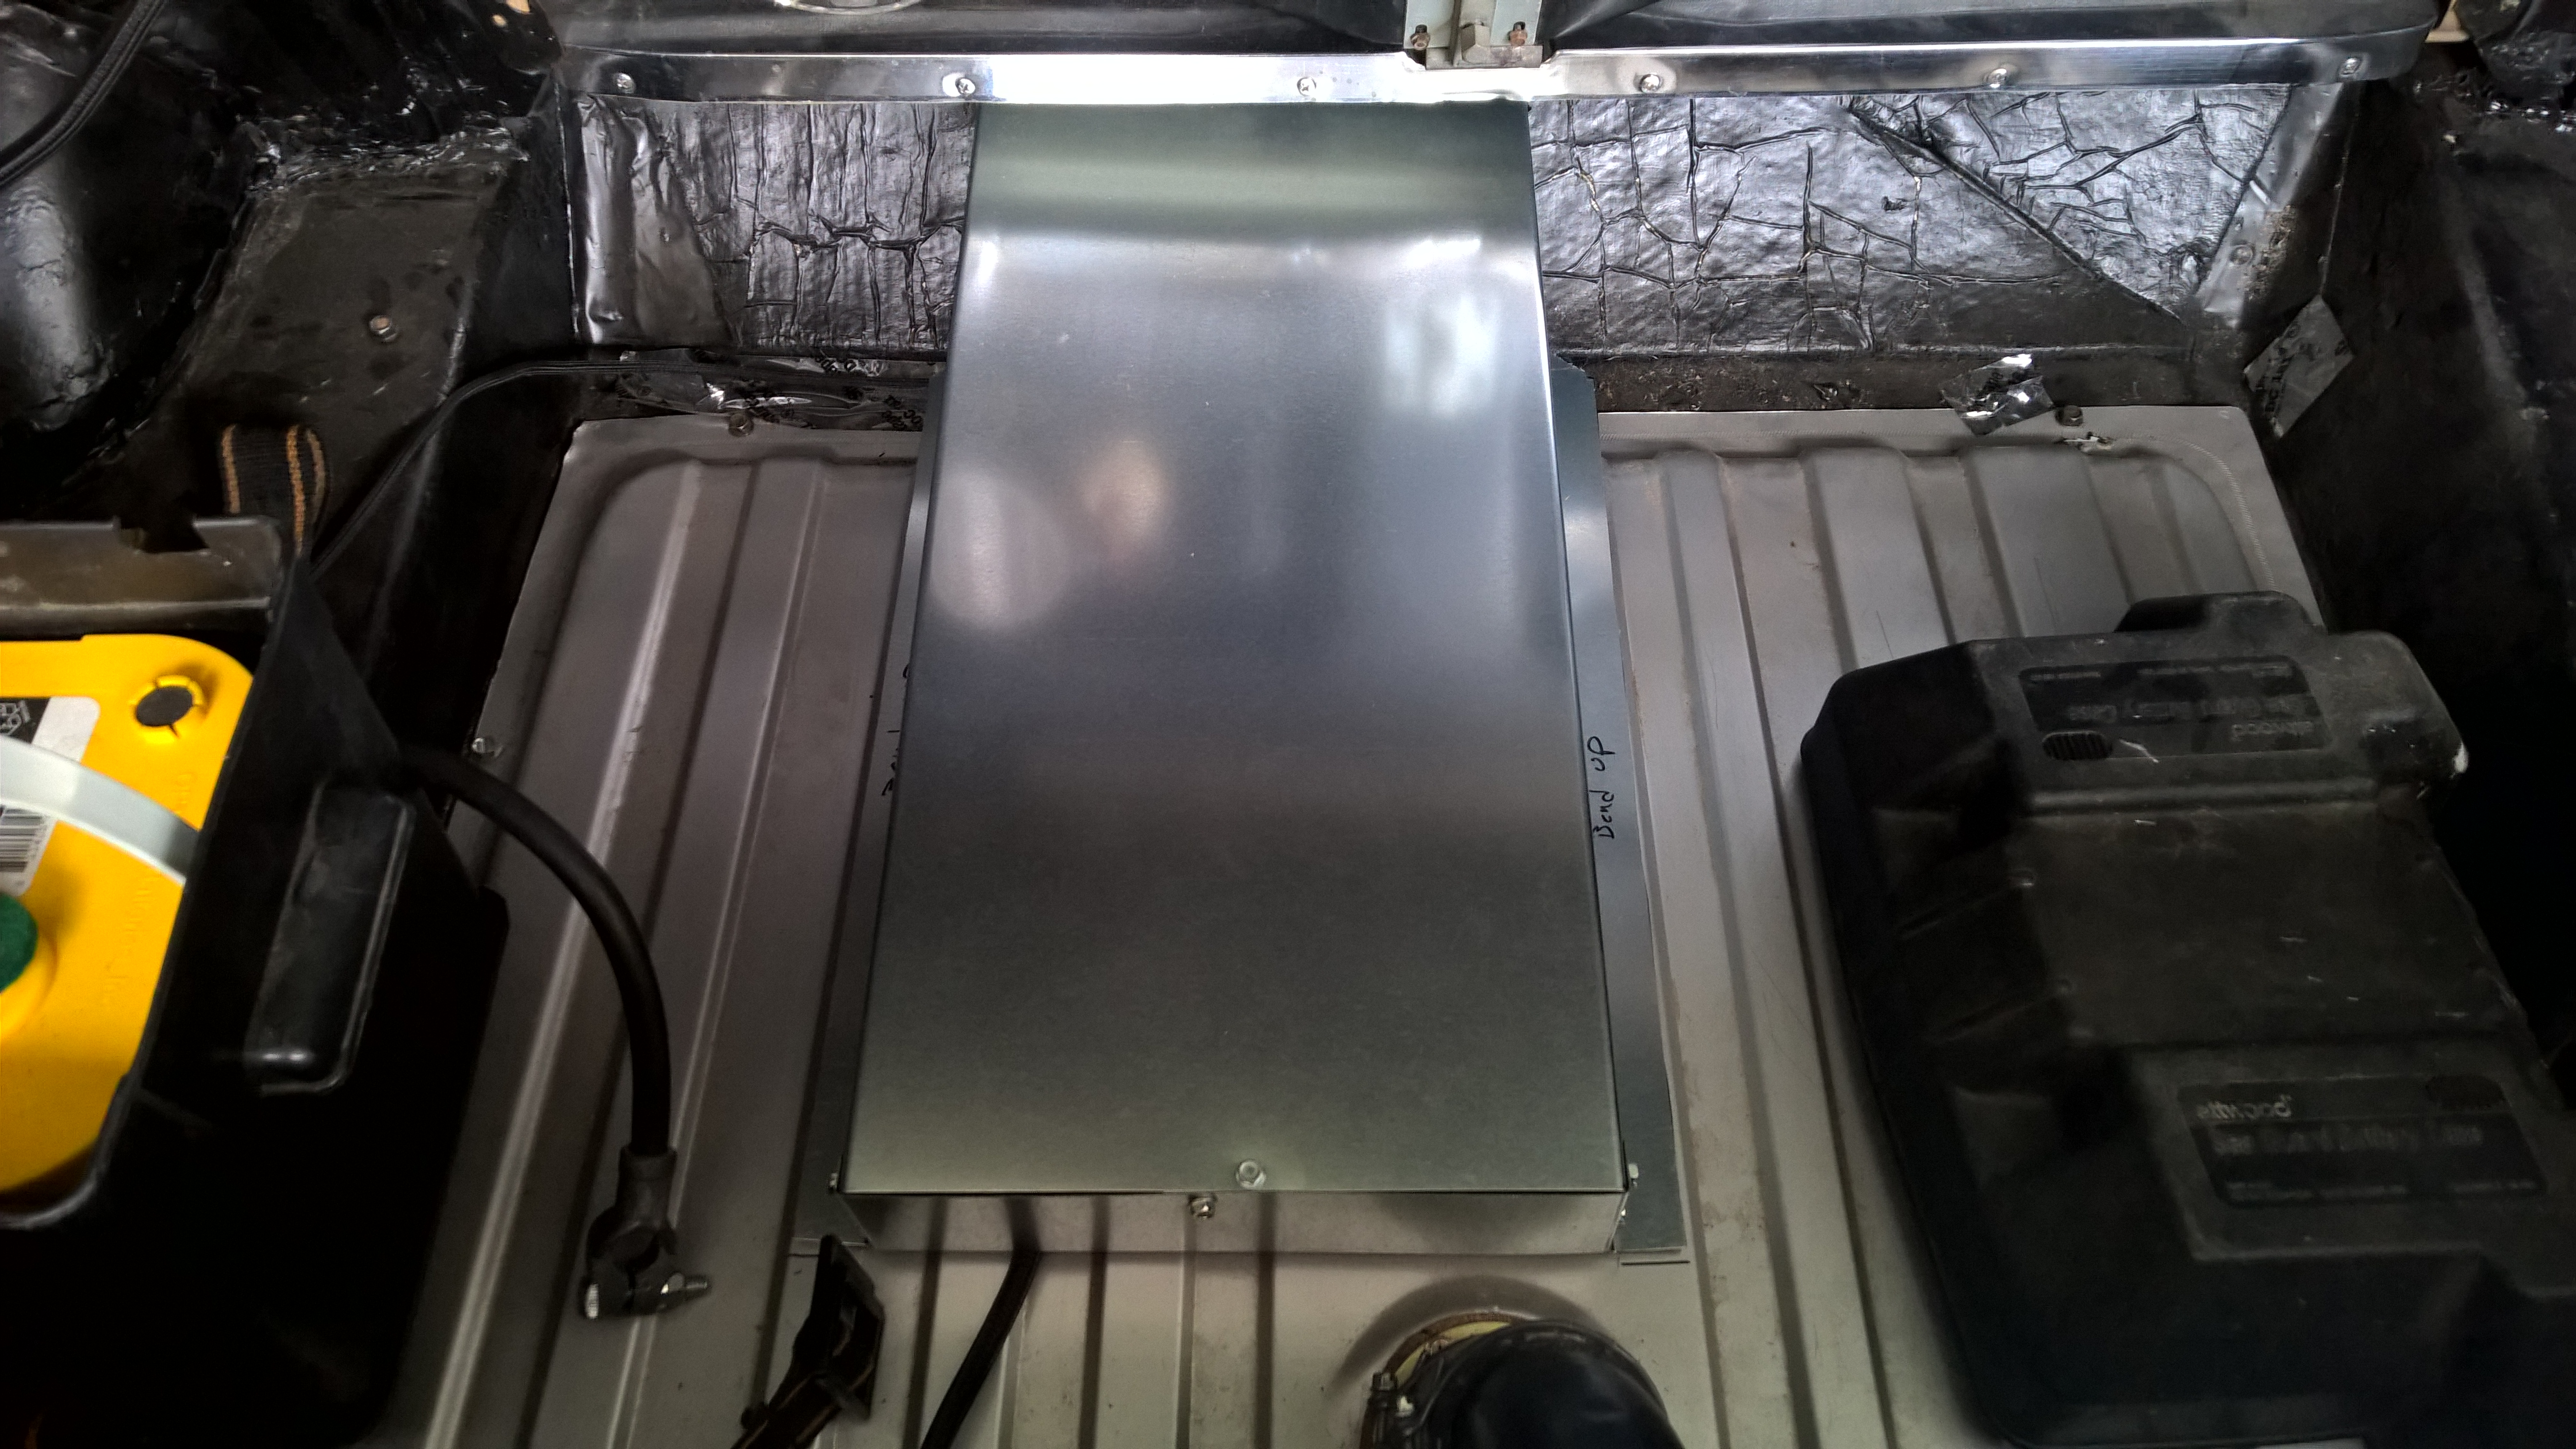
My other concern was the trunk. Classic Mustangs use the top of the fuel tank as the trunk floor. This is fine and meets the rules for SCCA in factory configuration, but my car has an EFI tank from Tanks Inc. that has a fuel pump and sending unit installed from the top. This means there are fuel lines running through the trunk before going under the car. Even though the trunk is separated by a steel seat panel and the fuel lines are braided SS, I was still worried that the SCCA tech officials would gripe about this. To address this, I took some sheet steel and bent a cover. This has the added benefit to now serve as a support for a trunk floor and carpet when I get around to that!
Unfortunately, despite all the work I poured into the car, it didn’t make it to Nationals. I took the car to work on a shake-down drive which ended in a broken throttle spring and sitting on the side of the road waiting on a tow truck. When I got the car back to the house and replaced the spring the car would idle and then die as soon as load was applied to it. Several afternoons and nights trying to debug it and we finally pulled the plug. I felt bad as my Dad was really looking forward to it, but with a new child and not enough time we just had to call it. After taking about the whole intake tract, reconnecting all the wires, and countless other debugging steps I couldn’t tell you exactly what fixed it, but the problem has never returned… Oh well.

In the meantime, Aly was growing up quick and decided to check out the Mustang she’ll one day get to drive!
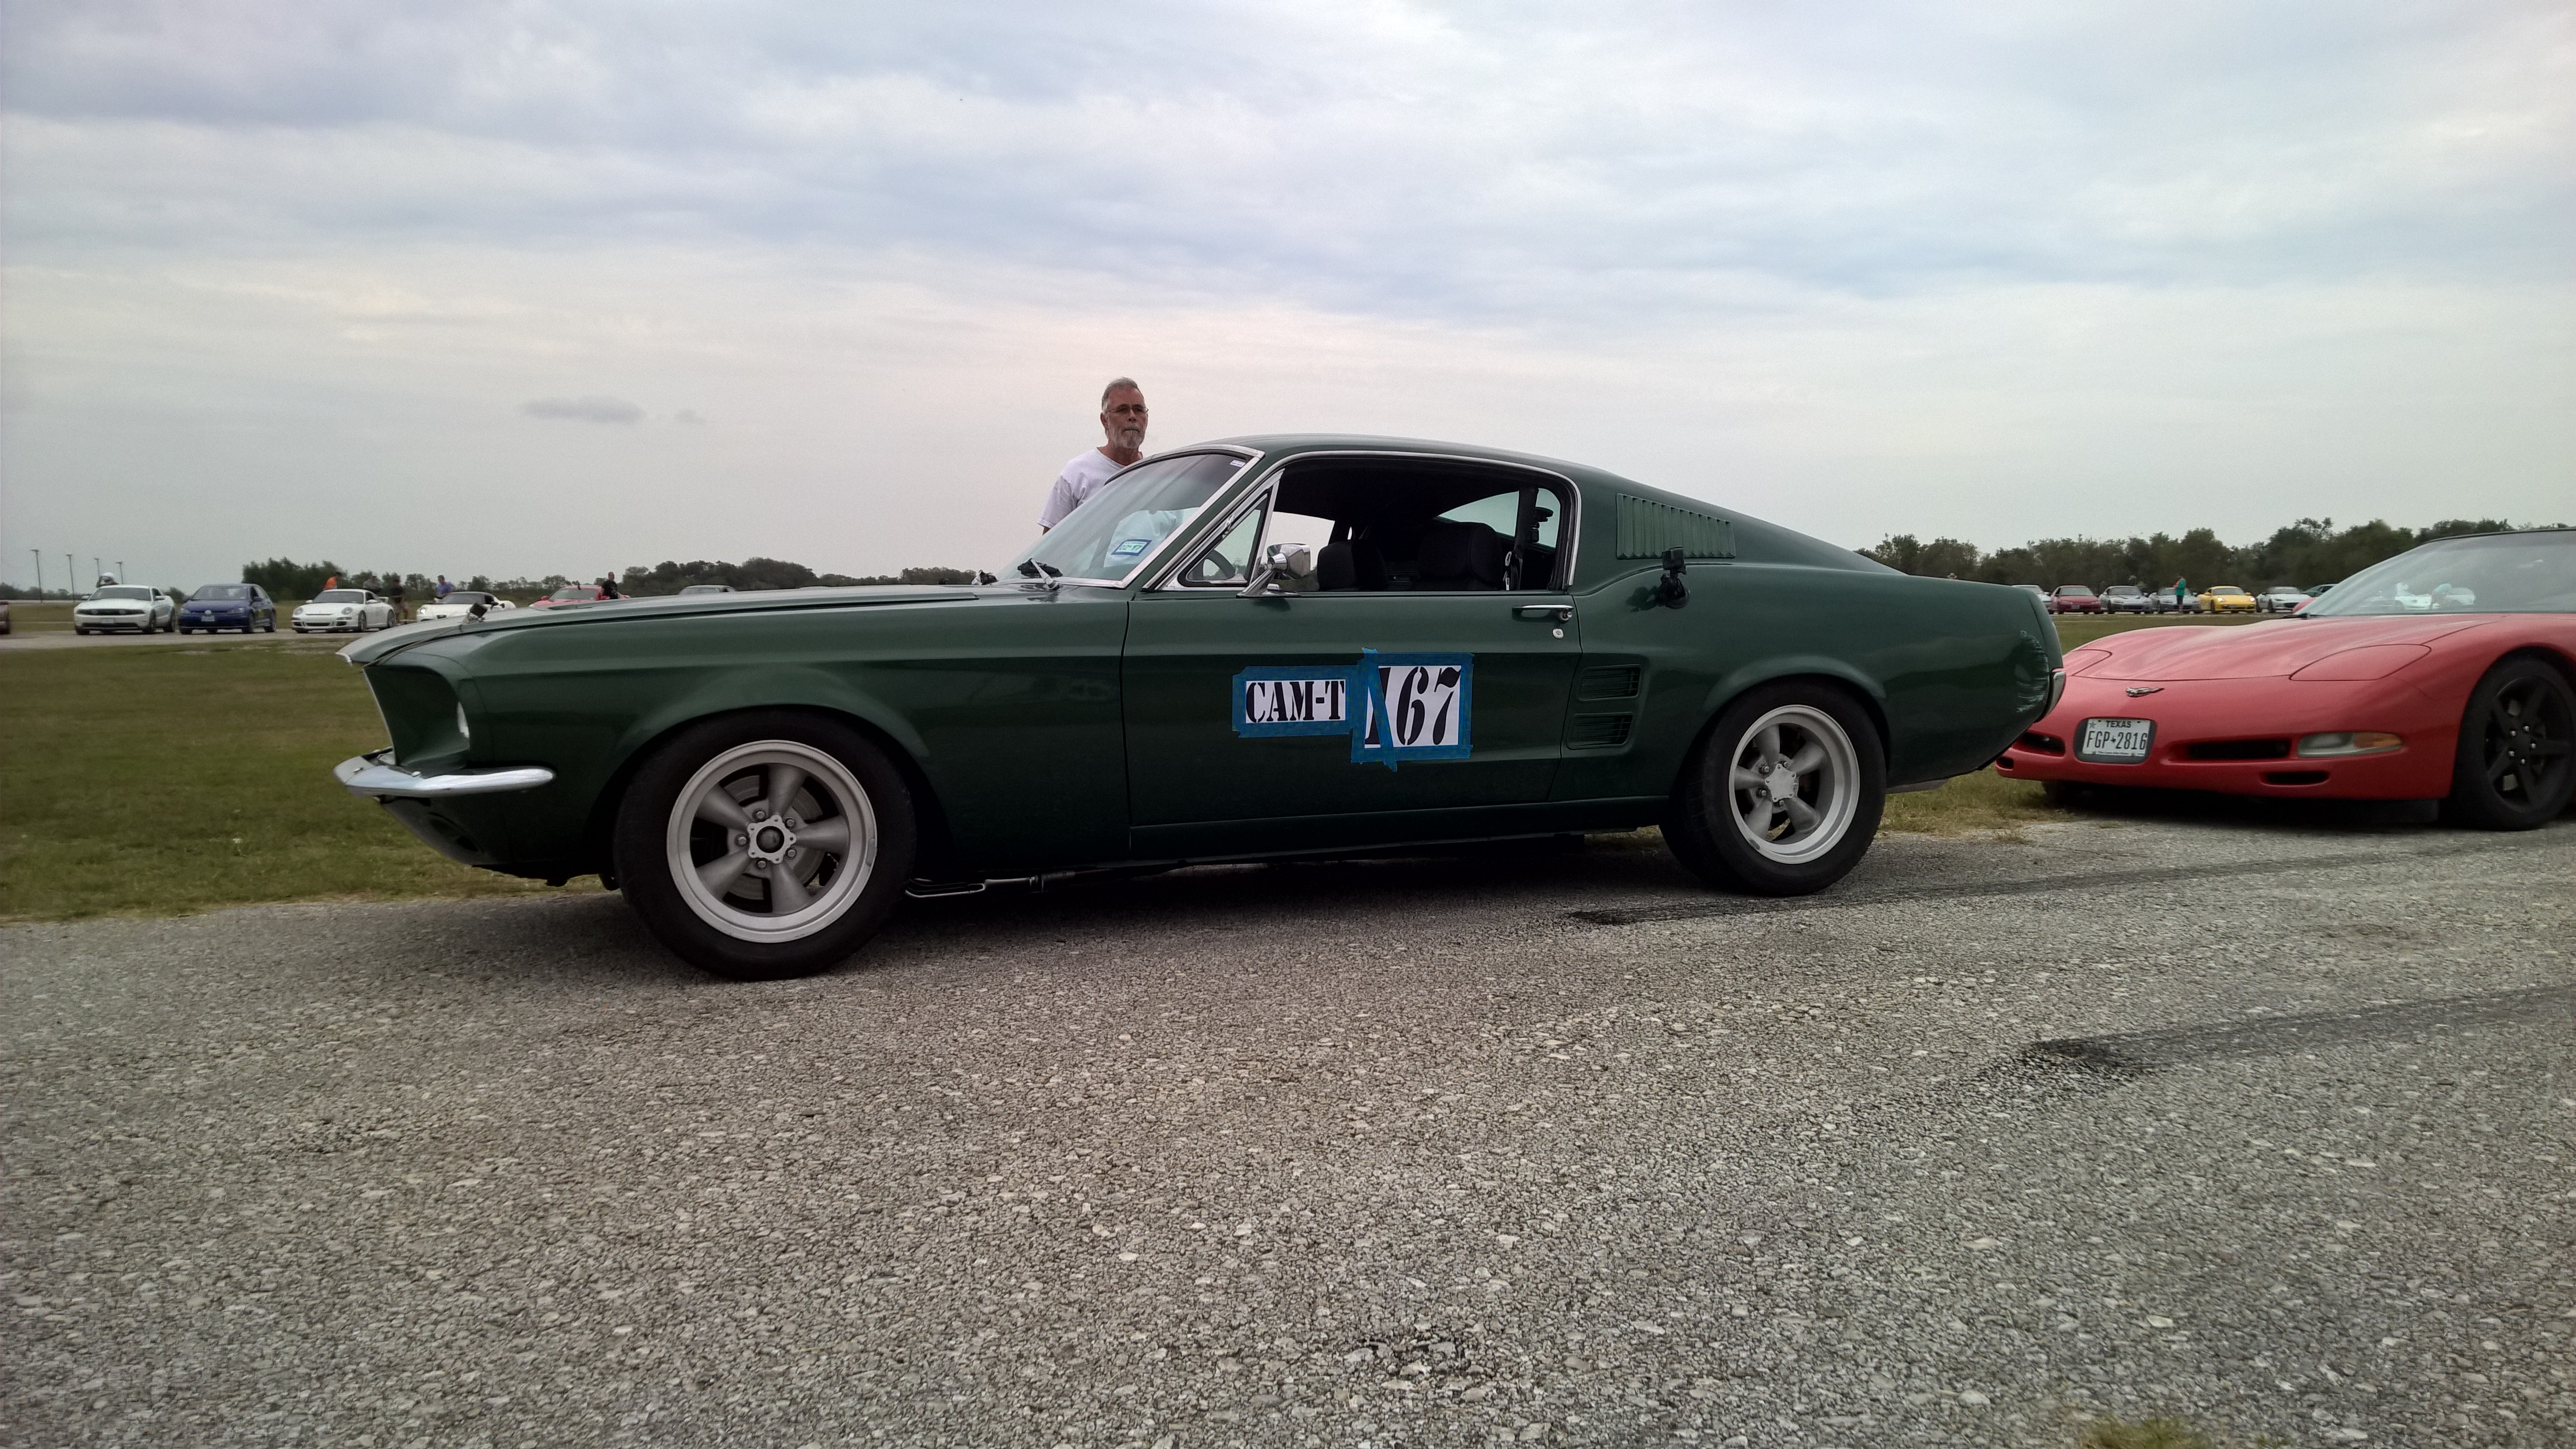
With the car all ready for Nationals and Todd out of town, my Dad and I decided to drive it at the November event. It was a blast, though it took a bit of work to shake the cobwebs off! The brakes on the car still leave a lot to be desired, so that’s in the plans for the near future. Nonetheless, we had a lot of fun!
This event shined light on a few things that still needed to be worked on. We had a bit of tire rub in the back and the car didn’t turn in very well. The car hadn’t been aligned since college, so a bit of attention there was needed as was a stiffer front suspension setup.
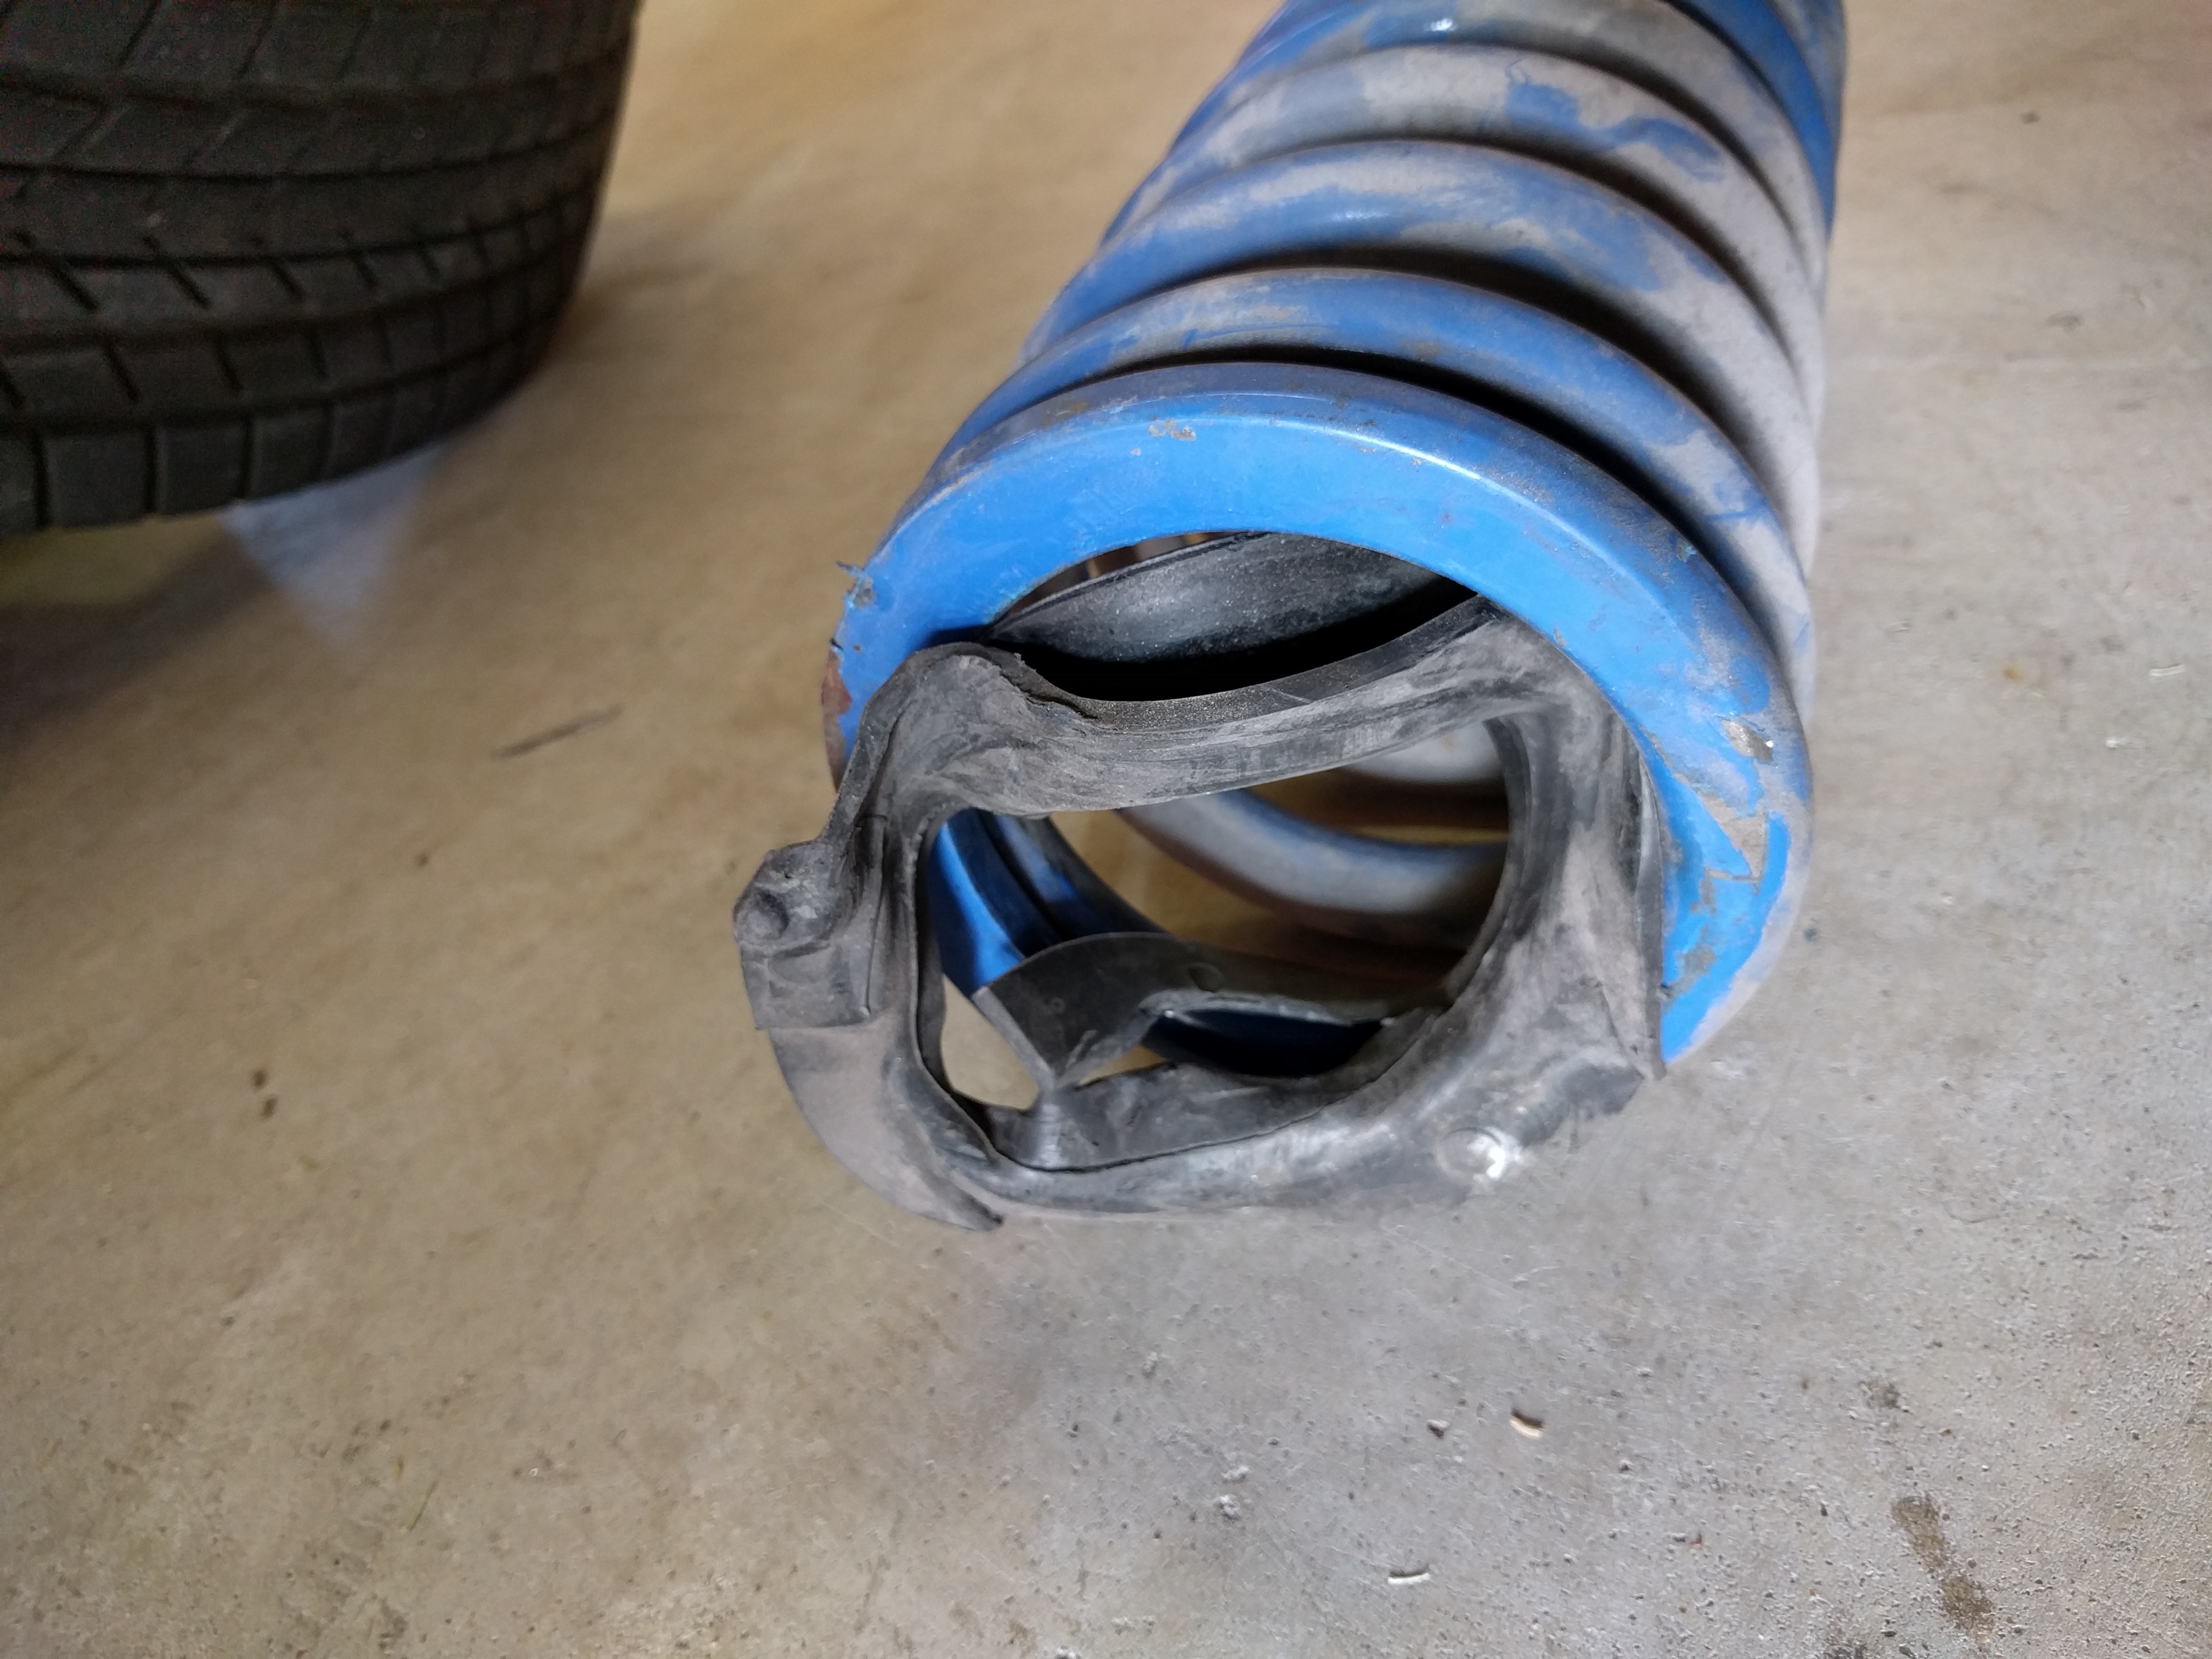
The old “620” pound springs and rubber isolators had seen better days. Somehow the spring isolators had slipped during one of the many times the car had been worked on and torn up completely.
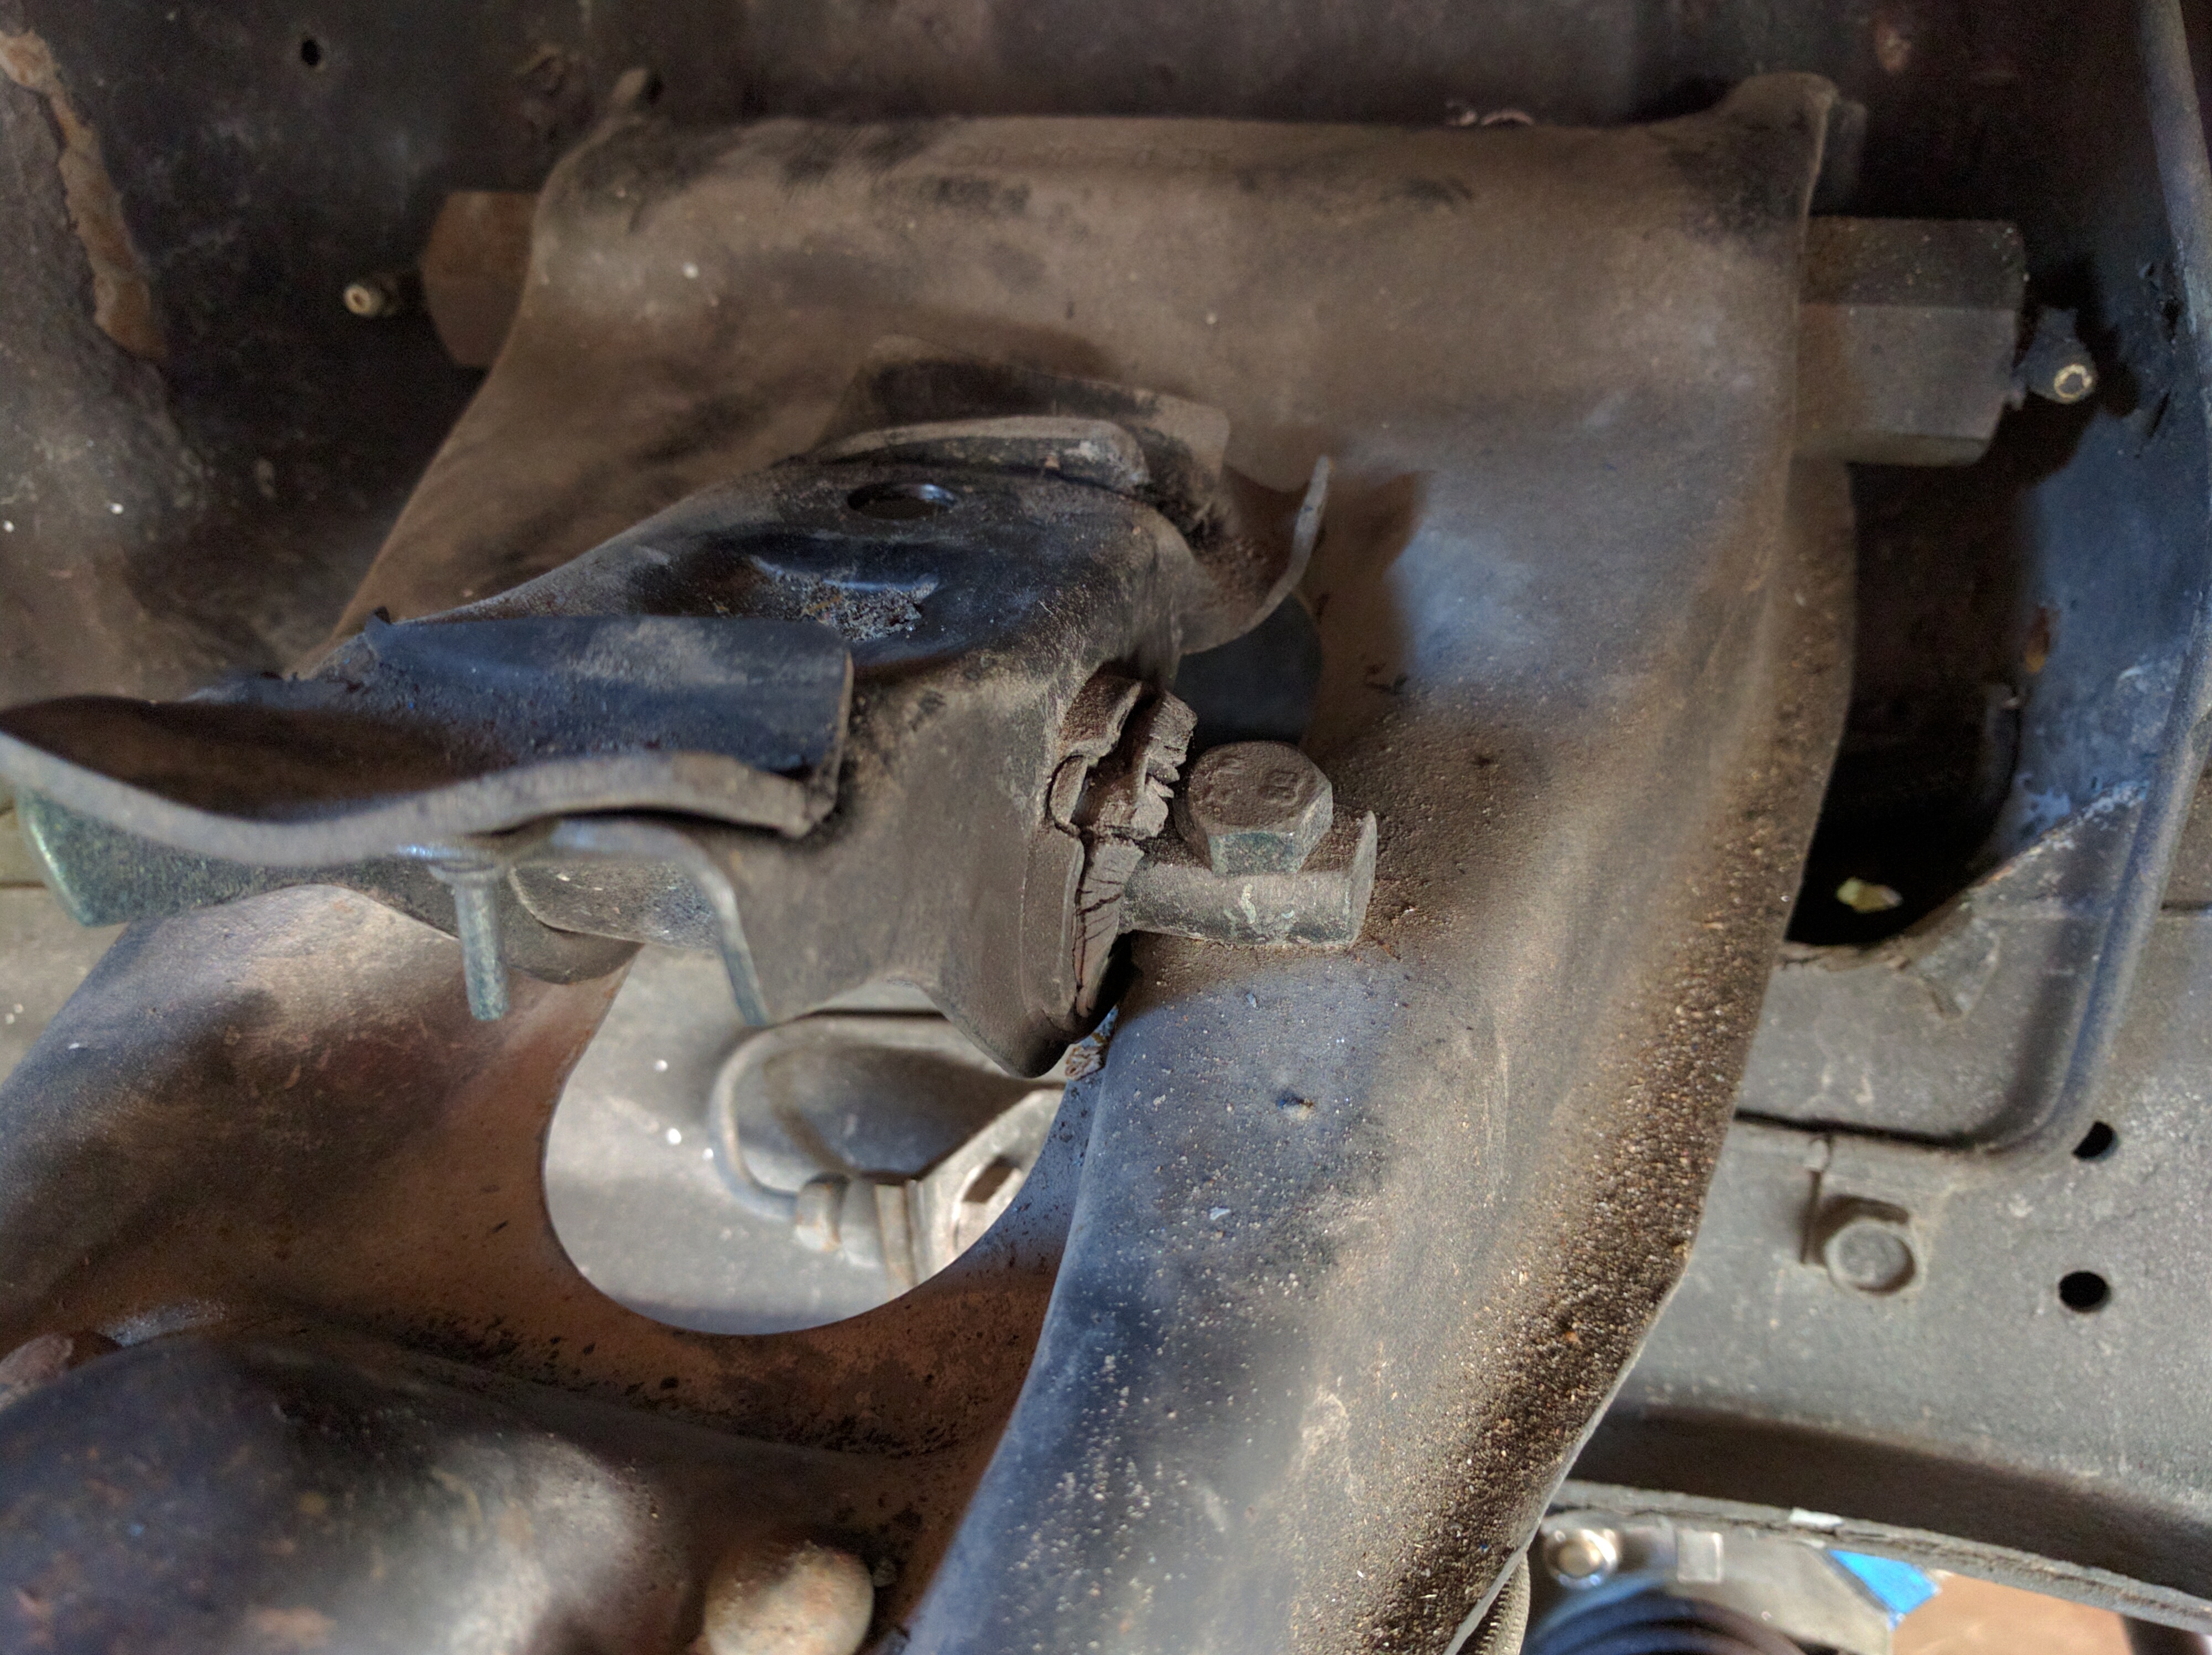
The coil spring perches also are starting to show their age. They make really nice roller bearing versions of these, but with plans for a coilover setup in the future, I didn’t want to invest the extra money now to fix these. As the same time that the springs were out, I removed basically all of the shims from the upper control arm mounts to get some additional negative camber. I did leave in 2 shims on each side in the front to get a little more positive caster, something that classic Mustangs badly need.
The coils I bought were Mustang Plus’ 750# race springs with their 1/4″ polyurethane spring isolators. Even though these are billed a “race” parts, I figured they would be just fine for street use considering how soft the “620#” coils were. These are cut-to-fit springs and it took several attempts to get the ride-height right. The springs are very short and fall down every time the car is jacked up. Instead of rigging up a chain setup to limit droop, I bent some cable isolators into a hook and mounted them at the top. These hooks hold the springs up when the car is jacked up and work very well in my mind.
I got the ride height right where I wanted it after cutting 1/2 coil off of each spring. After pulling out the shims, we’ve also got negative camber! I had to tweak the toe settings some to account for the new settings and also took the opportunity to tighten the lash on the rack and pinion, a change that finally resolved an irritating dead spot in the steering once and for all!
I haven’t autocrossed the car yet with the new setup, but I’m extremely pleased with how it drives on the street. I don’t feel any of the understeer that I would have anticipated (probably helped as I adjusted the rear bar to be stiffer) and the car turns in much faster than before. Really looking forward to getting some seat time in 2017!
2016 saw a lot of changes and a renewed interest in this car. I’m really looking forward to 2017 and having some more fun with the ’67.
 Red Line Oil

Pingback: Something new is coming | Oversteer Garage
Pingback: Big Tires = BigFun | Oversteer Garage
Hi there, thanks for posting about this – after installing the Mike Maier panhard kit, did you run exhaust tailpipes and through/around the panhard brace? I’m about to purchase the same MOD 1 panhard kit, but I’m wondering how I will need to modify my exhaust tailpipes.
By the way, I have a 67 fastback doing in a similar direction as yours, the way it is pictured here. Even have the same wheels, and wordpress page: https://my67fastback.wordpress.com/
Let me know if you’d ever want to chat about experiences with different setups, parts, etc.!
Great looking car! Yes I was able to fit 2 1/2 Magnaflow pipes through the panhard brace. I did have to grind/clearance it a bit, but was able to get it all in there and not rub.
Thank you – great to know that you got the tailpipes to fit without cutting them up. Hopefully I will get away with just grinding/clearancing too, with my 2 1/2 flowmaster tailpipes. It’s funny – the more I read about your car, the more similarities I find…including the fact that I also became a father during this project…just now starting to pick it up seriously again, after years of doing lots of small jobs (the things you can get done in an hour at a time, while the kids are napping…).
Anyway, enjoy and have a great day.