
Lasers and Computers – Chassis Measurement Part 2
Sorry for the delay, but it’s racing season and been quite busy!
So once you’ve got your dots on paper, time to boot up your laptop and start measuring. You’ve already got a table of the “Z” values that you took while doing the laser measurements, so keep those handy.
Every suspension software will have a little bit of a different input. Suspension Analyzer treats Z as the vertical axis, X as the lateral position from centerline of the car, and Y as the longitudinal distance from centerline of the axles. Positive is out from center of car for X, above ground for Z, to the rear of the car for Y (in the front), and to the front of the car for Y (in the back). Slightly confusing, but the graphical interface will draw your suspension as you go so it’ll help you if you end up switching the Y values… I won’t go through all the inputs, but take your time. Garbage input in = garbage input out! Below is roughly what your car will look like when done (with input data blanked – can’t give away any secrets!)

Lasers and Computers… Chassis Measurement Part 1
Conducted a test day with AST support on the 29th of April in the hopes of addressing our “lift” issue on the inside rear tire. We made great progress on the handling of the car but couldn’t replicate the issue when running up at A&M.
Still, feeling good about the car we loaded up and ran the Houston SCCA Regional at GGP. 1st and 3rd overall in PAX but still unloading the inside rear tire!!
Convinced it was time to get serious. Took the car to our shop and was time to break out the laser levels, WinGeo3 and Suspension Analyzer 2.0!!
First step is to lay down some paper on which to mark some marks. Make sure this is on a fairly level spot on your floor.

Sparco Test Fit

Test fitting a fixed back Sparco seat in the Mustang. Probably will buy Corbeaus but closest I could find to test. I like the look and it’ll force me to get a better steering wheel…
Camaro Paint Almost Done!
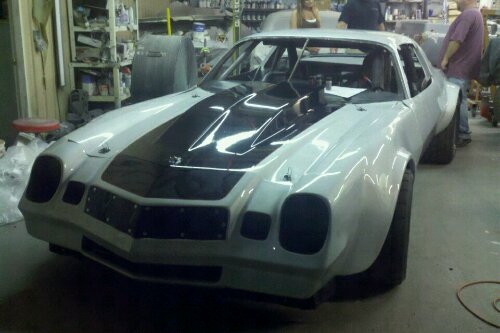


Big progress on the Camaro. Wasserman Motorsports has finished up laying down color and clear (except for rear bumper). Looks fantastic! That’s a 2012 Corvette silver with glass beads mixed in, Black pearl stripe with red pinstriping. Extremely pleased with the result!
Now onto getting a new spoiler done…
More Inspiration – Two Killer Mustangs
While browsing the magazine rack at the store, saw two killer Mustangs I had to show here. These may be a bit old news (SEMA 2010), but there’s no denying some serious work went into both. Most people, myself included, may not like every inch of these cars, the whole package on both comes together nicely.
First up – Dragon by the Ring Brother’s (designers of some serious cool previous rides as well like the Reactor).


It’s the little details that make all the difference on these cars. From the yellow ringed mirrors to something as common as selecting the right wheels. The whole package is a cohesive vision that you have to appreciate. I won’t bore you anymore with words, take a few minutes to skim the Mustang Monthly article for more information.
Second car is the Anvil by Purevision

Not as extreme as the Dragon, but impressive nonetheless. There are a few photo galleries around, but none as good as the feature in Hot Rod for April 2011. Check it out at your local news stand!
Can’t say I’ll ever have the money to recreate my vision for the ’67, but one can dream!
Z Car
In the spirit of Zenner’s new Z-car addition at the shop, I’m reminded of a 240Z that I absolutely love. It’s a fantastic mix of style. Wouldn’t change a thing about it!

Regional #4 – Houston Region
Ran the first event in the ’67 in a long time today! The Camaro is still down while we’re waiting on the painter. Worked hard most of Friday and Saturday to get the car “ready”. It wasn’t perfect, but made the event.
Loaded up and ready to roll out of the shop! Borrowed Zack’s trailer just in case…

Ran the event in “X” class with an STO PAX. Knew the car wasn’t competitive, but fun to take out anyways! Run 1 was a bit rough as I’d never run the car with the power steering before so it was a learning experience as well as getting used to holding myself in the seat again. Run 2 I managed to turn on the GPS logger which I’d forgotten on the first run. Couple of data points below!

Max .88 G lateral. Not great, but not horrible either for Sumitomo tires!

Fun course, lots of turns with some corners that really punished you if you didn’t do them right!
Only made 2 runs, at the end of the 2nd the engine had blown enough oil out of the breather caps in the valve covers that it made quite the mess. Fearing fire, I elected to sideline it for a bit. Luckily, grabbed 2 more runs in a friend’s 2001 Bullitt which was a lot of fun!
Not quite as successful a day as I’d hoped for, but nothing serious broke so we’ll take it. One thing it did was get me excited to run the Mustang at some more events. Suspension work, dyno tuning and a better seat/harness are in the future I think!

2011 Texas Tour
Well the 2011 Texas Tour has come and gone. We went in with high hopes off our test day at Royal Purple Raceway, but the race didn’t go as well as planned. The same issue keeps cropping up, an unweighting of the inside rear tire which is preventing us from putting power down anytime the car is under a high-G load (which is most of the time on an autocross course). Todd barely got the win and I struggled with adjusting my driving style, falling to 4th.
GPS data and some pictures to follow. In the meantime, check out the “work in progress” paint @ Mohflo’s Photography site. We’re CP 96 and 196.
More work on the car to come. Our new Goodyears didn’t arrive in time for the Tour, but they’ll be going on soon for a test day back to back with our old shocks to see if we can’t sort out this issue!
UPDATE 2 APRIL: Trackmaster Data has been downloaded and is available in my public Dropbox folder. Note that the split marker for the start isn’t quite right. One of these days I’ll figure out how to edit the markers in Google Earth for more accuracy. I am driver 1 (Runs 1, 3, 5, 7) and Todd is driver 2 (Runs 2, 4, 6, 8). Enjoy!
New Tank – Update
Started assembling the new gas tank and ran into a snag right off the bat. So followed the directions for assembling the pump in terms of the depth. Everything went together smooth, put the pump in and started screwing it down. Looking through the fuel sending unit hole though, noticed the bottom of the pump was nearly an inch off the bottom of the tank! Certainly don’t want to be running out of gas when I think I’ve got more to go. Out comes the pump and the tape measure. This time, measured and cut the feed tube in order to put the bottom of the pump at the height that I wanted off the tank. Now about 1/4″ off the bottom, about perfect I think.
Before and after photos. Difference was about 3/4″.

Sponsors
 Red Line Oil
